Wednesday, July 25, 2012

Boys faux-fly pocket pants!

Oh man!  I can't believe I forgot to blog these!


It's because I didn't invent them, but I did love this tutorial from Melly Sews.  It combined a faux-fly pocket front with my favorite boys pants pattern from Dana Made It.

You guys KNOW how I love a pocket.
I fancied them up a little by using contrast fabric for the pockets, and making lined pockets (and flipping the top over so it would show) on the back rather than just ironing the edges down for the back pockets.  I didn't spell out how I made my pockets--I think if you follow her tutorial and look at my pictures, you could figure out the tiny adjustment I made in the back.


It's me, so these were of course made out of a pair of women's pants, meaning the hem was already done for me.


The pockets and faux fly definitely make this a longer project than the basic pants, but I love the way they turned out and they look so much more "grown-up" than a plain elastic waist.  But still no snaps and zippers to deal with!


Here's how they look on the boy:


Dana's pattern is supposedly a 3T, but I only added a tiny bit of length to these (less than an inch), and they fit my extra-tall four-and-a-half year old perfectly.  I didn't add any width to the flat-front waist, but I did add a little length to the rise because I've made these before and they show a little bit too much crack for my taste.  For reference, he usually wears a size 4T, and some 5T if I can tighten up the waist.

No plumbers around here!

But today, of course, he's got them on backwards, and he has no interest in turning them around.  So I guess you could say they are reversible.  That's what reminded me that I hadn't done a blog post on these pants yet.

Friday, July 20, 2012

Fabric Flip-Flops!


I saw a post about these on pinterest, and thought they looked so much more fun (and comfy!) than regular plastic-toe flip flops.  I immediately pulled my grungy old flip-flops out of my closet (well, actually, my laundry room that is standing in for my closet while we redo the bedroom, but that's another story), but it turned out they weren't the right kind.  So when I picked up a pair at Old Navy, I noticed that it would cost me $1.75 for one pair and about $2.25 for two pairs--so I made a pair for my bestie too!

I did read this no-sew tutorial to figure out how to do it, but I'll go ahead and spell it out for you here because I did mine a little differently--mainly, I sewed my fabric into a tube so it had finished edges.  It took a little more time, but I think it was worth it since I won't have to worry about fraying.  I would NOT recommend using a knit for these, because there would be too much stretch.  I just used some basic quilting cottons.

I started by cutting the plastic out of the original flip-flops.  You have to use the kind that has the plastic straps that go all the way through the sole of the flip-flop.  Kitchen shears or any heavier-duty scissors will do the trick, you just need to push the plastic through enough to get a spot to snip.

Next, I sewed my fabric into a tube.  For each flip-flop, I cut a rectangle of fabric that was about 22 inches long and 3 inches wide.  You can also just leave it in one big long strip and cut it later when you're actually fitting it into the sole.

To make the tube, fold your fabric in half lengthwise with the wrong side of the fabric on the outside.  I like to sew one end of my tube closed to help with turning it inside out.


Then use a pencil to poke the end of the tube that is sewn shut down inside your tube.


Start working the rest of the fabric up along the pencil...


pulling the fabric up as you go, until the closed end of your tube pokes out the other end and you can turn the tube right-side out.


Now you can snip the closed end off of your tube and iron flat, with the seam in the middle.


Now you're ready to start assembling your flip-flops!  Take one end of your tube, and fold it over. I didn't measure, but as you can see below there should be about 3 inches folded over.  This is for the piece that goes between your toes.


You're going to be stuffing this loop through the hole at the top of your flip-flop, so roll the fabric right at the fold as small as you can get it.


Shove it through the sole of the flip-flop from the bottom.


I had to use the point of my scissors to help poke it through.


Once you've got it through, straighten it out so that you have a 1 inch tall loop with the seam to the inside, and enough fabric sticking out the bottom to tie in a knot.  Leave a little extra for that, actually, because it's much easier to trim it off afterwards than to try and tie a knot with barely enough fabric.


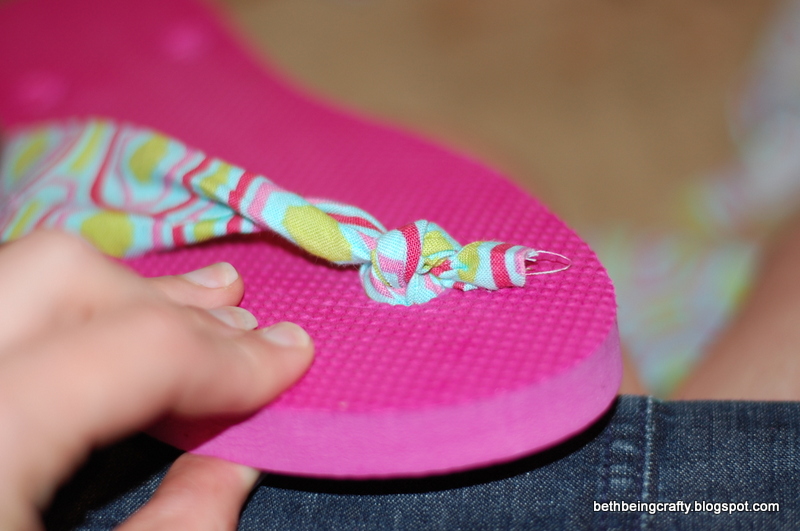
Next tie the two ends together on the underside into a tight knot.  I did a double-knot, but in the future I will just do a single and secure it with hot glue.  Tug your knot so that as much of it as possible fits in the little cup where the plastic strap used to be.  Cut off the long end, and later you will trim off the edges when you're ready to secure it with glue.


Now with the remaining fabric tube, tie a knot at one end.  Shove the other end through one of the holes at the bottom of the sole (it will be easier this time, since it's only single thickness, not double, but I still needed the assistance of my scissors.)

Rolled up tight
Make sure the knot is on the underside of the sole
 You will also secure this knot with glue at the end.
Two knots down, one to go.
Then, thread the long fabric tube through the loop that goes between your toes.


Poke the rest of the fabric tube through the last hole from the top, then before tying the knot, try the flip flop on.

Oops, sorry about the sideways picture.
The fabric will stretch out as you wear it, so you want to pull the fabric quite tight before tying the knot in the underside.

So once you've got it very snug, slip your foot out and tie the last knot.


Now heat up the old glue gun.  If you haven't done so already, trim off extra fabric at the ends of the knots, then glue the raw edges so the knot won't come undone.

I also put some glue in the well where the knot sits to hold it in place.  Be careful if you do this that you don't get glue on your fabric that you're going to pull back through the sole, since you have to pull the knot up a little to get the glue in there.


And that's it!  There are so many fun variations that you can do on this.  Super-comfy; I kind of want to schedule a pedicure now since these would be PERFECT for the nail salon.

What do you say, Rachel?  Want to get a pedi with me next week?
I think these would make such a fun gift--either with a pedi gift certificate, or a summery fun basket of stuff for a teacher, or with bubble bath and a good book, or with a beach towel--so many options!

Tuesday, July 17, 2012

Wide-leg pants into Slim Pants

I was going through a bag of my old stuff I have saved to make into stuff for the kids, and I found a pair of my old pants.  I tried them on, and they pretty much fit, except that they were almost highwaters.  I had been saving them to make pants for The Boy, since the wide legs had plenty of fabric for that, but then I started thinking...I can buy boys' pants for $5-$10 dollars, but what does a new pair of pants for me cost?  So sorry kiddo, I took back the pants and turned them into a more flattering pair for myself.


It was fairly easy to do, but there were some tricky parts around the crotch.  Um, if you found my blog because you were googling "tricky parts around the crotch," I do apologize--this is probably not what you were looking for.

I started by turning the pants inside out and laying them out flat.  I found my other pants that had a fit closest to what I had in mind for these pants and lined them up on top so that the OUTSEAMS were lined up.

Using my most favoritest jeans as a template

Then I started pinning.  I pinned all along the inseam so that my new pants would be roughly the same as my template pants.  I did notice that it was a little tricky to make sure that the center seam at the front and back of the pants stayed lined up, but I figured I could carefully tug it into place to make sure things stayed lined up as I sewed, as the fabric had a bit of stretch (more on that later).

I used my seam ripper to undo the hem at the inseam, so that when I was done I could put the hem back together and have it look all professional-like.  Then I slowly and carefully sewed along my line of pins (I suppose you COULD do this with a fabric pencil, if you are not lazy like me).  When I got to the crotch, I was so careful to make sure things lined up.  Stay tuned.

Anyway, once that was done, I turned them right side out and tried them on before trimming out all of the extra fabric, just in case.  Then when I DID trim out the extra fabric, I still left plenty of seam allowance just in case just in case.  When I tried them on again after doing that, I could see that there was a major pucker just below the fly.  Again, sorry googlers.  In any case, that is not what one wants.  So I used my seam ripper to take apart the crotch area (good LORD, I'm sorry for using that word so much!  It's starting to lose all meaning for me!), and what I discovered is that I needed to remove some of the fabric in front for it to line up correctly.  I was nervous that doing that would result in too low of a rise, but it was just fine.  I just needed to pinch the front of the pants just under the fly and sew a straight line from the raw edge of the fabric to the bottom of the fly to remove that little triangle of excess.

The piece that's sticking up is what I needed to remove to get the front to lay flat.
Pucker removal

Once I trimmed off the extra fabric so that the crotch (ACK!) lined up properly, it was so much easier to sew, and there were no inappropriate puckers.

ALL RIGHT.  So if you're still with me, here's what to do:  After marking the line where you want to sew, CUT OFF the old inseam before sewing the new one.  Leave plenty of seam allowance if you're afraid, but this way you can monkey with the center seam area (oh, that's better!  I was having a hard time figuring out what to say instead of CROTCH again.) and make sure it will lay flat before you sew it down.

Evidence that it did indeed work.
But would it kill me to pull out the iron?
So once that's done, and you've tried them on and everything's peachy, fold your hem back down and stitch it in place.  And you're done!

I can't believe I'm doing this, but I know that if I were thinking about doing this myself, I would want to know what the back looked like.  So, dear reader, here is my sacrifice for you:  I am putting a picture of my butt on the internet.  I am slightly horrified right now.

Never thought I'd see the day.
I was so excited about this project because I love slim pants, but not "skinny" pants.  I don't want them to be skin-tight, but I like having something more fitted/streamlined on the bottom when I wear looser tops.  And these are lightweight and perfect for summer and spring with sandals and flats (I did mention that they were almost highwaters to begin with?  Well somehow that works better on a slim pant than a wide leg one.)  I made these just a smidge wider than my favorite fitted jeans, and I loved that I had that option to make the leg just exactly as wide as I wanted it.  Hooray for DIY!


Sunday, July 15, 2012

Hot Pad and Peanut Butter Cookie Recipe!

You know what makes me feel old?  Attending the wedding of two of my former students.  Sure, sure, they were a young bride and groom, and it's not like I taught them when they were in kindergarten or anything, but there you have it.  I'm old.  Don't know why former students having babies didn't have the same effect on me.

So anyway, I was torn, because I wanted to make something, but I also love giving off the registry, especially when a couple is just starting out and they have a lot better idea about what they need than I do.  Not that I wouldn't have PLENTY of advice for them in this category after looking at said registry (KIDS!  Register for the pyrex with a LID that costs a few dollars more!  Believe me!), but I feel like I never know what they already have so sticking faithfully to a registry appeals to me.   

Luckily, I love baking, and there were several baking-related registry items that I could group together for an affordable gift, and supplement with a cute handmade potholder.  Best of both worlds!  


I made my potholder using this tutorial from The Crafty Cupboard, and it came out great.  I added an extra layer of the insul-brite to the top-hand section (the piece that actually handles the hot pot) after reading in a different tutorial that one layer might not do it.  I can't remember if the tutorial specifies, but I used single-fold bias tape for my trim since that was all I had in a color that matched. I was able to make it out of scraps from my insulated casserole project, and I must say I do love this fabric for anything kitchen-related; plus the fact that it's not too girly makes it work well for a wedding gift (this potholder is for you TOO, Groom!).

Also doubles as a puppet.

For the lining, I found a yard of this cute vintage fabric in my stash.  It came from my grandma ages ago.  


And finally, I included my all-time winner peanut butter cookie recipe.  It's been gradually adapted by me from a recipe on the Jif jar.  And lucky for you, I will give it to you too, reader, even though you maybe didn't invite me to your wedding.


Beth's Best Peanut Butter Cookies

Ingredients:
3/4 cup crunchy peanut butter
1/2 cup shortening
1 1/4 cup packed light brown sugar
3 Tb milk (I usually use 2% but whatever you have on hand is fine)
1 Tb vanilla (if you've got it, Mexican vanilla really really makes a difference.  So. Good.)
1 egg
1 3/4 cup flour
3/4 tsp salt
3/4 tsp baking soda

Directions:
Heat oven to 375 degrees f

1. Combine peanut butter, shortening, brown sugar, milk, and vanilla in a large bowl.  Beat at medium speed until well blended.

2.  Add egg, beat until just blended.

3.  In a medium bowl, combine flour, salt, and baking soda.

4.  Add dry ingredients to peanut butter mixture gradually at low speed.  Mix until just blended.

5.  Drop by heaping teaspoonfuls (I use a cookie dough scoop) about 2 inches apart on an ungreased baking sheet (I swear by the airbake sheets.)  Flatten slightly in a criss-cross pattern using the tines of the fork, if you are a peanut butter cookie traditionalist like I am.

6. Bake at 375 for 7-8 minutes.  Cookies should be slightly underbaked when you pull them out.  Let cook for at least two minutes on the baking sheet before carefully moving them to a wire rack to cook (I use a spatula since the cookies are still pretty tender at this point).  This will help them stay chewy!

Makes about 3 dozen.  

Let me get those for you!


Tuesday, July 10, 2012

Upcycled Boys Tank Top!

The Boy's been bugging me asking me for a summer tank top, and I thought it would probably be faster to just make him one than the time it would take to shop for one that I could stand to put him in.  So I pulled a t-shirt out of the pile of things I've gathered (planning to make a skirt out of it for Little Sister), and got to work.

supermodel in training

I found this tutorial, which was really helpful.  I used scrap fabric from another t-shirt for my trim--maybe I wouldn't have had this problem if I was using ribbed knit, since it stretches so much more, but I did find that I needed much longer pieces of knit trim than the tutorial called for. If you're using t-shirt scraps like I did (or ribbed knit, for that matter), make sure you cut them so that they stretch in length, not width. Otherwise your kiddo won't be able to get their head through!

Don't look at the mismatched shorts!
For a 5T, which is the pattern size I used, the tuturial called for armhole strips that were each 11.25 inches long and a neckline strip that was 13.25 inches.  I made my armholes 13.5 inches and the neckline was 17.  I could have gone a smidge smaller on the neckline (maybe an inch), especially if I were using a serger for added stretch, but I feel like the given lengths were much too short, so be careful!  Better to cut extra long then trim off the extra than end up without enough trim to go all the way around.  

Otherwise, a great tutorial!  The Boy loves his tank.

Even better when paired with a matching snow pea from the garden.

Oh, I also always stick something resembling a tag in the backs of things I make for The Boy--he notoriously puts things on backwards and then argues with me about it, so I have to have proof!  For this, I just cut a scrap rectangle of contrasting knit fabric (so it would show up) that wouldn't fray and tucked it inside when I sewed the neckline down.  I wrote 5T on it with fabric paint.


And the great thing about upcycling is that I didn't have to hem it--just made sure to cut it out so that I could re-use the original hem.  Yay for shortcuts!

Thursday, July 5, 2012

Ruffle-Yoke Appliqued T-Shirt!


This is a story about a plain brown t-shirt and a scrap of adorable fabric.  

I can't bear to leave a t-shirt unadorned.  And I had a few precious pieces of one of my favorite fabrics left, after my attempt to make the snappy top from Prudent Baby turned out too small and I had to give it away.  Ordinarily, I would use the scraps to applique some sort of critter on the t-shirt, but with this bold of a print I was having a hard time figuring out what shape to cut.  I wanted to see the print, not have the cute print distracting from whatever animal it was supposed to be.  So I came up with the yoke idea.

Loungin'
There were a few tricky steps, but overall it was simple enough to do.  Here are the steps!


First, I measured my t-shirt across the top from shoulder seam to shoulder seam.  I wanted the yoke to go almost all the way across, so I added a little bit for seam allowance.  I eyeballed how far down I wanted the yoke to go, folded my fabric in half (I paid attention to the print since I wanted it to be symmetrical, this will depend on your fabric choice), and cut the curve.  Then I laid my printed piece on top of the solid back fabric and cut out an identical shape.


For the ruffle, I cut a rectangle that was twice as long as my yoke.  For the width, decide how wide you want your ruffle to be and double that, plus a little for seam allowance.


I started by making my ruffle.  I pressed both short ends of the rectangle under, like so:


Then folded it in half lengthwise, inside out (so that the flap I ironed down were sticking OUT), and sewed a straight line down the length, backstitching at the beginning and end.

For the yoke pieces, I laid them right-sides together and stitched around the outside, leaving an opening at the top the same width as the neckline of the shirt. Then I clipped the corners and the curve.

Now I'm ready to turn and press!
 I turned both pieces right-side out and pressed them flat.  For the tube, I pressed it with the seam right in the middle, then I stitched both ends of the tube closed.


Next, I stuck the yoke piece inside the shirt so I could see where the neckline lined up.  Make sure to line it up evenly!


I traced the line of the neckline onto my fabric (with a white pencil, so it showed).  If you are worried about the line being visible on your fabric, you could do this on the back side of the yoke.  Actually, I might recommend doing that, so you can leave a little extra fabric above the line when you cut it out.


Then I cut along the line.  In retrospect, I think I should have left a little extra fabric (and maybe even serged or zig-zagged along the top), since I just sewed the raw edge directly under the t-shirt neck band.  I'm not entirely sure how this will hold up in the wash--I will let you know!

***UPDATE*** it has gone through the wash several times now and it's holding up just fine :) And the ruffle is holding its shape too--no ironing necessary!


Next, I ruffled my tube by sewing a straight line down the center of the tube using a basting stitch.  Don't backstitch at the beginning and end, then grab your bobbin thread on both ends and gently tug to gather the fabric up to the length of your yoke.

Then pin the ruffle down the center of the yoke, lining up the top and bottom edges.  Using a straight stitch, sew right down the middle of the ruffle to attach it to the yoke.


Now, this is the best time to sew your buttons on if you want them.  I forgot to do this and had to sew them on after I had already attached the yoke to the shirt--not ideal.  So if you want buttons, add them now!  I wanted four, but had to settle for three since that's all I had that matched.

Now you're ready to attach the yoke to the shirt!  Here's where you have to be a little careful.

On the front of the shirt, I carefully unpicked the bottom seam on the neckline using a seam ripper. You could unpick both to give yourself more room to tuck the yoke inside the neckband, but then you have to make sure you're getting both the back and the front of the neckband when you reattach.


 Then pin the yoke to the front of the shirt, starting with the neckline.  Make sure you have it lined up evenly by the shoulder seams, then pin your little loose edge of the neckband over the top of the raw edge of the yoke.  Take extra care by the ruffle, since you need to make sure to catch all the layers when you sew.


I started by sliding the shirt into my machine at the neckline and sewing starting with one shoulder and going across the top first (shoulder, neckline--CAREFULLY, other shoulder), backstitching at both ends.  Then I took the shirt out of the machine, made sure I was pinning the rest of the yoke down flat, then slid the shirt onto the machine from the opening at the bottom to sew the rest of the yoke.

Like I said, I wish I had added my buttons earlier.  I wanted to use brown buttons, but...


Yeah.  I had no two brown buttons that matched.  The downside of a vintage button collection.  Since I decided I didn't want the eclectic mismatched button look, I went with yellow, since I had three that were the same.


Here are my three buttons--if I had actually gone SHOPPING for buttons instead of using my stash, I would have probably chosen something bigger.  And brown, since the red/yellow combo always makes me think of McDonalds.


But I'm happy with the way it turned out!  And I like this way of dressing up a plain t-shirt.


Of course, YOU may prefer to dress up your plain t-shirt with a tutu.

Thanks, Grandma.