Thursday, February 18, 2016

Shiny Pink Norah Dress

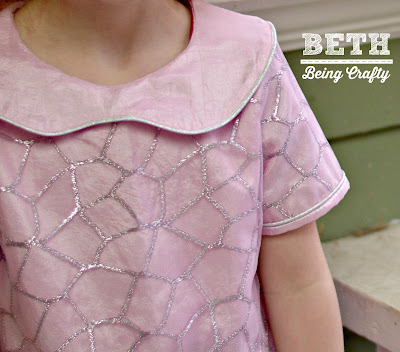
Well, Little Sister has been a very cooperative girl with all of the Project Run and Play themes, some of which are things she would have never picked out on her own (although she did end up loving them anyway!) So when I saw the "All That Glitters" theme, I knew I would make something pink and sparkly that Little Sister would love no matter what.  She has earned it.

I don't normally go in for something so fancy,
but I figured she could wear it for her birthday/Easter dress (a few days apart).
She was so excited when I showed her the fabrics.  Both the satiny, slightly crinkly pink and the fun geometric-ish silver lace (I saw that it was called "giraffe" on the bolt) were in the clearance fabrics at Joanns, with an extra 50% off--you know I can't resist that kind of a deal!  Even the piping was a bargain, from the clearance trims at Fabric Depot--love that place!

Love it with her silver boots!  It was pretty cold out today, hence the tights.

This is the second time I've sewn the Norah Dress from Mouse House Creations--last time was also for a Project Run and Play Challenge--I made a double gauze Norah tunic with sashiko embroidery for the embellishment challenge last year, and it (and the matching one for her brother) are probably some of my favorite pieces to date!

In my mind, I envisioned a super cool mod-style button on the back--something like this rhinestone-covered dome.  But alas, I didn't have a button like that, so you'll just have to squint and use your imagination since I had to use this one instead.

A cool button in its own right, but not what I had in mind.

I figured out a new-to-me technique for the sleeve--maybe this tutorial already exists out there, but I hadn't seen it before and I loved the way it turned out (and it was super simple), so I thought I'd share it!


I wanted to add the silver piping to the sleeve to echo the collar, but the overlay is sheer, so if I just sewed the piping on between the two layers, you would have seen the seam allowance showing through.   Luckily though, my pink satiny layer was the same on both sides, so I had the idea of rolling the sleeve hem OUT instead of in, and attaching the piping there.  I think it looks great!

First, I basted the overlay to the sleeve piece so it was like working with one piece of fabric.  This would work without the overlay, by the way--just as long as the back side of your sleeve fabric looks as nice as the front side.

Then, I pinned the piping to the bottom edge of the sleeve on the WRONG SIDE.

Crappy iphone photos ahoy--impromptu tutorial!
Sew the piping on, with the raw edges together.  Then turn the piping to the right side of the sleeve:


Fold the bottom edge up again so that the piping is at the top of your "cuff."  I used the edge of the piping as a guide for the width of my cuff, but you could make it wider if you wanted.

As you can see, I actually basted my layers together AFTER I sewed the cuff!
Pin the piping in place, then stitch in the ditch (right along the line where the piping meets the cuff fabric) along the length of the bottom of the sleeve.

Pinned and ready to sew!
You can use a piping or zipper foot to sew right up next to the piping, but here's a confession--I was too lazy to trade out my foot so I just plopped my regular sewing foot right down on top of the piping, and it worked fine! Obviously this will depend on how thick your piping is.


That's it!  When I sewed the sleeve together, I did do an extra seam to press the seam allowance down on the inside, since it's a little thick where the piping comes together.

All in all, my finished product came pretty close to my design yet again!  When I showed Little Sister this photo, she said, "Hey, it's got hair like mine!" I was like, um, yeah, I did that on purpose!

She even wanted to wear her silver boots since that's what was in my picture :)
She did request that I leave the pockets out--I had planned to do a couple of welt pockets with the silver piping for trim.  Is she crazy??  Doesn't she know that all the best dresses have pockets? But I wouldn't have had enough piping for the sleeve detail AND the pockets, so it all worked out for the best.
Monday, February 8, 2016

Queen of Hearts!

It's Week 2 of Project Run and Play, and the theme is Cosplay.  You would think that after a year in Japan, I would have some great anime/manga inspiration here, but for some reason I just couldn't get into that whole thing.  I was thinking of sitting this week out, but then I realized that this week is leading up to Valentine's Day, and I was hit with the idea to make an outfit inspired by Disney's Queen of Hearts.


Little Sister had fun getting into character, even though she's typically sweeter than the inspirational queen.

Aww.  That's my girl.
When I started looking at pictures of the Queen of Hearts's outfit for inspiration, the collar made me think of LouBee Clothing's awesome Bimaa sweater.  I have sewn this pattern a few times, for both of my kids.  I used the shawl collar and made a slightly larger size to allow for the thicker fabric (I used a light french terry sweatshirt fabric that I got in Japan for 100 yen per meter (about 80 cents)--I miss the fabric shopping in Tokyo so much!).  I also extended the length into a tunic, angling out slightly for some extra room, so I made the band at the bottom larger to accommodate.

I want the roses to be RED!
I love these little half-circle pockets that allow for a pop of color.  I've added them to quite a few things I've made--the tutorial is from Anu Miki, found here.  I had to add in the yellow--not only based on the inspiration outfit, but also because otherwise I would have ended up with two weeks in a row of red, black, and white all-knit outfits!

Multiple Personalities
The fabric for the leggings was another 100 yen per meter find--I swear, the knits floor at Tomato in Nippori is a magical place!  I have a cardigan that I made for myself from this fabric--it is a soft and snuggly double knit--you can sort of see the dots joining the two layers in the pic below. I sort of guessed on the knee patch placement, and I NAILED IT!


While I was getting ideas for this outfit, I tried out one of my Christmas gifts--this awesome design notebook is really fun for getting the creative juices flowing!  The body outlines are all grown women, so I had to shift the proportions to give myself an idea--does anybody know if they make one of these for children's designs?  Anyway, I was pretty pleased at how close my outfit came to my original design!  I had to switch the direction of the stripes due to the stretch, but otherwise pretty spot-on!


So, I found out today that Project Run and Play changed the method of determining the winner of the sew-along from being chosen by judges to random drawing.  Hmm.  I have to say, I'm not excited about that.  It's still fun to check out all of the contributors (here they are for this week's theme), but something about having a competitive aspect really inspired me to take my designs to the next level.  I love having the theme and the community to motivate me to sew and get stuff up on my blog (have totally lapsed on that lately, while I've been working on getting my business up and running), but winning (or losing) via random number generator rather than showcasing someone's skill is not very inspiring.  And I hope this doesn't mean people will just start searching their archives and uploading any old thing that might fit the theme, just to get extra entries.  [Edited:  I've been thinking about this statement more, and it's not that I really think people would try to get extra entries--it's more that I really want people to link up as much stuff as possible, because I love seeing all of the entries, regardless of skill and/or effort level, but now every entry is equal competition--I'd rather see the people who really put amazing thought into the theme be rewarded.  It was fun for me when I started sewing along with really no thought (or chance!) of winning to see what the winners were doing, and after doing it for a few years I felt ready to put in that level of effort.  I have won a couple of sew-along challenges over the years, and it felt really, really good to be recognized, and I also typically have some weeks where I'm inspired and other weeks where I phone it in because I still want to participate even if I'm not going all-out, and I tell you--if I won a drawing on a week where I didn't give it much effort, I would feel so bad to beat out the other amazing sew-along competitors!  But based on what I'm seeing, I'm feeling a little guilty that I'm sounding like it's all about winning to me--it's not, really, but as I said before the competitive aspect helps motivate me.  ANYWAY, blah blah blah!  Sorry!]  It just feels very anticlimactic to me--wah-waaahhhhhh.  And I'm not sure why the switch was made--was it so that the ladies behind PRP didn't have to worry about finding judges?  If so, I totally get it--it's a lot to organize.

Um, what?
Didn't there used to be voting on sewalong contestants?  That could be one way to eliminate the need for judges, although it can be unfair when some people have lots more followers than others.  What if there was a method for voting similar to the real contestants' method--that in order to vote on the sewalong, you have to upload something?  And then you can't vote for your own?  Anyway, I think it was more fun for me to have the chance to be recognized for designs, and to see what kinds of things turned out to be winners.

Monday, February 1, 2016

Strawberry Tap Dance Togs

You guys, Project Run and Play is back!  I get so inspired by sewing with a group of people and seeing everyone's take on a theme, and frankly having a specific project that I know will end up in front of more than my average number of eyeballs is very motivational to me.

When I saw that the theme of the first week was knitwear, I knew immediately what I wanted to make.  Little Sister just started a fun tap dance class at a community center, and although there is nothing strict about it, we did notice that there was a dress code sign hanging up that specified tights and a leotard.  Well, Little Sister didn't have a leotard but I thought it would be fun to make one.  My first try was an awkward fit in pale pink stripes that gave me enough information to draw a new pattern and start designing a full knitwear look for Project Run and Play.

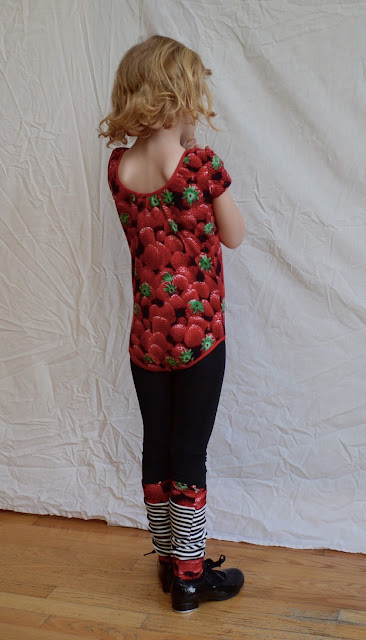
I'm getting down to the last bit of the awesome realistic strawberry print knit that I bought in Japan for less than $2/yard (I made this newborn set using it, and this tee for myself), and I instantly knew it would be a perfect leotard.  I could picture black and white accents for a graphic pop, and once I got started I couldn't stop!


The leotard was the no-brainer (I started with the free 24 month pattern from Shwin and Shwin and adapted it--added sleeves, and made it fit an almost-6-year-old), and I wanted to make a cardigan inspired by ballet wrap tops to go over it, but with a bit funkier vibe.


I love the black and white stripes against the strawberries--so fun!  Actually, all of the fabrics I used except for the black ponte knit in the cardi came from the fantastic Knits floor of Tomato fabrics in Nippori (Fabric Town in Tokyo).  I decided to add a little accent on the waistband (well, rib-cage band, I guess, since it's well above her waist!)--a bit of the black stripe gathering the band up a bit.

Sorry for the washed-out photo--it's hard to get the details to show up in black knit!
But the strawberry leotard is definitely the star of this look.  The fabric is a 4-way stretch, and the legs and neck are bound with foldover elastic.


The back of the leotard dips down a bit, and I cut the legs pretty low to avoid that awkward underwear-under-the-tights bunching.  And then of course we needed leg warmers--essential for dance class!


And while I was at it-- a headband too!  Why not?  I mean, when you start with that strawberry fabric, you go big or you go home.

This hairstyle cracks me up.
Next I added a pull-on french terry skirt to throw on after class.  The pattern is free, from Craftiness is not Optional--wonder where I got the idea to use this fabric?


Is it a bit much when you put everything together?  I don't know...I just can't get enough of it!


Little Sister prefers to wear just a few of the pieces at a time, but so far she has been excited about mixing and matching them.


I love all of the options!  And now I want to go eat a strawberry!