Tuesday, May 29, 2012

Women's Tank to Toddler Dress!

 
Would you believe me if I told you that this toddler dress started life as a women’s tank?  I mean, look at it!  No grown woman should ever have worn that shirt.  I’ll give you pre-teen, I guess.  Teenager maybe.  But considering the rest of the clothes in the free box on the sidewalk that I picked this out of, this did not belong to a teenager.  (What is it with my neighborhood and the free boxes, anyway?  Have you people never heard of Goodwill?)  In any case, I knew that this top was meant to be a dress for my two-year-old.


When I picked it up, I thought it would be a simple enough refashion.  I mean, it's crazy how many women's sleeveless tops can be made into little girl dresses with just a simple seam down the sides, maybe closing up the armhole a bit.  This top was the perfect length for a toddler dress, just too wide.
 
The problem that I had though, was that the front of the top had an empire seam and gathers, and the back of the top was all one piece.   Not too bad to deal with, but the pockets (a highlight of any dress for my little girl) were right by the side seams.  This meant that I couldn't just take the side seams in, or I would cut into the pockets.  And I couldn't just take the width out of the one-piece back, because then the pockets would end up towards the back of the dress.  So it was a little trickier than I anticipated, but still simple and totally doable.

I decided to just take the extra width out of the bodice portion of the dress, both at the front and the back.  I would just add extra gathers in the front and taper the back so that the skirt portion would be basically untouched, leaving the pockets right where I wanted them (and the bonus of having the hem already done).  

I first removed the straps.

Yes, it had those little heart buttons to begin with!
Next was to separate the bodice from the skirt at the empire seam.  It ended up being attached more securely than I anticipated, so I soon abandoned the seam ripper and just snipped.

Too much work!
Once I removed the bodice, I figured out how wide I wanted the top of my dress to be.  I was keeping the elastic band that was already at the top, so there is some stretch.  I actually made this while Little Sister was awake (I know, crazy), which meant that I could measure her to see how big around it should be.  
The inside of the back of the dress
 She was 21 inches around right under her arms, so I cut the front and back panels each to 11 inches. 

The bodice panel that I cut off
Once I cut the bodice panel and the back of the dress down to size, these are the pieces that I had: 
-Body of the dress
-Bodice panel
-Two straps 


I set my machine to a basting stitch and sewed a straight line along the top edge of the front panel of the dress (where I had cut off the bodice).


Then I pulled on the bobbin thread on the back side to gather the fabric until it was the same width as the bodice. 


Next, I laid the bodice on top of the skirt piece, right sides together, so that the raw edges were lined up, and sewed them together, making sure to sew below the thread I used for gathering. 


So now, because I cut the bodice off and reattached it, my back panel was taller than my front.  So I just folded the back panel in and sewed a seam right where the channel for the elastic was, making the back panel line up with the front one.
Pinched in!
 I don't have pictures for this, but to sew the side seams together, I turned the dress inside out and pinned the top section, then angled slowly on the skirt portion until I met up with the original seam. That way the original hem stayed intact.  So I only removed width from the bodice portion of the dress--the skirt retained the original fullness.

Next was to reattach the straps.  I figured out where to attach them and marked it with pins:


I sewed the straps, with buttons attached, to the front.  The original straps had the buttons sewn on, with no real buttonholes--I did mine the same way.


As I mentioned before, Little Sister was actually awake and entertaining herself pretty well while I made this dress.  So I could try it on her to check the strap length before attaching in the back.  I didn't even poke her with a pin! 
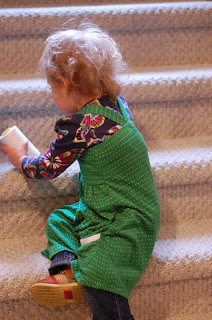

She did make off with my thread, though.


I guess she can have it.


Once the straps were attached, I was done! I left some extra inches hanging on the inside so that I could lengthen the straps down the road if I needed to.


And it fits comfortably (a bit loosely actually, but the straps keep it in place), but because of the elastic around the top I think she can actually get a couple of years of wear out of it.  Such a deal, because in the first place it was FREEEEEEE!
Recognize these shoes?

If I hadn’t already stocked up on Kiss MeI’m Irish t-shirts for her, she would totally wear this next St. Patricks’s Day.  It might be worth it anyway.

This is how Little Sister really feels about my photo sessions.
Posted by Picasa

Wednesday, May 23, 2012

Adult hoodie into Kiddo Hoodie

I had planned on making this a tutorial, but then I ran into two important obstacles:
Big hoodie (found at the Goodwill Outlet, where you pay by the pound) turned into little hoodie.
One was that my computer wouldn't read the card  that held all of the pictures of the process on it. 
Uh oh, Mom, what are you going to do now?
The other issue was that as much as I tried to keep this upcycle simple, I kept running into weird issues and trying things one way and then another until it worked.  So, not really friendly to putting it all down and explaining it clearly to someone else who'd like to try it.*

Wait, and then I do what?
My best advice, if you'd like to do this, is to reference this tutorial from Make.Think.Sew. , copy a kiddo hoodie that you already have, and don't be afraid to improvise.  And, make sure the hoodie you're chopping up has regular old pockets right next to the zipper, so you don't have to figure out how to move the funky slit pockets over when you cut the body down to size (I ended up cutting a slit out of the middle and reattaching the zipper).

And don't worry if there are still wonky things about it when you are done--chances are, the kiddo will love it anyway.
Can I wear it to school every day?
Especially because you're finally making something for HIM, instead of his sister.

This sweatshirt is MINE, Little Sister.  There is no need for you to be in these photos.
(Don't worry, Little Sister--you can have it when he grows out of it.)

*If you have any questions for me about how I did this, you can ask in the comments and I'll do my best to explain!
Posted by Picasa

Monday, May 21, 2012

Summer Sunny Clothes!

You guys!  I have been loving this early warm weather, especially after the last few years of dismal springs followed by gray wet summers and finally a few sunny days in August.   I'm even happy to see the rain we've had for the last two days, like coming home after two weeks of vacation--I'm not even sad, because I've been able to enjoy the last two sunny weeks so much.  Last year, I only made one sundress because by the time it got warm enough for me to be motivated to sew one, summer was almost over.  But here we are, in mid-May, and we've already had several warm days, including some record highs for this time of year.

Soooo, I have been making warm-weather clothes faster than I can blog them!  The internet is SO GOOD.  I can't believe the number of free tutorials and even printable patterns out there.  My Kids DIY Clothing page on Pinterest is getting crazy full with stuff I want to make.

For today:

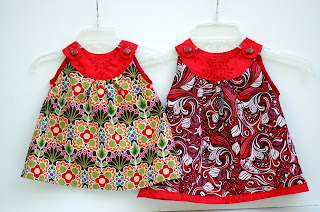
The Snappy Toddler Top from Prudent Baby

Out of one of my favorite fabric combos--I am finally starting to run out of scraps of this stuff!


I went with the buttons instead of snaps, because I didn't have any cute little snaps on hand.  Although it was more challenging than I would have thought to find two matching buttons in my stash, that were the right size and coordinated with my fabric.  One of the hazards of using mostly vintage buttons!  Would you believe this is the first time I've ever made buttonholes on my sewing machine?  My mom recently discovered a bunch of sewing-related papers in my grandma's stuff, including THE MANUAL to the machine I've been sewing on for a good 10 years.  It has my grandma's name written inside the front cover; I love that. Among other things, I learned that there is a secret compartment in the back of my machine containing such handy devices as a buttonhole foot and a zipper foot.  I HAVE HAD THESE THINGS ALL ALONG AND NEVER KNEW IT.  My years of putting off buying new feet for my machine have paid off.  Between the long-lost foot and the accompanying instructions in the manual, I have now conquered buttonholes.  Look out zippers, you are next!

However (of course there is a however!  This is me!)  I wrote this blog post before trying this top on Little Sister.  Can you see where this is going? Yes, you've guessed it, it's too small.

She can squeeze into it, but barely.

I was so bummed, too--when I showed it to her, she said, "New clothes?  For me?  Wear it?"  But it was not to be.

Look at her poor little armpits pinched in there!
And OF COURSE this was the last of the scraps of this fabric that I love, so I couldn't just make another identical one.  I thought about removing the neck pieces, widening the armholes, reattaching the bias tape, adding length to the bottom, and reattaching everything, but that just seemed like a lot of work for a top that was pretty easy to make to begin with, so I decided to just choose a different fabric and start again.  I am disappointed that Little Sister won't have a dress from this fabric, but I'm sure if it was really important to me I could track some more of it down at some point.  (For reference, I printed the pattern at 110% and added a small seam allowance, but then I assumed the pattern had included a seam allowance so I sewed using a larger seam allowance than I had cut, so I probably ended up somewhere in the 12 month size.)

When I recut, I didn't reprint the pattern larger, I just cut around the original pattern a lot bigger, including lowering the curve for the armholes.  For the neck panels, I also widened the curve.  So I can't tell you the exact directions for getting an accurate pattern for 2T.  But I did eventually end up with a great top that Little Sister can actually wear, and a sweet top for our friend's little girl who just had her first birthday.

Hey, look at that--I actually had FOUR matching buttons!
The most important difference is in the size of the armholes--the rest of the pattern is pretty forgiving.


Yay!  It fits!
Sweet gathers in the back
Little Sister loooooooves her pengwong (that's penguin, if you don't speak Iris)
So thanks again, Prudent Baby, for another great tutorial!  I am in love with this sweet top. As a matter of fact, I'm making a teeny tiny one next for a friend who has a newborn little girl.  Planning to pair it with some baby bloomers too--stay tuned!

Thursday, May 17, 2012

Padded Camera Wristlet

I often want to take my Nikon D40 with me when I'm running around with the kids, but it's just not practical to bring my giant camera bag in addition to my giant bag filled with diapers, snacks, water bottles, wallet, etc.  So when I saw this Fancy Padded Camera Pouch tutorial from Me Sew Crazy I knew it was the perfect solution--just enough protection to feel like I could stuff my camera in my bag along with everything else.

However, I (boo hoo) rarely have any reason for anything fancy, so I made mine with some pretty swirly cotton quilting fabric I got at Joann's on clearance for $3 a yard, and lined it with some flannel from an old sheet that got a hole in it.  Plus the fusible interfacing for padding.  So, a pretty affordable project!


I took a picture with my camera in the bag with my old point-and-shoot, but for some reason my computer won't read my card--time to get a new card, I guess!  This is also bad news for a tutorial I was planning on resizing an adult hoodie for a kid--all the pictures are stuck on that card too, but that will probably end up being for the best.  So you'll just have to trust me that this bag is a good fit for my Nikon D40, and probably has enough room for an accessory or two, like my flash bounce from Photojojo (I love that thing) or my battery charger.

The only thing I did differently than the tutorial (other than choosing non-fancy fabric) was the very last step.  Rather than just sewing the opening closed, I topstitched all the way around the whole top of the bag.  That way I didn't have to do any invisible hand-stitching and it gave it all a uniform finished look.

The strap did end up being a little loose for my taste, so I tied a knot in it--I don't even mind the way it looks. When making it, I thought maybe I should just do a drawstring instead of the elastic top and fixed wrist strap, but now that I've used it, I'm glad I didn't--I like the elastic opening a lot.  Ooh, I just thought of something!  I think I'm going to sew a square of the flannel to the inside so that I can use it for a lens cloth!

I was so excited to take my camera to the park--here's a few of my shots from our perfect playdate this afternoon!

Under the bridge downtown

Whee!!

Our little buddy loves swinging as much as Little Sister does!

The Boy and his school pals

Bubbles!
I guarantee, my camera will be getting a lot more on-the-go time now.  There's only so much I can do with my iphone!


Wednesday, May 16, 2012

DIY No-Brainer No-Tie Elastic Laces


This is one of those things that I cannot believe I didn't think of before.  I am ALWAYS searching stores for shoes my kids can put on and take off by themselves, partially because it's easier for me, but also because it's required at The Boy's school.  I love it when I find shoes that have elastic laces, because they don't look like "baby shoes" but are still easy-on easy-off.

Um, elastic in the place of laces.  Like, laces removed, elastic in its place.  Yes, I suppose I could do that, couldn't I?    When I think of the cute lace-ups I have avoided buying on great clearance deals...but no more.  I will be able to replace any old laces I want with elastic.  I am totally having a hand-to-forehead-DUH moment. I might even do this with my own shoes--who wants to bother with tying, anyway?

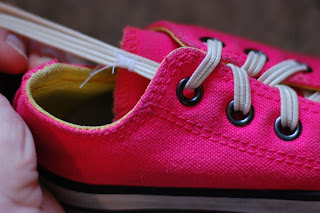
I found these little Converse in Little Sister's size at the thrift store for $3.99.  I didn't notice the double-neon tongue until I got them home, but I can work with that.

She wanted to put them on right away, but I managed to snag them away from her long enough to put in these elastics.  So this is a very quick project.


Start by removing the laces.

 
I used two 14-inch lengths of elastic, roughly shoelace width, for these size Toddler 6 Converse.  I happened to have some elastic that I took out of a piece of clothing somewhere along the line, but new elastic works fine too :)


 Start by lacing the elastic through the holes, just like you'd do for regular shoelaces.  If you have a little tab on the tongue, lace one side of the elastic through it--it will keep it from sliding around.
 
When you get to the top, put one lace behind the...lace-up area?  What do you call it?  I'm talking about where the grommets are.  So behind there, but on top of the tongue.  If you've gone through the loop on the tongue, just leave that elastic behind there.  On the other side, lace the elastic through the top grommet.

 
Then loop the elastic at the top over to the other side and pull it through.

 
Both laces should be lined up on the same side, behind the grommets.

 
Now straighten out the laces to where you want them when finished.  After you line that up, then pinch the two pieces of elastic and pull them out far enough to fit in your sewing machine.  I sewed back-and-forth several times in a wide zig-zag to secure the two ends of the elastic together.


Once that's done, trim the extra elastic and the loose threads, and let the elastic slip back into place.  


You're ready to go!  And save those shoelaces, because if you decide to teach your child to tie their own shoes, you can easily snip the elastic out and put the shoelaces back in.  You haven't changed the shoe at all.

 
Aren't you excited?  I know I am!

Posted by Picasa