Thursday, May 30, 2013

Boy/Girl Coordinating PJ's!

The Boy has needed some new summer pj's now that the weather is warming up (at least intermittently), so this is the second pair I've made for him.  Since the scraps coordinated so well with a turquoise cotton t-shirt I picked up at the dollar tree, I thought it would be fun for Little Sister to have a matching nightgown.  And they were both excited about it!


His is just a simple knit t-shirt and shorts I drafted from his one pair of store-bought pj's that fit (awesome Ethnic Animals on orange cotton knit from Girl Charlee.  I bought one yard on sale for $4.20, and had a few scraps left over that inspired Little Sister's nightgown project. So I made both of these pajamas for just over five bucks!  Bear with me while I show off some cutie pie pics--they really had fun with this "modeling
session"--then I'll get to the tutorial for the nightgown.

So, my photog skillz are not the best, so these photos aren't very sharp and some of them are cut off at weird angles, but it is definitely a challenge to get both of these guys at the same time.  We have one tiny blue alcove of uncluttered decent light in our house, and I did my best.  They had me working!


The old "no smiling allowed" trick
Big brother being a sweetie pie
Oops--Little Sister stepped on The Boy's foot
Who's bigger?

Trying out some fancy poses

Supermodel!  Man, when did he get so tall?
I can do it too!

Ok, so...it's about time I did another tutorial!  I've been lazy with the step-by-steps lately, so I tried to keep track of what I was doing here but it still was a lot of flying by the seat of my pants.  Let's see how this goes!

The idea with this nightgown was to re-use the neckline of an existing t-shirt to make a bodice, add new sleeves with the scraps of the pj fabric, and cut off the bottom to make a gathered skirt (reusing the original hem).  I have done this sort of t-shirt refashion before, but this time I wanted to figure out a way to finish the inside, so the raw edges of the ruffles were contained.  I did a kind of weird waistband application to achieve that, and I think it worked.  Hope I can explain what I did!

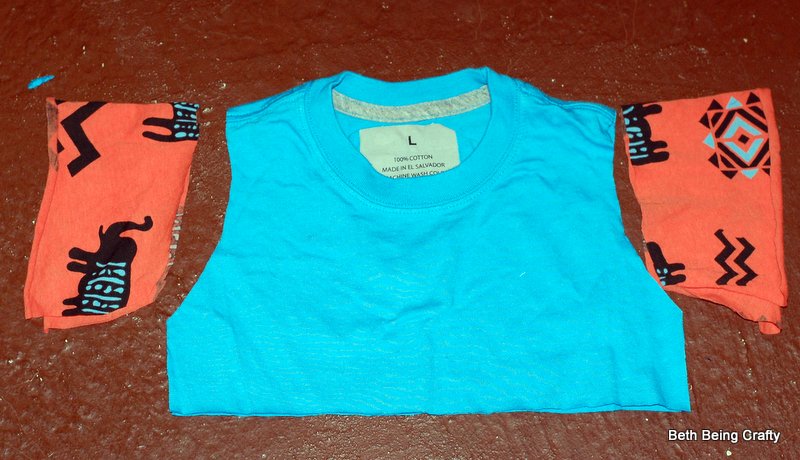
Here's what I started with:  a Youth Large cotton t-shirt, scrap fabric for sleeves, and scrap black fabric from an old knit maxi-skirt. I threaded my sewing machine up with a ball-point needle, helpful for sewing knits.  I have a serger but it's been acting funny lately, so I used my regular machine for this project.


I started by using a pattern piece to approximate a bodice shape.  This one is not a great example because this particular pattern piece is from a dress that is even above an empire waist--the skirt attaches above the armscye. But it was the one I had handy, so you get the idea.  You can also use a t-shirt that fits well to get an idea of what shape to cut.  It's pretty forgiving.


Next, I cut some sleeves out of the scrap fabric.  I  followed the curve I cut in the bodice and added some length. I wanted my sleeves to wing out a bit, so you can see how they extend down a bit at the bottom of the armhole.  I cut one sleeve first, and then used it as a pattern to cut the other sleeve.


Lay the bodice out right-side up so that the neckhole is in the middle.  Then lay the sleeves wrong-side up on top of the bodice and pin the middle of the curved edge of the sleeve to the shoulder seam.  I like to do both at the same time so that I make sure they are lined up.


Working your way along the curve, pin the sleeves along the armhole on both sides of the bodice.


Then sew your sleeves on.  If your sleeves are slimmer than mine, you may want to use a zig-zag stitch for a little stretch, but mine are loose enough that it wasn't an issue. I added my applique at this point--just by cutting around one of the animal shapes and sewing it to the center front of the bodice using a ball-point needle.


 Once your bodice is complete, fold it right-sides together and line up the sleeves and sides of the bodice.  I had to do a little trimming at this point to make sure my sleeves were lined up perfectly.

I trimmed off that extra orange you see there.
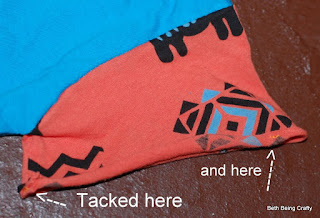
 After you've sewn the side seams of your bodice, you can hem the sleeves, or if your fabric rolls easily when you pull it like mine did, you can just leave a rolled raw edge on the sleeves.


I tacked the sleeve at the top and bottom to help the rolled edge stay in place.


Now you're ready to attach the skirt!

First, sew a gathering stitch around the top of the skirt piece.  There are a few ways I know of to do this, but they all start with sewing a basting stitch (just means setting your machine to the longest straight stitch length) with NO BACKSTITCHING.  And make sure you leave a nice long thread at the beginning, because you'll be using that to pull your gathers.

Some things that make this easier:
-sewing two rows of basting stitches right next to eachother for stability when pulling the gathers
-sewing halfway around the skirt and stopping, so you only have to gather half the skirt at once

But I'm lazy, so I just basted one row around the top of the skirt and gathered it up carefully (by pulling on the bobbin threads and gently pushing the fabric together).  I made it a little bit wider than the bodice, so I could stretch the bodice as I sewed them together.

One trick I like to do when gathering is to pull my bobbin threads to get the skirt to the width I want without worrying about keeping my gathers even, then tie my threads together so that the width stays the same while I THEN even out the gathers.

Threads tied together

Skirt gathered to slightly wider than the bodice
 Now this is where it gets weird.  You COULD just flip the skirt inside out, put the right-side-out bodice inside the skirt (upside down, so that the raw edges line up), and pin the skirt and bodice together and sew it, and you would be done. And it would be totally cute. But if you're not serging, you'd have ruffled raw edges on the inside of your nightgown. Definitely not the end of the world--Little Sister has several dresses I have made using that method that seem perfectly comfy--but I wanted to try to have a smooth inside that would by comfy for sleeping.

So I cut a waistband out of some contrasting knit fabric that I had laying around.  Same width as the bottom of the bodice, and about 4 inches wide.  I sewed it into a loop then pinned it, inside out, to the bottom of the bodice, so that the bottom edge of my waistband was about 3/4 of an inch above the bottom of the bodice.  Then I zig-zagged the bottom edge of the waistband in place.


Next I flipped the waistband down and pressed it, and I also pressed the raw edge at the bottom of the waistband under.

Pressed down

The fabric rolls, but can you see the line where I pressed the raw edge under?
 Once it was pressed, I flipped the waistband back up to expose that little strip of bodice sticking out under the waistband.


This is where it gets harder to see what's happening in the photos.  Before attaching the skirt to the bodice, you might want to use pins to mark the sides of the skirt, and the center back and center front (so four pins, spread out evenly around the top of the skirt) and do the same for the bodice, so that you can make sure you're lining them up evenly.

I  put the WRONG SIDE OUT bodice inside of the RIGHT SIDE OUT skirt (which feels wrong, but is right for this method). So the WRONG SIDES of the fabrics are together.


Then I pinned the skirt to the raw edge of the bodice sticking out under the waistband.  I stretched the bodice slightly so they would fit together.


Then I sewed the bodice to the skirt, sewing below the basting stitch I used for making the gathers.  Now the ruffly raw edges are sticking out on the outside of the dress, and the inside is nice and smooth.

This is the Right side of the dress after attaching the skirt.  Yes, it's upside down--sorry! 
Next is trimming off the seam allowance where you attached the skirt and the bodice,then pressing what's left down.  Then fold the waistband down to cover the raw edges and topstitch it down.  Try to keep your gathers smooth as you do so.


The inside will have some flattened out gathers under the waistband, but no seam allowances making a ridge in there!

Finished inside
Both of the kids have been wanting to wear these pj's every night! And the matching pj's make me so happy.  I love sitting at the breakfast table bookended by these guys.  Wouldn't you?


Tuesday, May 28, 2013

Me to a Tee--Signature Style Week

I promise, after today I will dive back into the stuff I've been making for the kids!  It's the last week of Project Sewn, the sewing challenge for women's clothing, and I really wanted to participate in this one.  The theme this week is Signature Style.  Here's the link to the contest--voting starts on Friday 5/31.

SO here it is.  The Shirt.  This may be the only style of shirt I ever wear again.  Well, no--I would get bored eventually.  But it is my staple.  This one is my second version (well, third, if you count the ready-to-wear shirt that I based it on, which has been my favorite for years,) and I have a third (fourth?) in the works.  Here's the first version I made, if you're interested.

Yes, that is a glass of rosé in my hand.  If you're wondering why I look so relaxed, it's because this was taken while I was on retreat with my book club.  Aaaahhhhhh!
Here's what I love about it:

A comfy tee that doesn't look like you're trying too hard
Flattering fit (longer length, defined waist that hits just in the right spot, wide neckline and gathered cap sleeves)
Awesome fabric (seriously lovely feel to this sweet printed knit from Girl Charlee, and on SALE! Booya.)
Binding fabric upcycled from an old tee of my grandpa's
Self-drafted pattern (I should definitely do a tutorial on this one.  A few simple tweaks to a basic tee.)

And the back

My style has changed in the last few years, since becoming a stay-at-home mom.  I have always been interested in fashion and looking current, albeit on a budget, and with comfort being important as well.  But after leaving teaching high school to be with my kids full time, it was harder to prioritize what I was wearing--not only because I wasn't interacting with many people, but also because babies are so hard on their mom's wardrobes.  I have known how to sew for a long time (I taught Drama which meant that much of the time, I WAS the costume department), and started sewing for my daughter a few months after she was born, but didn't take on sewing for myself until more recently.  And now that I am getting more and more confident with it, I love that when I get the urge to go shopping, I can instead SEW something new for myself.  Not only is it (usually) better on the budget, but I feel so proud of the item and love wearing it and showing it off to friends.  What, you like this top?  Oh yeah, I MADE it!  (Except it's usually more like, "Hey!  Look at this top I made!  Isn't it great?")

Gathered cap sleeves and slight gathering at the center of the neckline

This top in particular is great for my life right now, because of what I mentioned earlier--it doesn't look like I'm trying too hard.  I feel like I have a balance I want to strike in my stay-at-home-mom wardrobe.  I DO care what I look like, but I STILL mostly am interacting with my kids during the day.  They are three and five now, so not as hard on my clothes as when they were babies/toddlers, but they still also mostly don't care what I wear.  I feel weird about getting "dressed up" to be a stay-at-home mom.  So I love shirts like this, that allow me to feel pretty and somewhat stylish (especially when paired with skinny jeans or a coordinating printed skirt--that I MADE--with POCKETS) while still being able to throw it in the wash at the end of the day without worrying about it.  And without the other moms at the park wondering why I'm so dressed up.

Oh there we go--NOW that looks like me. 

To really make this into my signature style, I paired it with this skirt I made a while back.  It's the Milkmaid Skirt from Crafterhours, and it's my perfect skirt much like this top is my perfect top.  And what makes this look even more signature (besides the wrinkles) is that it was already in my wardrobe.  I thought about making a new skirt to be part of this "Signature Look," but really what I would want to wear with this top most is THIS SKIRT--elastic waist, pockets, a great gray/blue railroad stripe that coordinates well with the print of the tee and only cost $1.50 a yard--so what better way to be true to myself and keep the look on a budget than to use the skirt that I already have, rather than recreating something similar?


So there you have it.  That link for voting, again, is here at Project Sewn.  Vote, or just have fun checking out some other great bloggers' signature styles!

Tuesday, May 21, 2013

Ribbon Trim A-Line Skirt

Wow, it's been all me, me, me around here lately!  I have been working on stuff for the kids too, but blogging about them keeps getting pushed to the bottom of the priority list since it's apparently Spring Contest time out there in sewing blog land.  I'm having fun coming up with things to participate in Project Sewn, and now Skirt Week is underway!  I know I COULD sew a skirt for my daughter for skirt week, but since she won't wear them that seems like a bit of a waste of effort, especially when I LOVE wearing skirts.

Here's my first skirt for skirt week--who knows, maybe I'll get more than one done before the deadline!


I fell in love with this fabric when I found it on the Joann's clearance section for $4/yard.  It's the Alexander Henry Kenyan Tea Leaf in black and brown.  I bought just one yard of it, and barely had enough for this project.  Luckily I had already been planning to do something fun with the hem, so it didn't matter that I couldn't have made the printed part of this skirt any longer even if I wanted to!  When I was in the checkout line, I saw this ribbon (a 3-yard roll for $1) and snatched it up:


More than enough to go around my hem.  The banding at the bottom of the skirt is a lightweight linen-type feel.  It's just doubled and serged to the raw edge of the printed fabric on the wrong side.  I covered the join with the ribbon for a seamless look.  I'm so happy with how it came out!

I would never wear this skirt if it weren't for the pockets.  I just added simple in-seam pockets to my skirt pattern (I based this pattern off of the measurements for the Milkmaid Skirt from Crafterhours, which I have made several times and LOVE, but I wanted inseam pockets and an exposed elastic waistline this time).  A great tutorial for in-seam pockets by Make it Love it can be found here--I like to make mine HUGE, like just short enough so they don't hang out from underneath the hem of the skirt.

I haven't done this kind of simple waistband before, but man, I love it for it's...simplicity.  I just cut a piece of 2" thick elastic a couple of inches shorter than my waist, joined it together in the back, pinned it to the outside of the skirt so that it lined up with the raw edge, and zig-zagged it on there (stretching the elastic as I went--I had pinned them together at the side seams and center front/center back), then flipped up the elastic for a nice finished waistband.

I think this shot shows the elastic waistband a little better than the next one...

This is the obligatory square skirt shot for the Skirt Week contest.
Here's me looking all serious and stuff.  I am totally digging my goodwill belt with this outfit.
To sum up:  here's all the things I like about this skirt.  
Voting for Skirt Week doesn't happen for a few more weeks (June 8th or so), so I'll be sure to post a reminder once you can actually go and help me out with that.  Who knows, maybe by then I will have more skirts for you to vote on!

Edited to add--Oops, fell down on the job on that one!  Voting ends tonight (June 10th), so if you are happening by my page before it's over click the link and vote for #7, the Ribbon Trim Skirt!  Can't believe I was one of the top ten--I am SO FLATTERED!  Seriously great skirts out there in the flickr pool.


Totally '80's! High-Low tank

So, I've been thinking about trying a high-low top for a while, but worried that even though this look is currently in style that it would look too '80's to be wearable for me.  However, this week's Project Sewn theme is '80's, and if that wasn't an excuse to try it, I don't know what is.

Totally '80's!

I drafted my pattern using a loose-fit t-shirt out of my wardrobe, with short cuffed dolman-style sleeves.  To figure out the hemline, I took some cues from this high-low dress tutorial, but adapted for a top.  I ended up adding about 8 inches of length to the overall pattern, sewing the side seams, then folding the shirt in half so that the side seams lined up and the front and back of the shirt spread out from that point, folded in front and in back, then cutting at an angle so that the middle back of the shirt was 8 inches longer than the middle front.

Side view.  Why does that look like more than 8 inches?  I swear, that's all I added.
I tried it on to test it out before binding the neckline, and it was waaaaaay too open--it kept falling off my shoulder (which, if I had wanted to go all the way '80's would have been perfect, but I wanted something I'd actually wear).  So when I bound the neckline, I stretched the binding a LOT, to pull in the wide neckline.  However, I didn't consider what that would do to the sleeve openings, and when I put the finished shirt on the sleeves were now way too tight on my armpits.  Hence, the tank top version that resulted when I just cut the sleeves out and hemmed the openings.


Overall, I'm not sure how flattering this look is on me, but there is definitely a comfort zone factor for covering my bum when wearing skinny pants.  I have gradually come on board with skinny pants, but I definitely feel safer wearing them with tunic-length tops, so this high-low might just be a baby step towards wearing skinny pants with just regular length tops.

Also, I was thinking that this style of top would be an AWESOME repurpose to do with those sack-style long tank dresses that you see at thrift stores all the time.  Now to decide if I like the style enough to do it again...

Oh!  And I'm so bad about this part!  There's voting for the sewalong again.  I think I got 8th place last time for my sundress, so...there's room for improvement, you guys.  You know how much I like a freebie, so get over there and vote so I can get a fabric store gift certificate :)  Here's the link so you can vote for me starting Friday :)

Project Sewn '80's week (sewalong contestants at the bottom)

It would be totally rad if you voted for me, and if you don't, we can't be friends anymore...PSYCH!

Sunday, May 19, 2013

Boys' Knit Fakeout Tee Link

Oops!  I somehow forgot to add this post to my "Kids Clothing" page! If you were looking for the Boys' Fakeout Henley, it can be found here, and I've also added it to the Kids Clothing page.

This shirt was chosen as one of Girl Charlee's Knitpicks!  Thanks!

Tuesday, May 14, 2013

Easter Sundress!

I planned to make this dress a very, very long time ago.  I bought the fabric well over a year ago (I was trying to decide what to do with it here), and it took me months to decide to spring for a pattern to  make it into.  I decided on this lovely Gathered Pocket Sundress pattern from Pattern Runway on Etsy, and FINALLY got the guts to cut into my beautiful, beautiful fabric that came all the way from Mood.


 The pattern photos looked like this:

Photo from Pattern Runway, found here
I KNEW I'd be making something that had pockets in it, and I loved the look of this dress even if I was a little scared to death in my heart about the invisible zipper, seamed bodice, fitted waistband, etc.

And it turns out I may have been right to be scared.  But it all came out okay in the end.  Here's my final result:


Not bad, eh?  And here's the back:

Not terribly exciting.  BUT look how well I matched up the pattern!
I don't have great photos of the pocket detail, but I did really like the way they came together.  There is slight gathering across the front of the dress, which continues along the contour of the pocket.  And I like the method used for binding the pocket, even if the way the pattern explained cutting out the bias strips was confusing.


However, you will notice that I am wearing a belt in all of these pictures.  I do like the way it looks belted, but that was not my intention as the dress already has a fitted waistband.  But I will only ever wear it with a belt, because of the issues I had constructing the dress.

I haven't sewn many things from patterns, and the things I have sewn were mostly for children and were mostly pretty forgiving, loose dresses.  So for this one I really paid attention.  I mean, I paid actual money not only for the fabric, but also for LINING FABRIC that you don't even SEE, AND for a PATTERN!  This one isn't turning out to be cheaper than buying a dress at all!  So I wanted it to be perfect.  I took all of my measurements and compared them to the measurements given in the pattern and cut out the sizes recommended for the pattern pieces.  I was really careful with my seam allowances.  And this dress came out HUGE!  I could tell after assembling my bodice that it was too big, so I took some fabric out of the back (about an inch on each side) while inserting the zipper, but it wasn't enough.  I had to take another inch out of the front and sides to keep things even, which made my waistband wonky--enter the necessity of the belt. I reduced the size of the bodice by over 4 inches all together, bit by bit, which was really frustrating.  Especially because the directions are mostly easy to follow and give you really nice finishes--so even more frustrating when you have to take it apart and hack it up.  I normally wear about a size 6, and according to the measurements in the pattern I was a size medium for the waist and hips, and a small for the bust.  I wasn't too worried about the hips, since it's a loose skirt, but I figured I should be pretty precise for the fitted bodice.  I guess this is why people make muslins, but ...I just don't have the time or patience for that (or the spare fabric), and, never having done it before, how does that even work?  After you get the muslin to fit, do you take it apart and use it for pattern pieces, or what?

OK, FINE, you can see my head.

Anyway, I still do love the fabric, and it feels absolutely lovely.  I lined the skirt as well as the bodice because I didn't want to worry about a slip, since the fabric is pretty thin.

And how about this--I swear, I did not even plan for our family to be so coordinated.  My red necklace was a last minute addition, and my husband's red shirt was a surprise to me.  But I am impressed with myself, as I sewed most of the garments in this photo!  Little Sister's dress is the Cece Dress from Popolok Designs (I did a pattern test for it), and The Boy is wearing an upcycled button down and a pair of pants modified from the Kids Pocket Pants from Made.


Oh, hey, if you have a minute?  I've entered this dress into the Project Sewn Sundress Week contest.  Would you be a dear and click over there?  The "sewalong" links are at the bottom of the post.  If you like mine best (YOU LIKE MINE BEST), vote for it!  I could win fame and prizes!  Voting opens on Friday, May 17th.