Wednesday, October 30, 2013

Luke Skywalker and Chewbacca: Halloween 2013

Just in the nick of time, these costumes are done!


Now, look.  I know that Chewbacca isn't Luke Skywalker's best friend.  But The Boy wanted to be Luke, not Han.  And that dog--well, if there was any sort of Star Wars costuming going on, I was determined to dress her up as Chewbacca.  Originally, back when Little Sister was going to be Princess Leia (instead of Rapunzel), then someone in the family would have dressed as Han Solo so that Chewbacca was tied in a little better.  But you cannot deny me the chance to put a space bandolier on that dog and call her Chewy.  I have been imagining it since she was a puppy 10 years ago.

Since I'm on the subject, I'll talk about the dog costume first.  My rules were that I would spend no money and little effort on this costume, since it was FOR A DOG.  So I made a strap out of an old piece of black upholstery fabric that I had in my stash, attached velcro to the ends to hold it together, stuck a piece of duct tape down the length, and attached strips of black pre-made bias tape that came from Grandma's stash by sewing down either side of the duct tape.  DONE.

She only chewed on it a little.
I had planned on making The Boy's whole costume, but when he started Tae Kwon Do at the community center a few weeks ago, he got really excited about the uniform.  His dad told him that if he earned "Student of the Week," he'd buy him a uniform.  Well, that uniform pretty much looks exactly like what Luke Skywalker wears.  I wasn't going to reinvent the wheel.  It did take him until October 26th to earn it, but I believed in him.  I wasn't totally off the hook though.  First of all, the pants were way too baggy.  So I made a pair of more Luke-ish leggings out of a pair of sweat pants I picked up at Goodwill, by tracing around a pair of his PJ pants.

Skinny Space Pants!

That left the belt and the boots.  And lo and behold, look what Melly Sews posted last week!  Tutorials for a Luke Skywalker belt and easy boots!  I totally lucked out.  I cut down an old leather belt I had saved, and used a faux-leather remnant I bought a while back for a project I never got around to for the belt.  I used velcro on the flaps instead of snaps, and I did change the light saber holder so that it would actually hold the light saber, which is handy.


And the boots were super easy, and they work great!  These I made from a weird pair of knit pants found at Goodwill--there was a surprising lack of anything beige in the t-shirt sections.

Show me your boots!
Boy, you give a kid a light saber, and all of a sudden he just wants to pose for pictures.  He's got some moves, I tell you.


This is what I got when the posing was pretty intense and I asked for "just a casual, relaxed Luke."


And if I ever complain again about how hard it is to take pictures of kids, I need to direct myself back to this post, where I tried to photograph a kid AND a dog.  CRAZY impossible.

Look over here!  Go that way!  Sit down!
We tried using dog treats.  Want to see what happens when Luke carries Chewbacca treats in one of his pouches?


We are so ready for trick-or-treating tomorrow!


Wednesday, October 23, 2013

DIY Rapunzel--Halloween Costume 2013!

I didn't think I'd be able to squeeze in any blog posts before my first-ever craft show on November 3rd, but then I saw Project Run and Play's link up for Halloween costumes, and since the costume was done and the photos were taken, all I had to do was get the post written so I could join the fun!  I should totally be sewing away right now, but a little break from the show prep will be good for my sanity.

A couple of months ago, I thought we were all set for family costumes.  My son is obsessed with Star Wars, so he wants to be Luke Skywalker.  We had convinced my daughter that she wanted to be Princess Leia. Our dog IS Chewbacca.

Picture it.

Husband and I would figure out something--The Boy wanted his dad to be Obi Wan Kenobi, so I guess that left me as...Yoda?  Han Solo?  I don't know.  But then Little Sister decided that she wasn't really interested in Princess Leia after all, and what she wanted was to be Rapunzel (specifically, the Rapunzel from Disney's Tangled).  And she wasn't budging.


I should be thanking her, because since I don't feel the pressure to have family theme costumes, I'm not making costumes for myself and the hubby any more, giving me more time to sew for the craft fair.  Plus, I really had fun making the Rapunzel costume.

For reference.  Downloadable wallpaper image via fanpop
I used a purple microfiber sheet that I found at the Goodwill outlet in the perfect color for the main fabric, and accented with a pink burnout knit that I bought for $1/yard a while back at Walmart.  The pink elastic trim was another bargain, purchased for 30 cents a yard at a fabric store clearance.  The ribbons were handed down from my husband's grandmother.  The only thing I purchased specifically for this costume was the sheet, which I probably paid about a quarter for.

I did end up hemming the under layer up a bit after taking these photos.

Back view
She kept clasping her hands together like this while I took photos.  No idea where she got that!
Must be a princess thing.

And the real score was finding this free printable princess pattern and tutorial from The DIY Mommy.  It was so easy to adapt into a Rapunzel costume, and her directions were great.  And the pattern just happened to be the right size for my daughter.   My main adaptations were swapping out the ruffles for my scalloped elastic, and shortening the sleeves and adding more elastic and the knit long sleeve to the bottom. Oh, and making the skirt split with a layer underneath.


This costume will have a long life in the dress-up trunk.  The elastic neckline and waistband means my daughter can get into and out of it by herself, and there's plenty of growing room.  It also means the construction is easy, since there are no closures.

I keep admiring all of the details of this costume.  Little Sister wanted me to finish as quickly as possible, so while I was making it, she kept telling me to leave off the ribbons and trims.  Who does she think this costume is for, anyway?
I love the pink scalloped elastic trim, the criscrossed ribbon front, and the sleeves are my favorite part!

In any case, I tried to balance practicality with authenticity, and it's kind of a toss-up over who loves this costume more, me or my daughter.

And how hilarious is that wig?  It's a cheap adult-size wig that somehow fits her head, and I found it brand new in the package at Goodwill for $3.  It was by far the most expensive part of the costume.


I will be amazed if the wig survives until Halloween. She wants to wear the whole costume whenever we're in the house, and that wig is shedding like crazy.  It gets stuck in everything and Little Sister is whining about hair in her eyes, mouth, and fingers whenever she has it on.  But is taking it off an option she would choose?  No it is not.  That is often Mommy's decision.

I will post Luke Skywalker's costume when it's done, but don't be expecting too much--I'll pretty much be making a new belt and leggings to go over his Tae Kwon Do uniform.

Monday, October 14, 2013

Graphic Print Pocket Tunic

Every time I'm fabric shopping, Lotta Jansdotter's prints catch my eye.  But I haven't bought any...until this summer, when I found some in the outdoor clearance at Fabric Depot for only $4 a yard!  This print, while definitely recognizable as her work, is a bigger version of what I am usually drawn to, although the colors are right up my alley!  So when Project Sewn announced that one of the themes would be Graphic Prints, I knew it was time to cut into it!

Main fabric is Lotta Jansdotter Choma in Bermuda

I actually ended up sewing pretty much exactly what I imagined when I bought the fabric.  A loose tunic that can be belted for more shape, based on this tutorial from Made it on Monday that I pinned ages ago.  I kept it simple by leaving out the zipper in the back (the neckline was wide enough to not need one) and added on-seam pockets so I have a place to stash my stuff when I wear it with leggings.  I used a cotton blend jersey for the binding on the neckline and armholes, and bound it using this method from Kitschy Coo, although since the body of the tunic is a woven cotton instead of a knit I didn't stretch the jersey very much as I sewed it.  Both the band on the hem and the binding were scraps left over from other projects, so that kept this project inside a comfortable budget for me. I used about 1.5 yards of the main fabric, which wasn't quite enough to cut out the front and back panels in one big piece.  That (and because I liked the way it looked) is why there's a panel going the opposite direction in the back.

I think I might unpick that pleat at the back just an inch or two.

Using such a bold print meant paying a lot closer attention than I usually do to cutting the fabric symmetrically and lining things up with my pleats, etc.  I like the way the pleating changes the look of the pattern since I was careful to have things lined up just so--something not nearly as important when using solids or the little prints I am usually working with.

The full length effect
Just belt it! Cinch it!
So that's it!  Jump over here starting Friday 10/18 to view and vote for my graphic print look on Project Sewn, and in the meantime you can vote for the designers in the main contest starting Tuesday!

Wednesday, October 9, 2013

The Era Challenge: Mad Men-inspired Pencil Skirt and Top

I was so excited for this challenge, I've had my skirt done for weeks!  And yet, here it is on the second-to-last day to join the contest at Project Sewn and I'm just now uploading photos and writing my post!

But, I'm done now.  And starting on Friday, you can vote for me HERE! Just scroll down to the sewalong contestants and look for the photo shown below.  I'm really proud of this look, so I'm totally going to grub for votes this time around.  I'll try not to be too annoying about it!

It's been a busy couple of weeks (I'll share some pics of the wedding I made these outfits for soon), but the real reason I'm behind is because although the skirt came easily, I struggled with what kind of top I should make to go with it.  I ended up making two, since I didn't like the first one.

Shown with the second top

I was at Goodwill a couple of weeks ago and came across this cool vintage sweater knit fabric.  It was $10 though--more than I could justify on an unnecessary fabric purchase.  There was TONS of it, but I REALLY didn't need several yards, and since it was Goodwill and not a fabric store it's not like I could just have them cut off a yard for me so I could buy it for a couple of bucks.  So I sighed and left it at the store, but...I couldn't get it out of my head. I knew exactly how I wanted to make it into something perfect for the era challenge, but that I would love wearing any old day as well.  I bet you can guess how this ends--I went back and bought it.  So if you like it, I've got some extra for you!  About three yards worth!  I didn't realize when I saw it folded on a hanger that this fabric was actually a really long tube.  Have you ever seen that before? I hadn't!

So anyway, my skirt!  I absolutely love it.  I followed the tutorial from Adrianna (Crafterhours) on making a knit pencil skirt to your own measurements, and it fits like a dream.  But for the top of the skirt, I modified the Milkmaid skirt tutorial (also from Adrianna--how did I not realize that until just now?  She's competing in this round of Project Sewn, so I guess that's appropriate that I'm using all of her tutorials!  Her Era Challenge Audrey Hepburn inspired look is DARLING--go vote!), adding the pockets on top instead of hidden behind the front skirt panel, and narrowing the waistband slightly.  I like the added snugness that the elastic inside the waistband gives. I had a vision of piping with this fabric.  It gives a nice definition on the pockets--my thinking is, if you're putting pockets on a slim-fitting pencil skirt, there's no way they're going to be hidden, especially if you've got anything in there!  So you might as well draw attention to the pockets!


I also really wanted piping as an added detail above the hem.  But I started thinking about it, and realized that since it's a stretch skirt, I didn't want non-stretch piping going all the way around and making it more difficult to move in the skirt.  I was sad to abandon my vision, but then it came to me--the piping didn't need to go all the way around!  I added the piping in the front, then just past the side seam I curved it down into the hemline.  It reminds me of the door details on classic cars, or something--I like it even better than if the piping had gone all the way around!

I have to admit, this skirt makes me feel pretty damn good about how my butt looks.
If you'd rather just look at the piping and not my butt.  Fine.
Oh, and because I know you care about this kind of thing--I lined it with a soft gray-and-black striped knit--even the inside of the pockets.  I'm kind of sad that it's all hidden because I love the way it looks with the sweater-knit!
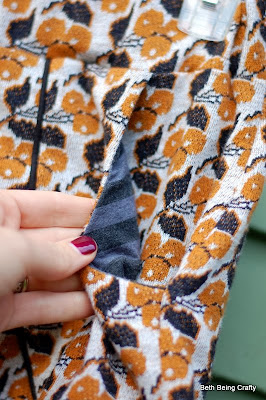
Pocket lining--and possibly the only time you will see my nails painted
Now, I'm not sure what era this fabric came from.  It feels a little late '60's-early '70's to me, but the silhouette gives it a slightly earlier feel. I thought it would be fun to make a little cardigan to go along with this.  Sort of a Mad Men sassy-secretary look. I had some mustard-colored knit fabric that I thought would work, and so I made a pattern based on one of my all-time favorite cardis.

BUT, whomp-whomp.  The slightly empire waist of the cardigan and the natural waist of the skirt just didn't work together.  The proportions are off, and it just looked unflattering.


I still like the cardi on its own, so it wasn't a total waste.  The color was terrible with my skin, so I used scraps from an off-white t-shirt for the binding. It's much better on me when that caramel color never comes in contact with my skin! I will totally wear this, just with something else.  It's good with jeans.

I just let the fabric roll at the bottom hem

I love the sweet fabric, despite the fact that it makes me look diseased.

Luckily, I already have a cardigan that I bought at Target that looks way better with it.  This outfit still has a quirky retro vibe while feeling casual--I wore it to meet with the other kindergarten room parents and felt totally comfortable.  I wasn't sure beforehand, but it turns out I am totally a pencil skirt kind of girl--as long as it has pockets!

Dressed down--the contemporary version
But that still left me without a top to use for the Era Challenge!  I went the easy route--I refashioned a dress that I never wore into a top, basically by cutting off some weird button-tab details on the neckline to turn it into a more classic cowl, then cutting off bottom so that it was shirt-length instead of dress. I really think the top and skirt suit each other, again giving the retro feel without totally looking like a costume.

Had to have fun with the styling!


Couldn't resist the kick pose--but my balance is so bad this is the only one I got where I'm not falling over!
So there it is!  My "Era Challenge" outfit!  I would really, really love it if you'd hop over to Project Sewn and vote for me--I'm number 12  in the sewalong links at the bottom of the page!  No email required, just click a button and you're done :)