Wednesday, July 31, 2013

Jersey Dress with Pockets


[Edited 9/28/13:  I am definitely cheating here, but there was no way I was going to complete a black dress for Project Sewn's Little Black Dress theme this week.  I already have two of them in my closet, and I rarely wear either, so it's just not something practical for me.  Plus, I am up to my elbows in sewing for the kids, and so I'm reposting this awesome dress that I love from two months ago, since the rules say you have to have sewn it in the last six months.  I just can't resist being involved!  AND, my book club just read Orange is the New Black by Piper Kerman, so it just kept going through my head.  Recommended, btw!  But I promise I will be sewing new things for the other themes.]

This dress was such a sewing win!  And I tell you, I needed one.  I feel like everything I touch lately turns into scrap fabric. This was low-pressure, since it was for myself (unlike the bridesmaid dress I was hemming and cut a hole in--maaaaaybe I'll tell you the story once I've figured out how to resolve it) and the fabric was picked up at a secondhand store for $4 for about 3 yards (unlike the leftover fabric from this dress that I attempted a tank out of, which totally doesn't fit in several weird ways).  I have also so far avoided getting any silly putty stuck in it.

But the happy ending is, this dress came together easily and quickly, it's super comfortable, and I LOVE it.  I want to wear it every day.  I will probably make another one. [When I do, I promise I will make it a tutorial!]

Full length
 This probably isn't a color I would have picked out at the fabric store, but I think it's great.  It's a nice soft orange, not too harsh.  I love contrast bindings, so rather than using more of the orange I found this gray jersey in my stash that I had just barely enough of to bind the neckline and armholes, and luckily enough for a raw strip around the hem too, since I cut the dress shorter than I meant to.

Back view
 I used the pattern I cut from a favorite t-shirt of mine for the top, which I recommend.  I have made several shirts from this pattern (see here, here, and here)--the original shirt and the ones that I have made have gathers in the shoulders, but I was feeling lazy so I just cut them straight across this time (curving down a bit actually to give a slight cap) rather than winging them up for the extra fabric to gather.  I skipped it for time, and because I wanted to do a simple armhole binding and not worry about hiding the gathered edges inside, but I actually like the simpler cap sleeve a lot.  I had marked my natural waist on my pattern, so instead of cutting the shirt full-length, I just cut it off about 5 inches below that natural waist point.

Photobombed by Snow White.  Who is usually nowhere to be found when I actually WANT a picture of her.
 For the skirt, I used my trusty Milkmaid Skirt pattern, which I've also made several times.  It's such a great free tutorial from Crafterhours, and I thought there was no reason it wouldn't make just as good of a skirt for a dress.  I was right!  I cut out the pattern for the front and back of the skirt from the orange jersey, and made the pockets from the gray jersey.  I didn't cut out the waistband piece, since I'd be attaching it directly to my top.   And I waited to hem it until I could see the length of the dress as a whole.

From the side
Once I had finished the top and the skirt, I turned the skirt inside out (pinning the pockets shut so that they wouldn't shift around on me--you could also just stitch across the top of them to hold them in place).  The top of the skirt is much wider than the bottom of the shirt--on purpose. I pinned the side seams to eachother and stretched the top to fit with the bottom, pinning all the way around, then sewed them together.  This is the part where I wish I hadn't been so impatient to get it done, because I didn't take any pictures--wasn't really planning on a tutorial--but now that I've decided to explain it to you I'm really wishing there were pics to help.

So, what I did was turn the dress inside out.  To make a casing for the elastic, the raw edges from joining the top and skirt should be folded up toward the top, then fold up again so that the raw edges are hidden inside the casing.  Make sure to stretch the fabric gently as you go so that you don't get puckers in the front of your dress, and sew all the way around the top of the casing.  Then flip the dress right-side out again, and "stitch in the ditch" (sew on top of your other seam) where the top and bottom are joined together to hold the casing in place.  Make sure to leave an opening for your elastic.

Then run your elastic through the casing.  I used 1/4 inch.  Before sewing my elastic together and closing the opening in the casing, I tried the dress on to make sure the elastic was as tight as I wanted it.

I would save hemming for last--that way you know how short your dress will be once you blouse the top out a little.  I was planning to leave the hem raw, but since it was on the short side I added a second raw strip of the gray jersey, and I really like the added detail as well as the length!

[Also an edit--shortly after I posted this, Cate Blanchett wore this dress to an event.  Coincidence, or she saw my blog post and called her stylist?]


Wednesday, July 24, 2013

Pattern Hack: based on the Go To Dress

As I was organizing my patterns a few weeks ago, I was excited to come across one I had printed out ages ago and had yet to make.  It was the Go To Dress from Train to Crazy, and I had some more of this purple jersey sheet that I had been wanting to make a dress out of for Little Sister, particularly because I had a ribbed tank to cut up and use for some cute binding.

Yes, she is holding a waffle.

So I got my pattern all cut out and taped together for a size 3, and I went to the site to find the directions.  Except...the pattern that was a freebie when I printed it out is now only available for purchase (it's a super cute dress)--so the tutorial is no longer on the website!

Pattern available from The Train to Crazy

I guess what a sane person would do is just purchase the pattern so that they knew how to use the pattern they had, but I am clearly not that person.   [Edited to add--I was going to put a link here to the site where you can purchase the pattern, for those of you who are more sane than I, but...I couldn't find it!  If I can track down where to buy the pattern I'll add the link here, or please let me know if you know where to get it!]

Since I was planning on making some adaptations anyway, I just went for it.  As you can see from the differences in the pictures, I pretty much only used the pattern for the main body of the dress--I incorporated the gathers in front and in the back, but left out the sleeves (both the long ones and the cap sleeves).  I had been planning to just do the cap sleeves, but without instructions I thought I'd better just keep it simple.

cute printed binding cut from a ribbed cotton tank

I used this method for binding the neckline, and just this simple method (she uses it for the neckline, but you can see how to do it) for the armholes.  I used my double needle to hem the bottom, and I was planning on doing an elastic waist, but when I tried it on the girl to see where to put the waistband, she declared that she liked it just as it was, and that she wanted to wear it right then.

Which should have been great, right?  I mean, she loves it!  She wants to wear it!  Except...

Before we even got out of the house, she managed to grind a wad of silly putty firmly into the backside.

Well, that doesn't look so bad, you might say...

Nope, it's pretty bad.
I thought I might just have to cut the bottom off, add a wide band of that printed ribbing, and turn it into a super cute tank top.  Honestly, that probably should have been the way to go (less time and effort, for sure), but Little Sister was SO SAD that I would turn her long long dress into a shirt that I decided to take a crack at Silly Putty removal.

According to Crayola's website (the makers of Silly Putty), you scrape off as much putty as possible with a blunt knife, then soak the area with WD-40 (which I had to purchase, making stain removal the most expensive part of this garment) and let it sit for about 5 minutes.  Then scrape again, respray with WD-40, and wipe stain off with cotton balls.  Summarized, but you get the idea.

Well.  It went fine until the "wipe stain off with cotton balls" part.  Not sure what I was supposed to be wiping off.  The putty was pretty much gone at this point, so was I supposed to wipe off the WD-40?  Hmm.  The wiping with a cotton ball did exactly nothing.

They go on to say that if any stain remains, soak a cotton ball with rubbing alcohol, blot the stain and rinse, then wipe remaining residue away with a dishcloth with a few drops of dish soap.  I guess they must have meant that if there was any PUTTY remaining, but I was more concerned with the WD-40 stain all over the back of the dress, and I had heard that dish soap (specifically Dawn) was good for removing that kind of thing, so I thought maybe they were referring to the WD-40 stain after all.  So I did the cotton ball with rubbing alcohol thing, then rubbed again with a sponge with Dawn on it, and threw it in the wash.

Good thing I checked before tossing it in the dryer, because...drum roll...giant WD-40 grease stains all over the back of the dress.  They even seemed to have spread out a bit.

But the happy ending is that I soaked all the grease stains with my Oxy-Clean Max Force Gel stain removal stick, and it all came out just fine.
Not sponsored or anything--it's just what was in my laundry room and it worked.

I tried to get a photo of the revived back of the dress while she was wearing it today...

You might have to take my word for it that the stains are gone--this is the best I could do.

But she just didn't want to take a break from her Jedi training with her big brother to let me get a photo.


I can't say I blame her.


It looked pretty fun.


"You know, I think you'll be a pretty good Jedi." 

Wednesday, July 17, 2013

Tee to Tank Refashion

If you hoard t-shirt scraps, like I do, then this refashion is reeeeallly quick and easy!


I took one of The Boy's shirts that was too small, cut off the sleeves, neck, and hem, and turned it into a tank top that fits.

The key to doing this really quickly is reusing the ribbed trim and hemlines off of another old shirt. For this particular tank, the ribbing on the neckline and the panels at the hem came from one shirt, and the ribbing binding the armholes came from another shirt that was the same color.  I love cutting off the ribbed trim and reusing it, because it's already cut to the right size and pressed in half!  So I always save those necklines.

Ready for a tutorial?  Here goes!

First, cut the neckline out of the shirt, staying just under the seam so that there is no stitching left on the shirt.

Saving this neckline for a future project!

Do the same for the sleeves, using the seam line as a guide for cutting straight but staying just to the inside of it.


At this point, you can check your shape using a tank top that fits--mine needed to be narrowed at the shoulders just a smidge, but it would have been fine to leave it.


I lined up the tank top that fit to one side of my new shirt, then folded the front part of the shirt in half, lined up the armholes, and trimmed the excess from the other side.  Then I did the same in the back.  If you skip this part, your tank will have more of a "muscle tee" look to it.


If the shirt you are working with is too short, cut off the bottom just above the hem, again using the seam line to guide your cutting a straight line.


Figure out how much length you want to add to the bottom of your tee.  I did that by lining the new shirt up with the shoulders of the tank top that fits and seeing how much was hanging out the bottom.  Because I was cutting up an old tee for the panels I added to the bottom, I lined up the shirt with the existing hemline so I wouldn't have to hem the new pieces.  I then cut two pieces about 1/2 inch wider on each side of my tank (so, 1" wider all together than the width of the shirt). If you are cutting these out of a piece of knit fabric, be sure to add an extra inch or so to the length for hemming.

The blue striped tank was my guide for length.

Once you have your bottom panels cut, make sure you've got your ribbing--mine was 16" for the neckline and about 11" for the armholes.  I ended up cutting the armhole ribbing narrower as well, so it was closer to the width of the neckline ribbing--about 1.5" wide when unfolded, but because I cut them from existing necklines and cuffs they were already folded in half and pressed.

All of your pieces--shirt body, ribbing for neckline and armholes, and 2 panels for the bottom
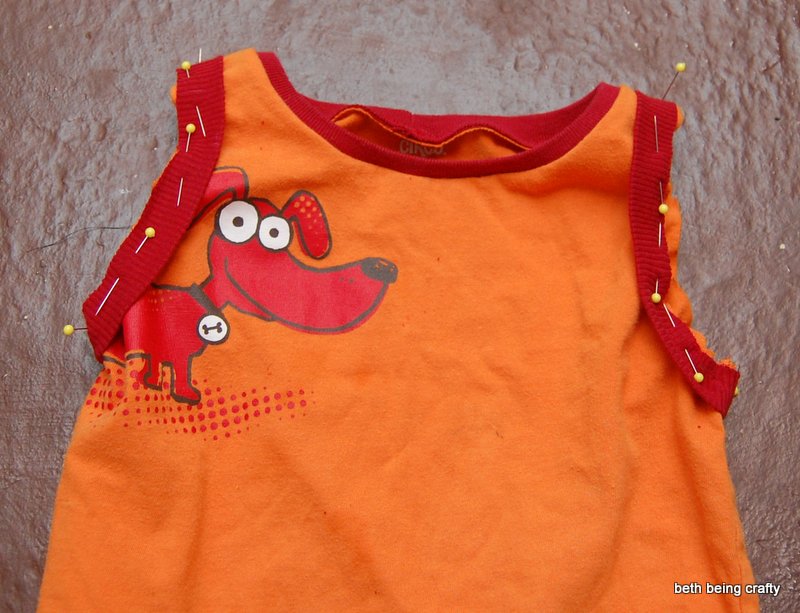
 Starting at the center back of your neckline, pin your neck ribbing to the right side of the shirt, with raw edges lined up.  I like to pin my neckline on, then join the two ends of the ribbing together so that I don't have to measure too carefully--this is how I do it, but you might have a favorite way of attaching ribbed binding that would work just fine.  So like I was saying, I leave a little bit of ribbing overhanging the center back.  Then work your way around the neckline, stretching the ribbing slightly but not the t-shirt fabric, and pin the raw edges together all the way around.


When you reach the center back again, figure out where the two ends of the ribbing come together.  Then unfold the two ends of the ribbing and sew them together, wrong-sides together.  To do this, you'll need to take out the first pin and stretch the ribbing so that you don't sew it to the shirt at this point.

Then trim off the excess and fold the ribbing back together, and pin the seam in place along the neckline.

Then, using a ball-point needle and a walking foot if you have one, carefully sew the ribbing in place, stretching the ribbing (but NOT the shirt) as you go.  I like to use a zig-zag stitch for doing this so that the neckline stays nice and stretchy, but for some reason I forgot to do that and it still has enough stretch to work.

Do the same for the armholes--although since I was cutting it close on the length for my armhole bindings, I just went ahead and sewed them into a loop BEFORE pinning them to the armholes, then stretched them evenly all the way around.


Once they're all attached, flip the seams to the inside.  You can press them flat at this point and see how nice they look, or you can wait and do all your ironing at the end.

All pressed and looking professional.  Except for the inside.
 Now for the panels to add length--first, turn the short edges under and sew them down on both panels.  If you are upcycling an old tee, the bottom will already be hemmed, but if not you can hem it at this point.

The panel on top is wrong-side-up, to show what that should look like.

I forgot to take a picture of this step, but it's pretty obvious--lay your t-shirt out flat, right side out, front side up, and lay your first panel on it, right sides facing and raw edges together (so your panel will be upside down and wrong-side out.)  Pin into place, then flip to the backside and do the same with your second panel.

On the side, overlap the two panels a little bit right at the seam.  I put the front panel underneath, so it would be on top when I flipped it down.  Then sew all the way around--use a zig-zag stitch so that there is stretch to the seam and it's less likely to pull out.


Now's a good time to press everything--I pressed all of my seams towards the body of the shirt.  I skipped topstitching to make sure I was leaving plenty of stretch in all of the seams.


Then it's done!  One more tank for those sunny days!


I like the look of the flapped hem, but you could totally just sew a band all the way around too.

Yup, the pants are on backwards.  That's what happens when you let the models style themselves.  Or when you take the first opportunity to snap a pic because who knows when you'll get another chance?

And I just can't get a photo shoot with The Boy without some sort of aerial stunt involved, so here you go:  these were jumping jacks, I believe.

Airborne!


Wednesday, July 10, 2013

Quickest Upcycle Ever!

I wasn't even going to blog about this "dress," but then Little Sister went and styled herself with the linen flower espadrilles and boho-style headband (so what if it's a Christmas poinsettia?) and I just couldn't help snapping a few pics, and as long as I had some pictures I might as well tell you about the dress, right?


My friend was getting rid of this top, and I found a 3-yard roll of the wide crocheted lace at Joann's for $1, so the whole thing cost me less than fifty cents.

All I did was put the top on my kiddo, figure out where to attach the straps and how long to make them, and then I actually did cut four little squares of knit fabric and sewed them over the lace on the inside of the dress, in case it was itchy--but that last part is totally optional.

She loves this dress, because it's "long long to the floor," which is her favorite thing.


Those curls with the headband are just killing me!

Sorry you can't see how cute those shoes are (and perfect with the dress)--they are natural-colored linen espadrilles with a flower cut from the same fabric that I got at Old Navy on super clearance ages ago that finally fit.  I have since quit buying ahead for this girl, because she's so dang picky now that I have no idea what she'll want to wear a year from now, but I got lucky with these ones. Oh!  I might have a picture still from when I bought them:

Yup!  That's them!  And my final price on these babies was $1.18.

Anyway, she had fun being sassy for my pictures in her boho getup, then we went to the grocery store and she was admired by many.  This outfit is a win.


Saturday, July 6, 2013

Piped Sundress

I have a confession to make--this dress does NOT HAVE POCKETS.  Don't worry--my blog has not been hijacked, I really did make this, but it is a case of the pockets becoming too much hassle in light of every other hassle I encountered while making this dress, and instead of giving up and tossing it in the scrap bin, I decided to overcome everything else but leave the pockets out.  Maybe someday, after wearing it a few times and being irritated at the lack of pockets, I will figure out a way to work them in.  But for now, it is such a relief to say it is DONE that I am out of motivation to add one more thing.

Oh my goodness, this dress has been such a case of "Keep Calm and Grab the Seam Ripper."  Why is it that it's never just one or two little things that go wrong?  In my experience, putting a garment together either goes pretty darn swimmingly, or else it's a complete and total mess from beginning to end.  Guess which kind this project was?

Don't just hang there, looking all innocent.

Here's the part of this post I wrote before the dress was finished:    It's time to forget it for the night and hopefully have better luck when I start fresh tomorrow (or, as fresh as I can be after the kids have gone to bed for the night, my sewing time) [Edited:  I waited a good two weeks after this to pick it up again and hem the damn thing].  After inserting an invisible zipper TWISTED rendering it unusable not once but TWICE, I have to throw up my hands and give up.  And that's after taking off then reattaching the skirt, undoing the side seams, pulling the bodice through a narrow strap the wrong way, undoing and reattaching the waistband,  accidentally unpicking 6 inches of piping from the neckline while taking out the zipper for the second time, creating the lining as a muslin that ended up being ridiculously too small and had to be pretty much completely resized (actually a genius move in my opinion, since I don't mind a frankensteined lining and it allowed me to redraw the self-drafted pattern before cutting the dress fabric. [Edited to add--however now the side seams on the lining don't line up with the side seams on the dress, making on-seam pockets somewhat of a challenge])...um, let's see, I'm sure I'm forgetting something, but I'm also not finished yet.

On the plus side, putting the piping in was easy, and I love the way that looks.  Silver lining.

Did I mention that I even PLANNED some seam ripping in this project that I haven't gotten to yet?  Since I wasn't sure how the finished skirt was going to lie, I haven't inserted the on-seam pockets yet, so I'll be doing even more seam ripping before this is done, because I am NOT going to spend all of this time on a dress that doesn't have pockets.  [Yeah, that's the part I wrote while I was still optimistically thinking I'd come back and add pockets.  We'll see if it drives me crazy not to have them.]

So with all that, here's how it turned out:


I started by printing out this pattern, which claims to be a size 6, but...I'm pretty sure she must mean size 6 TODDLER, because there was no. freaking. way this was going to fit my typically-size-4-to-6 body.  I should have known, looking at her photos, because she is clearly much tinier than me, but anyhoo.  I added four inches to EACH SIDE of the skirt.  EIGHT total inches.  And I actually really love the way the skirt fits now.  I can't remember exactly now, but I added I think somewhere in the neighborhood of 6 inches to the bodice, but there was a lot more tweaking going on up there so I'm not sure how much of that was the pattern's fault.  I also added the waistband, because the bodice pattern pieces I tried fitting together ended up being reeeeally short as well as not near big enough around, so rather than recutting them all longer, I just added the horizontal waistband strip, which ended up being one of my favorite things about the finished look.

Speaking of the bodice, though, I really wanted to have piping along the neckline and armholes, but once it was there it made adjustments to these areas really difficult.  So rather than taking things apart AGAIN once I figured out that the neckline that I cut was droopy, I did this:

Not very professional, but a hell of a lot faster
Can you see how the piping is folded in on itself up there?  And harder to see is the seam going at an angle from the folded spot on the neckline down to a couple of inches under the armpit--that's just topstitched into place to keep it from bagging, and to hide an awkward bust dart.

Also, (and this one's really probably only obvious to me, so clearly I need to point it out):


Somehow in my exhaustion, I failed to line the skirt up properly before attaching it, so the darts are not in the same place on both sides, nor does the print line up.  I highlighted the darts with a black dotted line above--see how the one on my left is way further over?  I vaguely remember now that when I was putting in the zipper, I had a lot more extra fabric on one side than the other...doh.  I totally didn't even realize this until I was putting the finished dress on.

Also, that waistband started its life about 2 inches wider than you see it now.  The proportion was just off, but instead of taking the skirt off I just tucked the waistband under and topstitched it down.  LAZY!  And now that I see that I attached the skirt crooked, it would have been even better to take the skirt off because maybe I would have lined it up right the second time around.

Maybe you can't tell if I put my hand on my hip.

But in any case, it is finally done, thanks in no small part to the lovely Suzanne at D&T's Sewing.  She hosts a crafty social night on the first Friday of the month, which was motivation for me to haul it out and get it hemmed and over with.

No pockets.  I have no idea what to do with my hands.

I'm pretty glad I did too, because I wore it today and despite all of the issues that are mainly noticeable to me, I think it is a pretty flattering dress in a great fabric (it's a cotton lawn) with some nice details, and I think I will get some use out of it.  And I THINK I learned some things in the process--namely that I am not a pattern maker, so if a printed pattern isn't going to fit just start the heck over.