Wednesday, November 28, 2012

Kiddo Padded Headboard!


Our little girl has moved into her big girl bed!  She transitioned pretty easily to a toddler bed (her crib converted into one), and even though SHE would have been comfortable there for a while, her dad and I were most definitely NOT comfortable when we snuggled in for stories at bedtime.  So we found a twin captain's bed on Craigslist and moved it in (breaking this family picture in the process, sniff).

Before
It was working pretty well, except...maybe it was intended to use a box spring?  I don't know.  It's a platform bed, so doesn't need a box spring, and adding one would have felt like my little girl was teetering a bit high above the floor for my taste.  But there was a lot of blank headboard showing.

With pillows removed.

And this handy little hole:


Great for stuffing toys and books into.  Not so fun for toy-and-book retrieval.

Sooo, I took it upon myself to make a padded covering for that area between the mattress and the cubby shelves on the headboard.  I measured the width and the height that I wanted, went to Home Depot where I found a piece of MDF in the scrap bin and they cut it to the right size for me (cost me two bucks, yeah!).

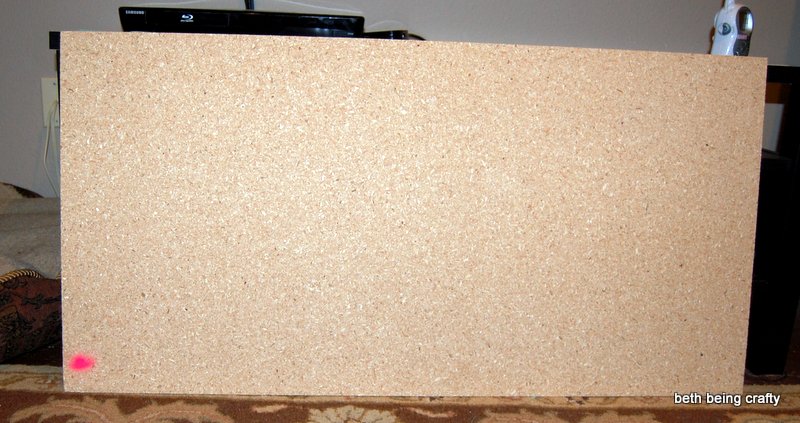
That pink dot means it costs $2.

I also had a roll of 1 inch thick foam that I bought at Joanns' with a coupon a while back, intending to make a headboard like this for the boy.  He may still get one at some point; we'll see!  This was the most expensive part of the project, since the stuff costs something like $17/yard.  Use a coupon!

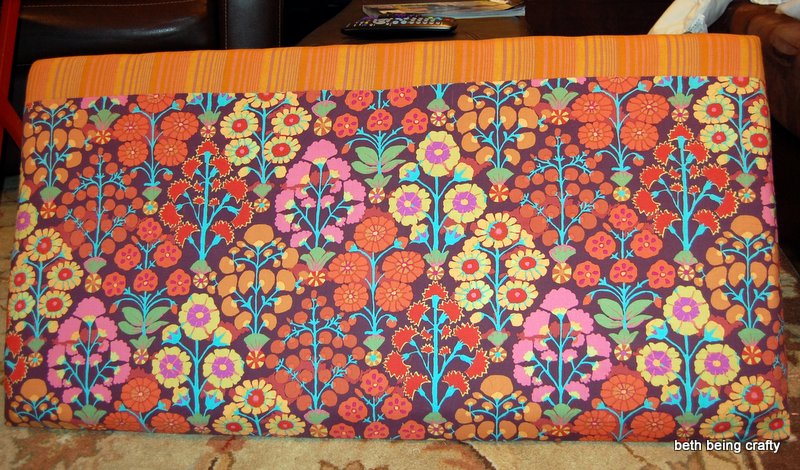
My quilt batting was handed down from the hubby's grandma, and for my fabric I cut up the duvet cover my mom had made for Little Sister's crib.  The fabric matches the curtains that are still in her room.  That's why the two fabrics are on my headboard--they were already sewn together that way!  You can easily use more than one fabric as well.

Little Sister's original nursery--you can see her duvet and curtains here


Supplies:

Backing board, thick enough so that you can attach it (I used screws coming through the backside of it so they didn't show in front)
1 inch thick foam, same size (or slightly smaller) than the backing board
Sheet of quilt batting large enough to wrap over the foam and around the edges of the board
Fabric same size as the quilt batting
Spray Adhesive (not required but helpful.  You could also use hot glue, but it would be more of a pain.)
Staplegun and staples (make sure they aren't longer than your board!)


Directions:

First, cut your foam to the same size as your backing board.  Lay it out on top of the board, then lift up one end and spray the board with spray adhesive.  Get that end stuck down, then lift up the other end and spray the board little by little, laying the foam and pressing it in place.


Once the foam is adhered, lay out your batting over the top.  Make sure you have plenty to stretch to the back side of the board, where you will staple it in place.  I was lazy and didn't staple the batting separately; I just skipped on to putting the fabric on top.

Lay the fabric over the batting.  I started with the top since I wanted to make sure I had a straight line with my contrasting fabric.  I stapled right in the middle first, then stretched the fabric around the bottom and stapled in the middle down there.  Then I did the same thing on the sides.  Making sure the fabric was stretched tight and the line across the top was straight, I stapled the rest of the way across the top, then did the rest of the board.  I folded fabric under and stapled at the corners.  Because the back won't be visible, I wasn't too careful about the way the back looked--I just made sure the front was smooth.

Back side
 Once I was happy with the way everything was stapled down, I was done!


The only thing left was attaching it to the original headboard.  So I called in the husband.  I held the headboard in place from the front while he screwed through the original white headboard and into the new padded piece, and through to the bed frame.


Minor problem--I was thinking it would be more secure if I had the headboard go down below the actual mattress.  Turns out, it would have been easier to attach if the headboard just lined right up with the platform where the mattress rests (or a teeny smidge above that).  Because the headboard has THICKNESS.  Duh.  So we ended up with this issue:

Mind the gap.
Not such a big deal, really, so we decided to let it slide.  However we did have to be careful when attaching it that we didn't screw the drawer that's in the base of the captain's bed shut.  Not an issue if your padded headboard is smaller.

But all in all, I love it!  It brightens up a rather boring-looking bed, and it's way more comfy to lean on during story time.  Plus it softens the edge of the shelf for head-bonking.  So now we have an official big-girl room!


Wednesday, November 21, 2012

Womens' Tops

I made myself a few tops a while ago; well, made one, and adjusted another.

I made this one out of a little remnant I picked up for next to nothing.  It was a 54" wide piece that was a little over 3/4 of a yard, I think.  I made a shirt/tunic-length version of the simple dress in this tutorial.

Boy do I hate taking pictures of myself.
 I did do a single row of elastic thread around the waistline, but it still definitely needs the belt to be flattering.
Less pressure without the head.

In a similar vein,  I rescued this baggy top I wore during pregnancy from my "upcycle" pile.  I gave it two rows of elastic thread around the waist to add some shape, then cut the sleeves off at three quarters (didn't hem since the t-shirt fabric won't fray), and added two lines of shirring for about 6 inches up from the bottom of the sleeve.  This was a little tricky since the sleeves were already sewn together, but I managed it--my advice is to make sure you measure your STOPPING place on both sleeves and mark it with a pin BEFORE sewing the first sleeve, so that the sleeves have the same amount of gathering.


I actually really like this top now!

Sunday, November 18, 2012

Fabric-covered Coasters!

These made for a fun little housewarming gift, don't you think?


I had seen tutorials for these using scrapbook paper, but I don't scrapbook.  I wanted to use fabric, because I have tons of it.  I combined ideas that I saw in several places, like this, this, and this, and here's what I came up with:

1.  Find four coordinating fabrics.


2.  Cut them into squares to fit on your tiles (I bought mine at Home Depot for 18 cents each).

3.  Start by painting one layer of Mod Podge for Fabric on the wrong side of your first fabric square.  (I did splurge and buy the real deal when I had a Joann's 60% off coupon, so it ended up being less than $3 for an 8 oz jar.)  I used a foam brush to paint it on, and I laid out a piece of cardboard for a workstation to keep the mod podge off the table top.

4.  Then lay the fabric onto the tile (right side up, of course), and smooth out any bubbles with your fingers.

5.  Paint a layer over the top of the fabric, going all the way to the edge of your tile.

6.  Let it dry for a few hours.

7.  At this point, I cut out coordinating felt and hot-glued it to the back of the tile.  You could also do this at the very beginning instead, or at the very end, or after the second coat of mod podge--really, at any point that the mod podge is not wet.


8.  After I glued the felt, I flipped the tiles back over and applied a second coat of the mod podge.  Once it was pretty dry, I trimmed off any little stray threads from the edges.

9.  The next day, I took the tiles outside and sprayed them with a clear enamel spray paint.

10.  Once dry, I stacked them up and tied them with a pretty ribbon.  I tied a matching ribbon around the bottle of wine we brought to the housewarming party too :)


The end!  I'm going to give the photo-printed ones a try too, maybe as a Christmas gift.

Wednesday, November 14, 2012

Holiday Outfits, Part 1: The Milkmaid Skirt for little girls

After making three of Crafterhours' awesome Milkmaid Skirts for Grownup Girls for myself (here and here), I thought it was time to make one for Little Sister, using her original little-girls milkmaid skirt tutorial.

Little Sister's Milkmaid skirt
I knew as soon as I saw this little gold-flecked tweed remnant that this would be the skirt.

I reversed the direction of the fabric for the pocket lining--subtle but kind of a cool detail!  

It was a close call--I had to adapt the waistband because I didn't have enough fabric to do it the way the tutorial describes, but I was able to make this little beauty with a remnant that was only 1/3 of a yard.  I paid 85 cents for the remnant.  I did have to buy the turquoise bias tape, but I had a 60% off coupon, so that cost about a dollar (and I didn't use it all).  Funny--I think I may have paid more for the bias tape than the fabric!  I guess I really do need to start making my own bias tape.

The ever-popular "jump on the bed" pose

Trying out the pocket

The back
Anyway, super cute!  And she agreed to wear it!  Hopefully that will happen for me again, because I'd love this to be part of her Thanksgiving outfit.  Wish me luck!

Final cost:  $1.85.

Monday, November 12, 2012

Baby Shower Bonnet and Booties

I got to go to a baby shower for one of my high school buddies that I haven't seen other than via facebook in  probably 10 years.  She's having a little girl, and this mama is decidedly not a girly girl.  I had to go a little girly, because that's my style, but I thought bringing out the yellow and gray combo would be the perfect way to avoid girly overkill.


I had been wanting to try this reversible ruffled bonnet from Prudent Baby (tutorial with printable pattern) ever since I saw the pattern, and I think it makes a great gift!  Especially when paired with these sweet little baby shoes.

The bonnet is reversible:


And it has a little elastic strip in the back to keep it snug without being too tight.


For the bonnet, I made strings that tie in a bow rather than the super-cute snap-tie from the tutorial, mostly because I didn't have any functional snaps and didn't want to go to the store.

The shoes came from this tutorial from Michael Miller fabrics.  Instead of the fleece/shearling they suggest for the sole, I used one of my fabrics with fusible fleece attached for the outsole, and the coordinating fabric, also with fusible fleece ironed on, for the insole.  I just basted them together (wrong sides together) and then treated it as one "sole" piece when assembling the shoe.  Also, when I made my elastic casing on the heel portion of the shoe, I made the casing visible on the outside (so basically, attached my heel portion inside-out) because I liked the way the contrast fabric looked.
Outsole/Insole

Casing turned to the outside of the shoe rather than to the inside
I learned at this shower that I have been doing a good job of making Little Sister's clothes and staying away from the stores, because I knew that owls were a thing right now, but I had no idea how prevalent they were until almost every baby present involved owls in some way!  And no, it wasn't what she had registered for!  I love them because they're cute AND there's the suggestion of wisdom/smarts, so it makes sense to me that people have seized the owl.  Even I was not immune:


This was the card I gave.  I mentioned before that I didn't want to go to the store to make this gift--well, that extended to a baby shower card!  I didn't have one around (or a blank one that would work), but I did have this cute mama/baby owl card that I got for my birthday.  I cut out part of the image, glued it to a blank notecard, and covered the paper edge by hot-gluing on a little ribbon.  Tacky?  Or resourceful?  You be the judge.

One of the reasons I was so excited about this shower was that the invitation included a fabric square.  The instructions said that half the guests had received a onesie to decorate, and the others had gotten a quilt square.  The mom-to-be would be presented with the onesies and the finished quilt at the shower (her mom assembled the quilt), and the guests would vote on the favorites and winners would get prizes!  Well, I'm not a quilter, but one square I figured I could handle, and I was planning to kick some quilt square butt.


Owls again!  We voted on the onesies (some really cute ones--got some inspiration!), but mom-to-be was put on the spot to pick a favorite quilt square, and she understandably refused.  I know in my heart that I was the winner, but I totally forgive her for not wanting to embarrass her grandmother's inadequate square (totally kidding!)  I did take home a prize anyway--I know my fill-in-the-blank nursery rhymes!  Anyway, fun idea :)

Wednesday, November 7, 2012

Making skirts on Election Night

I made this skirt last night while watching election results. Therefore, I will always feel patriotic when I wear it.  I gotta say though--did anyone else find the quick presidential results anticlimactic?  Not that I'm disappointed with the outcome, but...maybe it's because the first presidential election I was able to vote in was the great Gore/Bush debacle of 2000, but I like a little dramatic tension with my election television.  This time, I rushed the kids into bed so that I could settle in front of the TV to nervously await each state's electoral votes--but before the goodnight kiss, the election was decided.  Much more relaxing, but I missed my night's entertainment.  Hence all the sewing, while I waited for the candidate's speeches.  I was feeling lucky that I was on the west coast so I could watch those speeches and still go to bed at a reasonable hour!

But back to the skirt.  It's the Milkmaid Skirt by Crafterhours again--I've made two others using this pattern, and it's a great, easy skirt with, you guessed it, pockets.  If a women's skirt or dress ever turns up on this website without pockets in it, please alert the authorities, because it means my blog has been hijacked.


I fell in love with this soft, lightweight cotton printed with a denim-y railroad stripe when I found it on clearance for $1.50 a yard, and bought all that they had (about 2.5 yards).  This used about a yard of it.  I knew as soon as I saw it that I would make a Milkmaid skirt out of it--it even reminds me of the fabric Adrianna used in the tutorial.  Love her idea to turn the pocket lining on its side to give it some contrast!

I used a narrow gray bias tape from Colby's grandma's stash for the pocket trim, rather than making my own.  One of these days I just won't have something that coordinates and I'll have to make my own bias trim, but until that day comes, I love the packaged stuff.

Fabric/Pocket/Bias tape detail
I love that it's neutral enough to try out my new burgundy tights.  I'm delicately dipping my toe into the bright colorful tights trend with burgundy (I have a navy pair too).  Wild.

Those tights are NOT black!  Promise!
I think I'll use some of the rest of the fabric to make a pair of pants for The Boy, although it is pretty lightweight. I'd love to make Little Sister a dress out of it, but unless I add some purple ruffles and sparkles, I really doubt I could get her to wear it.  I actually am making a little girl Milkmaid skirt for Little Sister too--with a fabulous remnant of teal tweed with little gold threads running through it.  I couldn't finish it last night because I needed to pick up some more bias tape at the store.  It should be done tonight, so look for it soon on a blog near you!  Hopefully the sparkle of the gold threads plus the pockets will be enough to entice Little Sister to wear it.

By the way, I don't know what I was thinking posting my belted pocket dress yesterday.  Who is going to be checking craft blogs on election day? I'm pretty proud of this dress, so if you missed it, take a look!  You can even see my incredibly on-trend navy blue tights.

Monday, November 5, 2012

Belted women's dress--with pockets, of course!

I made a top a while back following the "Most Flattering Shirt Dress" tutorial from Prudent Baby, and I was really happy with the way it turned out.  I immediately made a dress version as well, and I love it!  I did the same kind of contrast "piping" edge using bias tape that I used when making my top--but this time I found a beautiful burgundy silk bias tape for 88 cents a yard.

It's great with a cardigan:

You try looking natural while trying to hide your camera remote.

Or not:
Ah, the pocket!  A perfect place to stash the remote!

But of course I had to add pockets.  I just did a simple in-seam pocket, using a method like this one from BurdaStyle.

When I was about to add the elastic waistline, I realized that I planned to always belt this dress.  And I wanted options.  Sometimes a wide belt, maybe a skinny one; belt it higher on some days than others.  So I decided to skip the elastic waistline and just always use a belt to define the waist. That way I don't have to worry about the belt slipping off and exposing the elastic seams.  Leaving out the waistline eliminates the "most flattering" aspect of this dress, that's for sure--I won't ever be skipping the belt.  Another issue is that without the gathered waistline, you have to be careful to "gather" evenly yourself when adjusting your belt--the fabric can easily bunch under there.  I actually did go back and narrow the waist area a bit once I decided to skip the elastic shirring, which helps with the bunching some.

Most Unflattering Tent Dress
So, on to the belt:


I'll do a tutorial on this belt soon--I had some scrap velvet from the hubby's grandma's stash, so I made a simple D-ring belt, but I put the d-rings in the back and tuck the tail end to the inside.  That way I can slip various decorations on the front.


I started with this bow, and I also made a cluster of fabric flowers, but I'm not quite happy with the way it lays yet.  Once I've figured out some cute variations I'll post a belt tutorial, but in the meantime, I incorporated some of the ideas I found in these belt tutorials:

DIY Bow Belt from Momtastic
Bow Belt Tutorial from Dana's Fashion Blog (this one's in German, but between the photos and the Google Translate feature, I think I got the idea)

I can't wait to make more fun belts!  Oh, and on that subject, I have a question I've been meaning to ask.

Is this allowed?
Pardon the messy closet, we hadn't built any shelves/hanging rods into it yet.
It's just a patterned silk scarf, tied over the top of a t-shirt.  I felt like this outfit needed something, but I don't know if I can get away with pretending my scarf is a belt.  If I just make some more fabric belts, I won't have to worry about it I guess.

Oh, and as long as I'm throwing my belting questions out there--what do you do if you're belting over a cardigan, but you're also wearing pants that require a belt?  I fully wore two belts the other day.  Out in public.  Only one was visible, but still--I kept feeling like I was going to get caught.

So now you know my belting faux-pas.  I'm pretty sure there's a belting learning curve, but I'm getting better at it!

Thursday, November 1, 2012

Salt and Pepper: Easy Couple DIY Costume

So, totally too late to be helpful to anyone, but maybe you're planning early for next year...

This was a really easy DIY costume that was not too embarrassing for my husband to wear.  

We went as Salt and Pepper.


And when I say "went," I mean took the kids trick-or-treating in the neighborhood.  No fancy parties for us. So...I wasn't too motivated to pull out all the stops, you know what I mean?

I made the hats out of a gray button-down shirt that had silver metallic thread running through it.  I pulled it out of a free box a year or so ago and it's been sitting in my "to upcycle" bin.  I used another upcycling bin gray sweater to line it and make the band, because I wanted the band to have stretch and the woven fabric from the shirt was too thin to have structure on its own.  I didn't do any fancy lining though, I just cut out the pieces and laid them on top of each other and sewed the hat together as though they were one piece of fabric.  

The hats also have black dots on top--hard to see in the picture. Sorry!  Oh wait--here you go:


So maybe I'll add a few more dots further down the hats if we wear these costumes again.  You know, so that people can tell they are there when they are not suspended over our heads.

I cut the letters out of felt and used hot glue to stick them to these shirts that we already had.  Both of these shirts were rescued from my upcycling bin--good thing I hadn't started cutting any scraps out of them yet!

To make this costume even easier, you could obviously just buy gray hats and glue the dots on, but I didn't have any gray hats on hand and I wanted to spend zero dollars on this costume.  So, here's how I made the hats:

(Note:  I made the hats out of black fleece first.  Then they bore no resemblance to the tops of salt and pepper shakers.  So I remade them out of the silvery gray fabrics. But the process is the same.)

First, I cut the band to be slightly bigger than my head.  For me, that was a 24 inch band, for the hubby I needed 26 inches.  

I divided that number in quarters and rounded up to figure out how wide to make the four "triangles" that would form the crown.  I made the ones for the 24" band 7 inches wide and the 26" band 7.5 inches wide, but I recommend 7.5 inches for either band length.  Mine was a little snug, and it would add to the rounded look of a shaker top if you had some extra width in the crown for gathering.

The "triangles" were 7 inches tall, and the sides of the triangle curve up slightly to the top.  The hats made from the ones pictured below came out a little pointy, so I made the curve a little wider when I made the gray hats.  More "arch", less "triangle," but still with a slight point at the top.


Sew the crown pieces together, right sides together, along the edges.  I pinned and sewed three of the seams first, like this:


(If you want to sew your dots on rather than glue them, do it now--it's trickier once the four pieces are all the way closed up.)  Then I pinned the last seam together and sewed it to form the crown.

Then fold your band in half lengthwise, wrong sides together, and sew the loop closed.


I just left my raw edges to the inside since it's only a Halloween costume, people, but you can finish yours more nicely if you like.


Next, turn the crown right-side out, and place your wrong-side out brim on the outside of that, with the raw edges all lined up.

Sew around the raw edges, then flip the brim down and you're done!  Then you can glue on your dots to turn the hat into a shaker.  


Or, you can just make this hat out of fleece, skip the dots, and have a comfy warm hat to wear.  No costume necessary.