I wasn't sure if I was going to participate in
Project Run and Play this week--inspiration for the
"Mad for Plaid" theme was slow to strike. But when I was digging through my pile of clothes for upcycling, looking for a sweater to use in the Signature Look challenge next week, I found an old pair of denim capris and a snuggly thrifted vest, and my Mad for Plaid look was born!
I really wanted to go to the pumpkin patch for a photo shoot with this outfit, but since I was cutting it so close timewise (I finished this outfit on Tuesday afternoon), I barely had time to get the outfit photographed and blogged before the Thursday deadline, so we just went with an apple and a hedge around the corner instead of a field trip.
 |
| Right this way! |
First, the vest--I found this years ago at the Goodwill Outlet store and bought it, planning to make it into a pair of snuggly slippers. But it turns out, my boy refuses to wear slippers. He thinks he wants them, but when he actually has some he will never put them on. So the vest just laid in wait. It was originally a handmade item, which I think is so cool. Whoever made it in the first place did a great job! It's lined with snuggly sheepskin-style fleece, and the plaid outer part is woven wool. I used my MADE basic tee pattern to estimate the size, cut it down, and sew it back together. I pulled the lining and exterior apart and sewed them back together separately so the seams would be nicely finished. BUT, when The Boy got home from school and put it on, it was too small! I cut the shoulder seams and used scraps to make the shoulder extensions, deciding to flip the fabric around so that the fleece was on the outside for contrast.
The jeans were a little trickier. I made
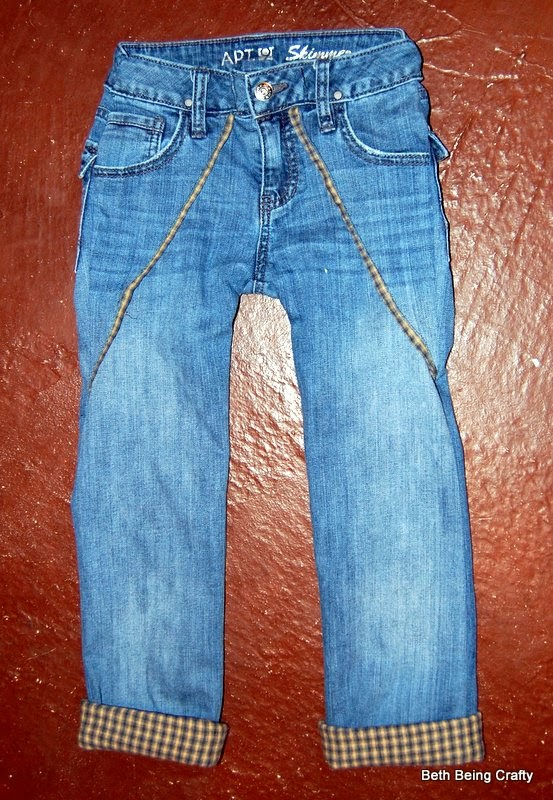
a pair of jeans for the boy out of an old pair of my pants once before, and I was pretty happy with the way they turned out, except that the side seams were SO thick where I sewed the waistband together. I discovered a better way this time, which I will describe below. But the fit was kind of strange in the top--because of pocket placement, I couldn't cut the top of the original pants quite as small as I needed to, so while the legs fit, the fly/pocket area was strangely baggy. I came up with a funky way to counteract that problem, and I am SO happy with the result!

I unpicked the waistband in between the fly and the pocket on both sides in the front and made a diagonal tuck in the denim to pull in the loose parts. I accented with the same plaid flannel (upcycled from an old bathrobe of my dad's) that I used for the cuffs, using it like a piping. I think the diagonal detail is cool looking, I was able to preserve the original pockets, and the jeans fit great now! Upcycling is such a crapshoot sometimes--for every step you save (not having to make a zip fly), you have to invent three other steps to, as Tim Gunn would say, make it work.
 |
| Having edible props makes the shoot go SO much more smoothly! |
 |
| My assistant keeping my model happy |
OK, now for the tutorial on the jeans. Feel free to skip this part! Here's how to size down a pair of ladies jeans.
There are a few things that will make this easier. First of all, you can't make toddler jeans out of ladies pants. At least not if you want to have pockets. These ended up being about a size 5/6 slim, made out of a women's size 8, and that was pushing it. Starting with smaller women's pants or ending with larger kids pants is helpful.
Secondly, if the original pants are super low-rise, you might be able to just take in the side seams. On mine, I had to lower the rise so that the pants didn't go past the kiddo's bellybutton, but
the last pair I did had a low rise so I kept that part as is.
Thirdly, you will want to use a sturdy needle made for jeans. And you'll want to have some backup needles. This stuff is THICK, and you will sometimes be sewing through many layers of it. Although miraculously, for the first time ever when upcycling denim, I DIDN'T break a needle. Go me!
Finally, keep in mind that every upcycle is different. Chances are, you aren't working with the exact same pair of jeans I started with, and even if you were, your kid is probably shaped differently. There is a lot of guess work in upcycling. Don't be too concerned with perfection!
Ready to start?
 |
| Starting point |
You'll want to have a pair of pants that fit your child handy as a reference. This is how mine lined up to the original.
Because I needed to lower the rise, my first step was cutting the jeans in two, front to back.
I marked with pins (tiny yellow ones--can you see them?) where I wanted my waistband to end up, using the kid's jeans as a guide. You could also work with a pants pattern, if you have one, but for upcycling I often just estimate with existing clothes since I'm trying to keep some of the original seams in place and it can be tricky to figure out how to use the pattern pieces exactly.
Once I knew how big I wanted the front waistband to end up, I used a seam ripper (the upcycler's best friend!) to unpick the waistband from the sides. Keep going to about 1/2 inch beyond where you want the waistband to end up.
 |
| Keep unpicking about another 1/2 inch beyond this point! |
Once you've got the waistband opened up on the sides, lay out your kid's jeans on top of the adult jeans and cut out your shape. I like to cut out one side, then fold in half to match up the other side and cut. If you are going to make the visible cuff, add extra length to the bottom.
 |
| Make sure you tuck the interior pockets out of the way when cutting so you con't snip off the bottom of one of them like I did. |
 |
| Front, all cut out. |
Do the same for the back--unpick the sides of the waistband, then cut out the jeans to the size you want. Once both are cut out, then line up the waistband on one of the sides. Unfold and pin, right sides together, so that the outer waistbands from the front and back are lined up as well as the inner waistbands. If it's too hard to unfold and line them up, you might want to unpick the waistband a little further to give you more maneuverability.
God, these pictures are so unhelpful, and it's hard to describe what I mean. Maybe this will help. You are joining the waistband back together so that the seams will be hidden inside the waistband. It's kind of like sewing a neck binding together on a t-shirt, where you unfold the ironed binding strip and sew them together to close up the loop. It's just harder to do on a pair of jeans, because the fabric is so much thicker and stiffer, and there are existing seams to deal with.
Maybe seeing what it should look like when it's done will help--this photo came out better.
 |
| conjoined jeans |
You'll do the same on the other side as well, so the waistband is closed up all the way around.
 |
| Side seams are still open. |
Once the waistband is intact, turn the jeans inside out and sew up the outer side seams. Start with a straight stitch, going slowly over the pockets since those existing seams are thick. Be especially careful if your jeans have any rivets. Reinforce the seam with a zig-zag.
If you are going to attach the flannel cuffs, it might be easier if you do it now, before you sew up the inseam. I didn't do it that way and I wish I had. You can skip down to the part about the cuffs to see what to do here.
Once your side seams are sewn, make sure the top of your side seam is tucked into the waistband, then topstitch the waistband down where you unpicked it. You may need to do a separate seam to topstitch the inside of your waistband, because it can be hard to get them to line up exactly.
 |
| I had to cut off a little of the back pockets for width. |
Almost done! If you're not attaching the flannel cuffs, you can hem the pants now!
 |
| For comparison |
 |
| Not a lot left over! |
Originally I thought I might line the jeans entirely with flannel. But then I thought about how the point of upcycling the jeans was to reuse the fly, pockets, and waistband, and adding a lining would mess with all that. So I decided to just add cuffs to mimic the look of lined pants and add some plaid (since that was the theme, after all!) I cut out two pieces of plaid flannel a smidge wider than my pants, and 4 " tall.
Iron one long end of the flannel over to the wrong side. If you are adding the cuffs before you sew the inseam, don't sew the cuff into a loop as pictured. If you're adding once the pants are done, then fold the cuff right sides together and sew into a loop.
With the jeans right-side out, slip the cuffs onto the bottom of the pant legs, right sides together and with the ironed edge pointing towards the top of the jeans. Line up the raw edges of the flannel and the jeans and sew around.
Turn the jeans wrong-side out and fold the cuffs to the inside of the legs and press.
Using thread that matches your denim in the bobbin, sew the ironed edge of the flannel cuff down. You will see a seam on the outside of your jeans.
 |
| My seam would have been more hidden if I'd had matching bobbin thread! |
Now you can roll up those flannel cuffs!
 |
| Done! |
Now, I would have stopped there if the jeans fit. I don't really have a tutorial for this part, but this is how I added tucks to pull the top part of the jeans in tighter without affecting the legs. I unpicked the waistband, folded the jeans with the strip of accent fabric and pinned in a diagonal, matching as best I could.
This would have been so much easier to do before the side seams were sewn, but I would have had no idea how much to take in. So it had to be an after-the-fact alteration. It was a squeeze to get my machine all the way to the bottom of the seam, but I managed it.
I also cut the waistband on both sides of the zipper and sewed it back together, just like I did on the sides of the jeans, but it was a much tighter fit since I had to squeeze inbetween the zipper and the pocket. In hindsight, it would have been perfect to remove the belt loops and reposition them to hide my seam.
 |
| But it worked out in the end! |
And PHEW! That's the end! Just a reminder to hop over to Project Run and Play to
vote for this week's Mad for Plaid competitors and check out all the
great sewalong submissions (like mine!)
Update--this was my winning look for the Mad for Plaid Sewalong! I can't believe it! SO flattering--and I'm so glad I pulled it together to submit!