It's time for
Project Run and Play again! They are running things a little differently this time around, so you'll be seeing posts from me throughout the year on various inspirations from the online sewing contest, rather than every week for the next month.
UPDATE: I made the top 10! It's time to vote--head on over to
Project Run and Play and choose your favorite (ahem, #4, nudge nudge) between now and Thursday, January 28th!
The first inspiration is a sweet
bubble-style sundress from
Alida Makes. I have actually
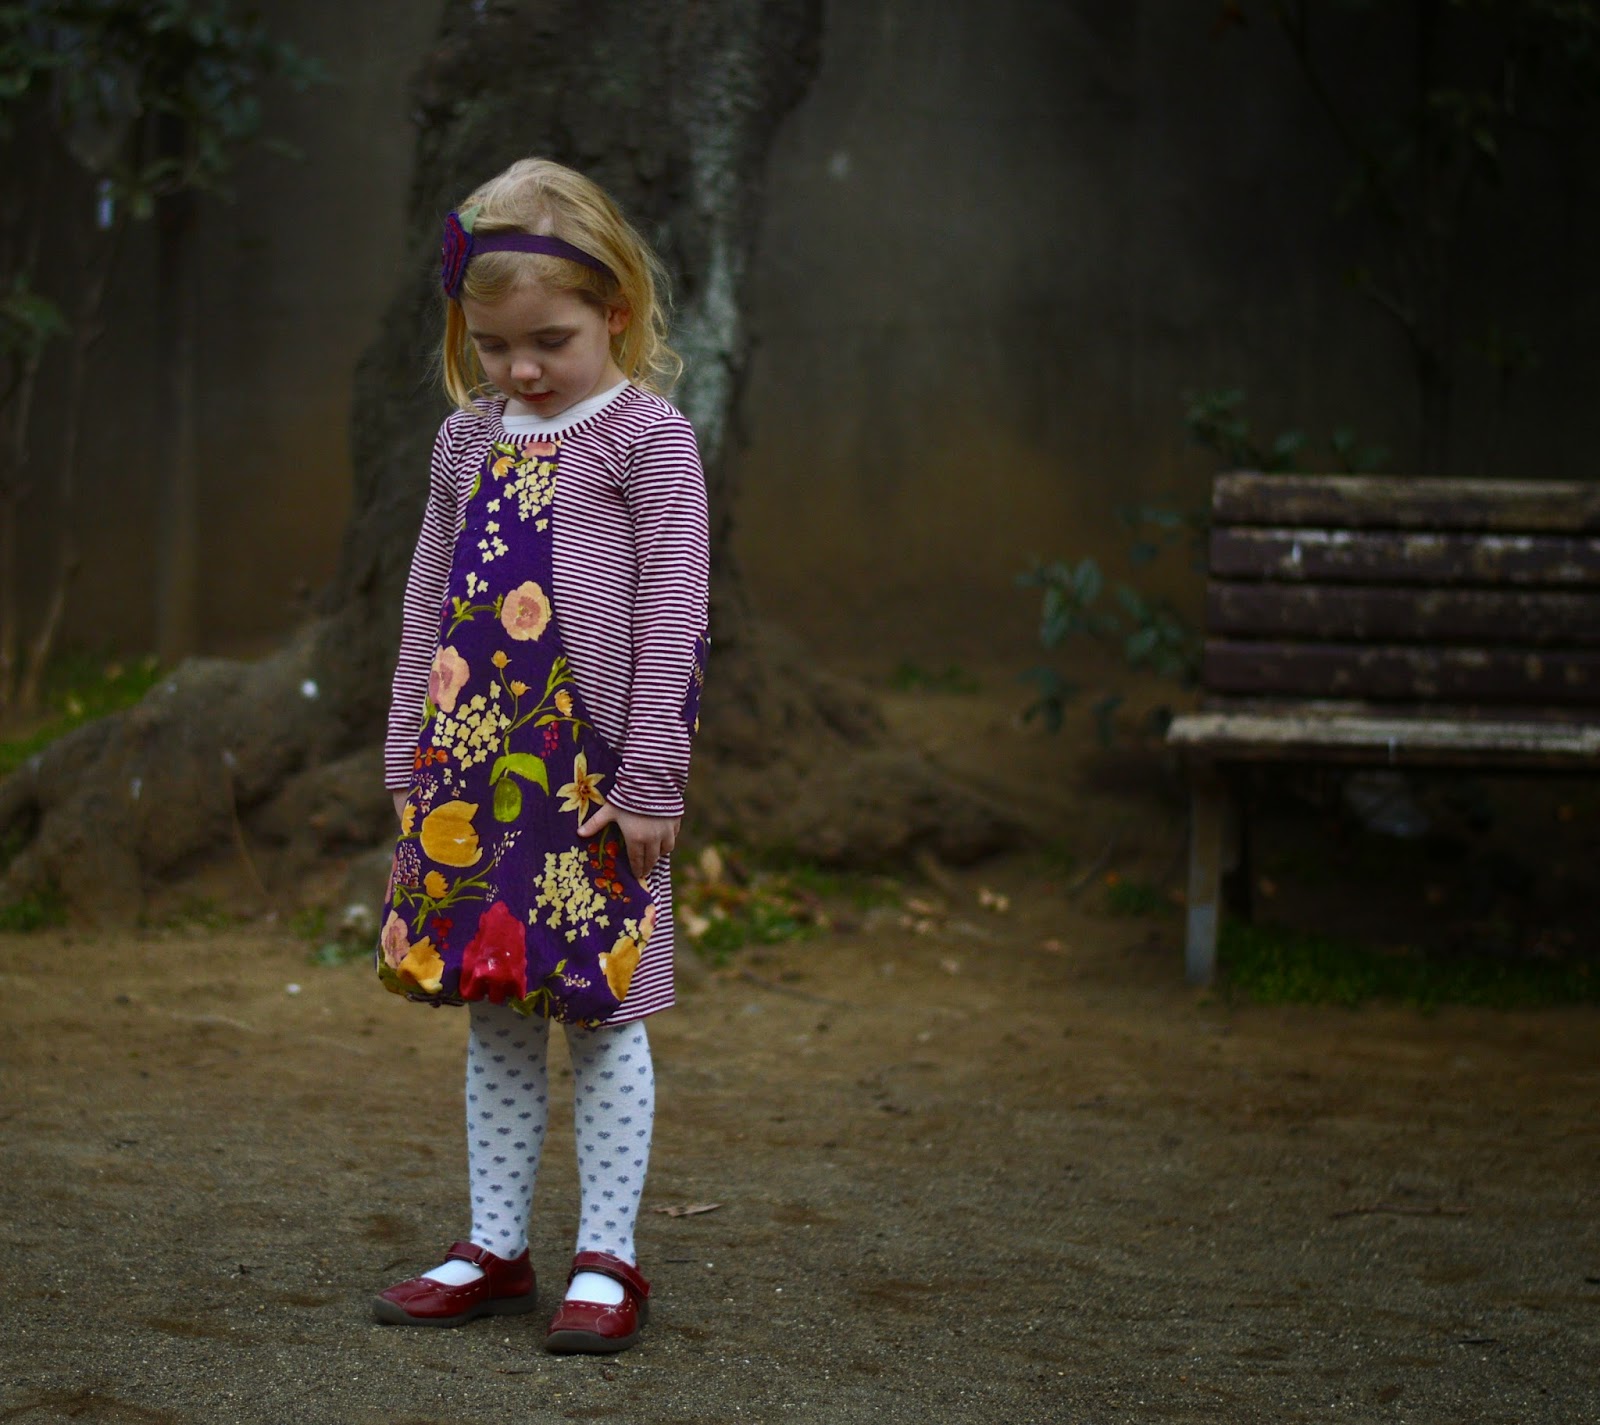
sewn a sundress inspired by this pattern/tutorial once before, for a different season of Project Run and Play! That was the first and only time I had sewn a bubble dress, and I loved the way it turned out. However, I have since learned that Little Sister is not really interested in bubble dresses. She NEVER wears that dress, no matter how much I push it. I had purchased a few knit bubble skirts that were similarly ignored, so I had sort of given up on the bubble idea for her clothes.
But then. I definitely wanted to participate in this month's sew-along! I thought I would sweeten the pot for Little Sister by making this dress out of the lovely nani IRO double gauze that she has had her eye on ever since I brought it home from Fabric Town (Nippori) in Tokyo (for only about $7/meter!!) I sneaked a little of that fabric as an accent when I made a
Plantain Tee for myself, and she immediately recognized it as the fabric she wanted as a dress, although she liked the striped knit I used as well. So now we will be twinsies ;)
I did minimize the bubble effect a little by only bubbling the front of the dress. The back does not have a second layer--both to streamline it for Little Sister's tastes, and to conserve my nani IRO for the
Ruby Top I plan to make out of the rest of it for myself!
I attached the floral in the front using the method Alida describes in her sundress tutorial, and I really like the effect. Using the elastic thread makes it really easy, and the placement of the shirring allows the lining to tuck under nicely. But instead of making the entire dress two layers, I cut the top layer so that I could add a giant kangaroo-style pocket in the front of the dress (another carrot to dangle for Little Sister, who loves wearing dresses with big pockets!). At the end of the post I'll describe how I adapted the front of the dress.
Like I said, the back does not have the top layer--it's just a basic knit dress. But with the important addition of elbow patches! That was a request from Little Sister, who loved the elbow patches on my Plantain Tee.
 |
| I almost guessed right about where her elbows are located! |
I'll have to get pics of us together at some point--I don't know if I'd be twins with her in public, but I do think it's kind of fun to have mother/daughter pieces.
 |
| Snapped a while back when I finished my shirt |
I was excited to finish my dress last night, so we set out to take the pictures after school today, and Little Sister had a last-minute change of heart about being in the mood to be photographed. She made me work hard to get anything resembling a happy child today, so I have to share the few pics I did manage to get!
 |
| Checking how the swing is attached to the bar |
 |
| I will push your swing after you smile! |
 |
| Why is Mom standing on a bench? |
 |
| Let's try writing on the ground with this stick... |
 |
| SO many of the pictures had this face! |
She was much more cheerful when we headed back to her school to pick her brother up after his club this afternoon.
 |
| At least the stick was a hit--she wanted to keep it! |
The final version turned out pretty much as I had imagined--although when I looked back at my sketch, I remembered that when Little Sister had gotten her hands on it, she added a hair bow, so I guess I still have some work to do!
 |
| Joint effort |
As far as putting this dress together, I pretty much just added the floral panel and bubble hem to the front piece of the dress then assembled the rest of it the way I would have put together any knit dress (or tee, for that matter). Here's what I did:
First, I cut out the front and back panels from the knit. I used a
bodice pattern that I liked but cut it so that the pieces would be 20" wide at the bottom. For the length, I used Alida's tutorial as a guideline. Her dress was about 19" long (the 20" piece gets folded over to make the casing) so I cut my dress to hang 18" from the armpit.
 |
| This fabric kind of makes me go cross-eyed if I stare at it for too long! |
 |
| It's a super-soft knit, and I got it for 100 yen/meter (less than a buck!) |
Then I used the front piece as a guide to cut out my floral panel. I cut the same shape for the skirt, marked where the neckline should be, and eyeballed the curve. I even remembered to make it bigger than it would end up, since I'd be folding over the raw edge of the curve.
 |
| I did end up trimming it so it was the same length all the way across! |
Next I pressed and hemmed the curves. It was easy to do without puckering since the gauze has quite a bit of give and it was going around a bias, but if you were using a stiffer fabric you might want to finish the curves with bias tape.
Next I attached the floral panel to the front of the dress along the bottom hem. This part made me stop and think, to make sure the floral was facing the right direction! You want to sew them together with the RIGHT side of the floral laying on the WRONG side of the stripe.
Just like in Alida's tutorial, first I sewed the two fabrics together along the bottom. Then I turned the floral to the front of the dress and pressed the bottom edge, and then I sewed two lines of shirring with elastic thread across the bottom of the knit stripe fabric (like in the tutorial).
But since I was only doing the front piece, my next steps were a little different.
I basted the floral to the front of the dress from the bottom of the pockets to the hem. Then I topstiched the floral onto the dress from the top of the pocket (wherever I wanted that to be), up and around the neckline, and back down the other side.
Next I sewed the front and back of the dress together. I wanted to do french seams on the sides to tuck away all of the gauze edges, so my assembly was a little wonkus. I started with the dress body pieces WRONG sides together, sewed down the side seams, turned it inside out and pressed it, and finished off the french seams. THEN I sewed the shoulder seams together, and attached the sleeves in the round instead of with the dress side seams open.
Of course there was the neckline binding and hemming the sleeves too, but who wants to read about that? There are much more eloquent and easy-to-follow resources for those things if you need them.
Well, I'm excited to be kicking off another round of Project Run and Play, and I think it will be pretty interesting to have a month between new projects! Hopefully I'll be able to participate in most of them!
Don't look so sad, Little Sister--you'll get a new dress next month!