Wednesday, June 29, 2011

My Big Refashion--women's tunic/muu-muu to my favorite baby dress ever!

While I was doing this project, I thought I might attempt to make this post a tutorial.  Therefore, I took a zillion pictures of the process (none of them very good quality, unfortunately), and then when I was just uploading them I realized that I'm not sure I can remember what exactly I was trying to document in each one.  I'll try my best!

Here's a preview of how the dress came out, and if you're impatient (or if you're just not interested in all of the gory details of the process), you can scroll to the very bottom of this post to see the final product.


Also, this tutorial is probably completely useless unless you happen to have a very similar dress to this one that I found on clearance at Target for $5:

The bigger the garment, the more fabric you have to work with!
That's a tip I picked up on someone else's blog (make it and love it, I think?)
Screamin' deal--I don't know if you can see that it was originally $39.99, marked down to $5.04,
but that's the kind of thing that makes me happy.  Even if I am just going to chop it up.
So, it's actually kind of a nice safety net to have for my first tutorial attempt--it's a really specialized tutorial, so probably nobody will ever make it!  But I will try to include things I figured out that would be helpful for other things you'd want to repurpose as well.

So, here goes:

My advice in a project like this is to look at the original garment and figure out which parts of it you want to re-use so that you don't have to make them yourself.  In this particular case, the dress is two contrasting sheer chiffon-type fabrics with a rayon lining.  I knew I wanted to use the ruffles, and I also wanted to refashion the neckline so that I could make use of the clean two-layers-sewn-together finished edge that was already there. I went from there in figuring out my design.

First, I cut the dress into front and back halves, and started working on the front.  I started by removing the contrasting side panels (and I saved every scrap, since I wasn't entirely sure what parts I'd be using).

Then, using one of Little Sister's dresses as a template (another favorite measuring technique of mine, since I'm usually working on this when Little Sister is asleep and therefore unavailable for measurements), I figured out how wide I wanted the square neckline to be.

TIP:  Make sure the dress you're using as a template actually fits your child!  Okay, back to the tutorial.

I wanted the square neckline to be 5 inches across, so I folded the original dress in half and measured two and a half inches away from the strap on either side, then pinned it together and sewed through the neckline so I had a little tube that stood up.  Hmm, that doesn't sound like it makes sense--let's see if a picture helps.
 I then pinned the tube flat and sewed across the top and bottom of it, making a nice little pleat in the center of the neckline, which 1.  added a cute detail, 2. made the neckline the width that I wanted, and 3.  meant that I didn't have to sew two layers of fabric together for the neckline.

The pins are hard to see, but there's one at the center of the neckline, and one
in the center where the dotted fabric meets the floral.  That's where I sewed them flat.
Next I decided how long I wanted the dress to be.  I knew that I wanted to use the part of the fabric where the ruffle was already connected to the floral fabric (so I didn't have to do that), so I'd be cutting out the middle part of the original dress, therefore I wanted a contrasting waistband to join the top and skirt together.

I measured the top part so that I had 8 1/2 inches from neckline to waist, then CUT!  This part totally made me nervous, because all that extra fabric seemed like a safety net.  I knew I had to cut it off eventually, but I put it off as long as I could. I know the saying is "measure twice, cut once,"  but I'm more of the "cut it big the first time, then cut more" school. I then cut the skirt from the bottom of the dress up.  Again, I used another baby dress as a template to figure out length and where I wanted the waistband (I ended up with 8 inches from waistband to hem here, approximately--a little tougher to measure because I wanted the top sheer layer to hang down a little lower than the lining.  The rectangle I cut out for the front of the skirt was 13 1/2 inches wide and 8 inches long.  If I'd had enough fabric all in one piece, I could have cut this out at 27 inches long and had the seam in the back, but when you're repurposing you don't have that option sometimes!

Eek!  Now I have to make it work with just this much fabric! (Oh, and I didn't actually sew the neckline
flat until later, but now that I know that it actually worked I would go ahead and sew it right away.)
Sooooo, next was joining the top and bottom.  I just laid them right-sides together, then because the skirt was wider than the top, I folded in a couple of pleats as I was pinning.  This is flowy fabric, and I wasn't too precise--just eyeballed two places where a little extra fullness looked good to me.  Actually, I did start by pinning the outside edges and center point together to try and keep things symmetrical, now that I think about it.
The backside, with the top and bottom sewn together

The front, sewn together.
Adding the pleat to the already full top gave me a cool blousy effect that I wanted to maximize.  I thought about elasticizing the waistband, but I thought that a flat waistband would show off the blousiness more.  So I just measured a rectangle of the dotted fabric and the lining, sewed it into an inside-out tube, then turned it right-side out.  I tried ironing it, but this fabric doesn't iron.  The good news is, it also doesn't wrinkle, so it should be good packed in a suitcase for our trip to a wedding next week!

TIP:  Make the waistband tube longer than you think you need it to be.  It's much easier to cut off the excess once it's sewn into the seam than it is to add more fabric.  Mine was 12" wide and it was a close call--I would have felt better with a 13-14 inch one and then trimmed off the ends.
inside-out tube

right-side-out tube

Waistband, sewn flat over the seam connecting the top and bottom.
You could totally thread elastic through here if you wanted.  I stitched one row at
the top of the waistband and another at the bottom.
The next step for me was cutting out the armhole shapes.  I knew I wanted the strap to be 1 1/2 inches wide, and I used a dress pattern that I had to cut the curve of the armhole out, but I didn't cut it out low enough because I was looking at the wrong part of the pattern (not taking straps into consideration with armhole placement, or something like that).  In any case, I hadn't realized yet that my arm openings would be too small, so it was a really good thing that I tried the dress on Iris while I still had a chance to remedy this!  Seriously, I would have cried if I finished this thing and it hadn't fit.

SO the moral is, make sure you're putting the armholes in the right place, and double-check, preferably on your baby, if she's not sleeping.

Armholes

Cut too high.  I eventually cut these about 2 inches lower than what you see here.
To finish the armholes, I did a tiny rolled hem on the top layer and lining layer around the armhole.  I left it open (as shown below) so that I could eventually place the flutter sleeve between the two layers and sew them together for a finished edge.
I opened up the two layers to do the rolled hems, then later (after joining the front and back of the dress together) put them back together with the flutter sleeve inbetween and stitched them all together.
So anyway, before I got to the trying-it-on-the-baby phase I had to sew the back together.  I used much the same concept as I did to create the front, except that instead of the pleat detail from the front, I wanted a row of buttons in the back, so I cut the top section into two pieces to remove the extra fabric.


The plan was to use the same method as I did with the sleeves (roll hem then topstitch the two layers together on the button side, do something similar but put elastic loops for the buttonholes in the other side), but then...


It was late at night and I totally went on autopilot and just sewed the two pieces of the top of the back together.  I figured it out soon afterwards and just decided to leave it until I was at a point where I needed the back to open up, then fix it, so please ignore the fact that the back is just sewn together in the next pictures!

I measured the skirt for the back to be the same length as the skirt in the front (good idea, don't you think?)


I sewed these pieces together, just like I did in the front:
Right sides together, the skirt and top of the back side of the dress
 Then I lined up the front and the back so that I could match the armholes and finish them in the same way.  Too bad they didn't fit!
Hard to see, but the front is laying on top of the back here to use as a template.

For the back, I made two tubes of the same length (they were each about 12 inches long) and attached them over the top of the seam just like in the front, except for leaving about 6 inches of seam exposed so I could cinch in the waistband with a bow.

Next step was to sew the front and back together.  I started by lining up the armhole, waistband, and hem.  The tricky part was the hem.  I would have liked to have the lining separate from the outer fabric, but it was so much easier to just sew them together down the side, so that's what I did.  I made sure that the same amount of top fabric was hanging down over the lining on both sides then just stitched up both sides.  At the armholes, I opened the seam and stitched it down so that it wouldn't fray up into the armhole.  I wish I'd waited to do that, since I just had to reopen it all up when it was time to make the armholes the right size, but oh well.
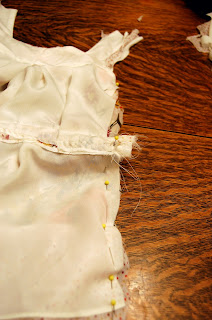
The two sides, pinned together.  The waistband is sticking out slightly past the hem,
which I trimmed after sewing together so that it wouldn't be irritating.
Okay, so this is the point where I decided to try it on Little Sister to see how long I should make the straps.


Oops--no buttons yet!

This one shows how tight this was looking under her arms, so I marked where the
armholes should be with a safety pin before taking it off.  I also marked the strap length, but had
to leave them flapping since I couldn't fit the dress over her head without the buttonhole opening in the back.

After fixing the armholes, I then joined the tops of the shoulders together about halfway, leaving them open at the outer edge so that I could insert the flutter sleeve.  The straps were 7 inches long from neckline to...backline?  What do you call the top of the opening at the back of the dress?  Anyway, at the shoulders on the back of the dress, I folded the fabric under where the seam would be, and did a rolled hem there, so that I could tuck the shoulders from the front of the dress inside to have a finished seam at the top.  I didn't take any pictures of that part, which is unfortunate, because that description was terrible and confusing.  Sorry about that!

For the flutter sleeve, I used scraps of the existing ruffle.  I centered it in the armhole and started pinning the part of the ruffle that was stitched down inbetween the two layers of the armhole.

Here's what it looked like when I put in the flutter sleeve between the two layers.  You can also see the bigger armhole here.


Next I pinned the cut edge of the ruffle the rest of the way around the armpit.  It was just the right size so that the ends met under the armpit--nice!  Then I stitched all around the armhole so that there was a finished edge with the flutter sleeve inbetween the two layers.
You can see the finished sleeves here.  Also the rubber band that will soon come into play!
 Now it was time to reopen the back with my trusty seam ripper.  I did the small rolled hem again on each side, then stitched them back together separately, one side for buttons, one side for the button holes.  To make the button holes, I cut up a hair elastic into three equal pieces, then divided them up evenly along the button placket and sewed them inbetween the two layers of fabric.  I saw the idea of using an old hairband for the button loops on someone's blog tutorial, and now I can't find it for the life of me, but it was an easy way to get colorful button loops for free.


Oh, then I sewed on the buttons--I found three matching vintage shank buttons in my stash that were perfect with the fabric, so on they went!

The only thing I think I didn't mention was tucking in the ends of the tie in the back of the dress and stitching them down, but you would have figured that out on your own I bet.

If you're still with me, here's the payoff--the finished dress!  I'm hoping to update this post later when I am able to get a better picture of the front of the dress.  Little Sister is getting better at standing up all by herself every day, so I should be able to photograph her without standing her next to a chair soon :)

the front

the back
And here it is in action:


A close-up of the pleat detail on the neckline

the best pic I could get of the front
So there you have it!  It was a lot of work, since I was basically figuring everything out as I went, but it was so fun to see it take shape, especially because in the end it came out pretty much exactly how I had pictured it.  Can't wait to do another one (hopefully simpler next time :).
Monday, June 27, 2011

Sewing as a favor

Last week, a friend asked me to hem some pants for her little boy, who needs to look dapper for his uncle's wedding this weekend.  I was happy to oblige--I've been telling my friends that I'm able to take care of little sewing needs for them, so I was glad she took me up on it.  This is really the first time I've done any sewing for anyone other than myself or my kids (headbands/appliqued t-shirts excepted).

You guys, it totally stressed me out!  I'm hesitant to write this because I know this friend reads my blog and I don't want her to feel bad--Rach, don't worry!  It has a happy ending!  But anyway, when I started measuring those cuffs, I was so nervous to cut that fabric off.  And I was so worried about puckering the fabric.  And when I went to press the hems before sewing them, there was no tag in the pants with care instructions, and it just wouldn't press without high heat, at which point it seemed to get a little sticky--yikes!  Every step of the way, I was totally worried about ruining the pants.  For a simple little hem.  And big surprise--they turned out perfectly fine.  I mean, I know how to hem pants!  This is no big deal!  So why am I freaking out?  And did I mention, I totally procrastinated this project too.  She dropped them off with me last Wednesday.  The family gets on a plane for the wedding the day after tomorrow. I just finished them tonight, at about 11:15, breaking my own "no sewing after 11:00" rule. I did have a busy few days and was out of town for the weekend, but there were times I could have done it, and I just couldn't get motivated, because deep down I was worried that I wouldn't do a good job, and little D would be wearing these hacked-up pants for all of the wedding pictures, and I would ruin everything.  Because clearly, the wedding would be ruined if the ring bearer had a crooked hem.

So, in the end, the pants are good.  The legs are the same length, the hem is straight, I even added belt loops using the leftover fabric so that little D can cinch the waist so they don't fall down (I wasn't going to attempt taking in the waist, but this should help).  And now I have more confidence for the next time I get to help someone out who needs a simple sewing favor.  Don't all come knocking down my door at once, please!

belt loops and hem.  Phew, they're fine.  Now I just hope they fit!

Thursday, June 23, 2011

Father's Day Gifts!

I decided to go with edibles for this year's Father's Day gifts for my dad and the father-in-law. These guys can be very hard to shop for, and I know I can never go wrong with a plate of peanut butter cookies.  But I wanted to add something a little personalized.  My mom told me my dad had been wanting a tomato plant, and as luck would have it, Colby's mom had several specially-developed-at-OSU-to-be-blight-resistant varieties ready to go, and she said I could have one.  Done!  Colby's dad had been hinting pretty heavily that he'd like me to try making the rhubarb sauce just like his mom used to make.  No pressure.

I found this recipe, which I chose because it could be used as a topping or just eaten, kind of like applesauce, which is how Colby's dad ate it as a kid.

Here's the link:  rhubarb sauce

And here's the recipe, if you don't feel like clicking over:

3 large servings

Ingredients:

  • 4 cups rhubarb, chopped in 1/2 inch pieces
  • 1/2 cup sugar
  • 2 Tb water (really, that's all!  I was incredulous, but it was fine--the rhubarb's moisture comes out as it cooks.)
Directions:
  • Wash rhubarb and chop into 1/2" pieces.
  •  In a sauce pan, add rhubarb, sugar, and water. Bring to boil over medium heat, stirring frequently. Reduce to a simmer. Simmer until rhubarb is soft and slightly thickened (about 10 minutes), stirring occasionally. If rhubarb is not the desired intensity of color, add only a few drops of red food coloring to enhance the red appearance. (I did not do this, even though my sauce wasn't very red.)
  • Remove from heat and cool. Serve warm or refrigerate and serve.


It was SO EASY.  And I thought it tasted good, although I haven't heard the verdict yet on whether it lives up to Lillie Copeland's sauce.

So, after it was done, I put it in a jar I had around, and then needed to cover up the old label that was on the jar.  I made one out of felt, and used puff paint to write "Rhubarb Sauce."  But then I felt like I couldn't just hand my dad a plain-old tomato plant, so I embroidered the name of the plant variety onto a felt tomato that I tied to the plant.  I don't have a picture of it on the actual plant, but it looked pretty cute.

The embroidery on the tomato could refer to the plant variety, or as my dad preferred to assume,
the identity of the recipient.
Anyway, it made my little gifts feel more personal.

Oh, and in case you were wondering, Colby got a porch swing.  I did not make it, but watch for an upcoming post regarding a cushion for it!  That is all.

Wednesday, June 22, 2011

Getting Things Done!

Man, I've got to stop sewing so much and start blogging about sewing!  I've made two dresses, a bunch of headbands, and appliqued a couple of shirts since the last time I posted here (and bookmarked about a zillion other projects I'm excited to get to), and I promise I will show you what I've been up to soon!  I have been taking pictures, so hopefully I'll be able to finish a post or two while I'm at the beach this weekend....Aaaahhh.

Saturday, June 18, 2011

Making a baby dress fit for a leeeetle bit longer!

As our weather is finally starting to warm up a bit, I've started pulling Little Sister's summer clothes out of the closet.  The dress I pulled out today is one I was so excited to find in the consignment shop (I got it in trade).  It's a size 18 month, and she's 14 months old.  She's never worn it before.  So, I bet you can guess where this is going....it's too small!  Wahhhh!

Luckily, this dress buttons up the front, so I had an idea.  After squeezing her into it for the morning, I took it with me when she went down for her nap to see if I could fix it up. I just couldn't bear only getting one wear out of it!

Cute, right?
So, first I made a tube out of leftover denim from the jeans I tried to recycle for The boy.  Side note--every time I make one of these tubes, I have flashbacks to all of the scrunchies I made in the '80's.  My early craft heritage!  I chose the denim because it was a similar weight to the rest of the dress, and the fabric would blend.  If all went according to plan, the new fabric wouldn't really show, so I didn't need an exact match.  I made the tube the same length as the placket of the dress, and once it was right-side-out, I ironed it flat and ironed the ends in.
Here's the tube, once I'd turned and ironed it.
Another note--I always forget what a pain in the butt it is to turn these tubes inside out, especially when they are skinny.  That took up such a chunk of the time involved in this project!  I've seen some sort of tube-turner thingy--has anybody used one?  Do they work?  Are they expensive?  Are they worth it?  (edited to add--I just looked these babies up on Amazon, and whoa! $60?  I'll suffer with a screwdriver or knitting needle!)  These are the thoughts that go through my head while turning the tube.  Well, that, and the scrunchie memories.

Soooo, back to my dress modification, I then took the buttons off of the dress and pinned the flattened tube to the edge of the button placket so that about 1/2 inch stuck out.  I stitched it down along the edge of the original placket, and on the back side I stitched along the edge of the added strip.

From the back side--the second seam is the one that lines up with the front edge of the original dress.
Extra strip, all added in.
The added strip is a bit shorter than the original dress, top and bottom.
It doesn't stick out that way.
All I had left to do was reattach the buttons, now about 3/4 of an inch further over than they used to be!  Granted, the row of buttons is no longer perfectly centered, but I don't really care.


Another benefit of this alteration is that it will be easy to reverse it if I want to pass this dress on or resell it at a consignment shop.

All done!
I don't have any "before" pics of Little Sister in the snug dress, but I'm sure you're familiar with the look of an oxford shirt buttoned over your lady humps?  Yeah.  That's how the buttons were pulling on my poor little girl.  So here she is now!

A dress that fits!

Thursday, June 16, 2011

Matching (ish) kids shirts!

A while back, I made The Boy a shirt with a guitar on it that I just love.  Lucky for me, he likes it too.  So I decided to applique a guitar onto one of Little Sister's shirts as well.  The colors are totally different, but the design is the same, and I like having some fun continuity in my kids' outfits without being totally "matchy."  I know it's cheesy, but I like it.  What can I say?

So when I got both of them to wear their guitar shirts on the same day, (which totally tickled The Boy--Little Sister, I don't think, cared one way or the other), I wanted to get a photo of the two of them together.  So, this post is less about the shirts and more about documenting my process of getting a photo of my two kids.  Here goes.

As is what usually happens in these situations, the first shot ended up being the best one.
Note to self:  GIVE UP NOW!
Um, is something the matter, there, The Boy?


Oh, hey, Little Sister is almost looking cheerful!  Now let's just get rid of that pacifier...

Perfect!  Boy, you look very nice!  Oh wait, maybe Little Sister needs something.

Gahhh, I give up.  Also, converse hi-tops are the most impractical baby shoes ever.
And yet, I keep dressing her in them, because !!!!  the cute.

So, in case you didn't get a good look, here are the shirts, posing nicely, without children inside of them.

gee-tarz