Thursday, January 23, 2014

Little Leia Costume

Oh, I am so mad at myself!  I meant to finish this blog post last night so that I could upload it into the "Movie Inspired" week for Project Run and Play, and now submissions are closed.  Boo.  But I'm going to post it here anyway, since it's done and everything.


The Boy is having a Star Wars themed (SIXTH!!!) birthday party next weekend, and he already has his Luke Skywalker costume since that's what he wore for Halloween.  Little Sister will be the only girl at the party, so it seemed fitting that she have a Princess Leia costume to wear.  IF I could make it quickly, easily, and cheaply.


Well, check, check, and check!

I know, I know, Leia doesn't have a light saber, let alone a purple one, but give a girl a break!
Light saber is made from a wrapping paper tube covered in fabric from an old sheet and duct tape.
This costume is made from a couple of old t-shirts that I cut up and sewed together using a couple of free peasant top/dress tutorials.  Here are the links I looked at (free peasant dress tutorial from Trendy Treehouse and free peasant top tutorial from indietutes), and for reference, I cut the body panels out at 16" wide at the top, widening to about 18 inches at the bottom, and 25 inches in length.  I used the existing hem of the old t-shirts so I didn't lose any of that length to hemming.

I didn't have quite enough length so I had to sew two t-shirt pieces
together to get one of the panels.  I thought the belt would cover the seam...
maybe we should turn the dress around the other way!

For the sleeves I cut out two rectangles that were 12.5 inches wide and 18 inches long, and ended up cutting them off at an angle to mimic Leia's sleeves.  I didn't hem the sleeves since jersey doesn't fray.


The belt is obviously a defining feature.  It's the only thing I spent money on--I spent $1.35 on a quarter yard of silver vinyl fabric at Joann's.  I already had the velcro I used for the closure in the back on hand.  And Jess from Craftiness is Not Optional was nice enough to provide a free printable template and tutorial that I followed (except that I added a few extra inches to the belt's length).  Oh, and I didn't have any stitch witchery on hand, so I used regular double-stick tape to hold the pieces together while sewing.  It won't dissolve when washed, but since I'm not planning on washing or drying this belt in the machine anyway it should be fine.  I was surprised at how easy the vinyl was to sew--I expected more stickiness or something.  But you do have to be careful because every hole your needle pokes in that stuff is permanent!


And what kind of a Leia costume would this be without the hairdo?  I cut the toes off of a pair of too-small baby socks and made these mini-sock buns!  So crazy cute.

Ready to take on the galaxy!

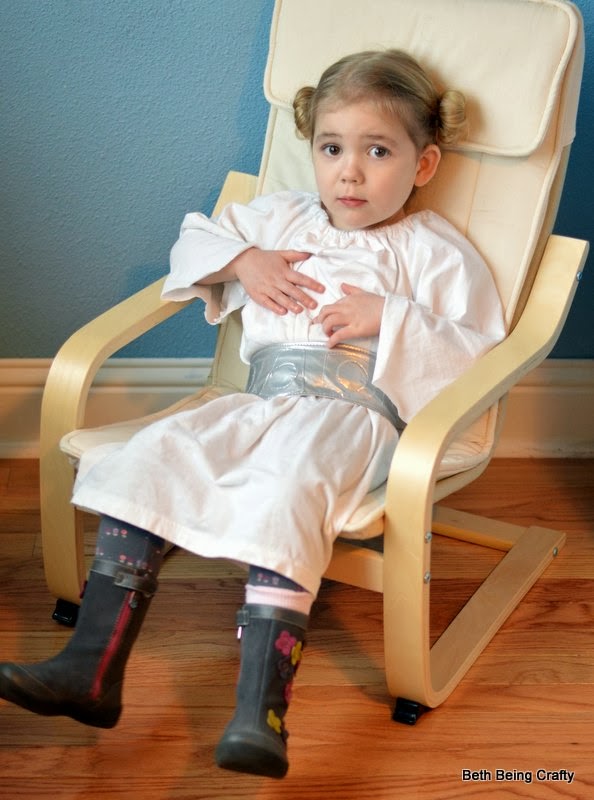
And then have a rest.


Tuesday, January 21, 2014

Upcycled Earwarmer/Cowl

This one is so, so easy.  It literally took me 5 minutes to make, including snapping the selfies of me wearing this item.


I have been growing out my hair, and I like to wear it up, but the mornings are chilly and it messes with my hairstyles if I have to shove a hat on my head to walk the kids to school in the morning.  I know, life is hard. But I've been meaning to make a snuggly headband so I can wear my hair up and still keep my ears warm while walking around outside, and I've finally done it.

I found the remains of a cashmere sleeveless tank in my sweater upcycling pile--I had used the rest to make a pair of armwarmers which I am now wishing I had kept!  I was going to follow this cute tutorial to make one, but then it occurred to me--a turtleneck would probably do the trick.

I cut off the turtleneck, folded the raw edge under and sewed with a zig-zag, and I was done.  And it feels great!

If you didn't want the double-duty of using it around your neck as well, it would be fun to embellish or gather the headband together, but I like the idea of pulling it down around my neck sometimes when I do want a full-on hat on my head.  This would also work well for a kid's cowl!

If you wanted to make something similar but didn't have a turtleneck to work with, any stretchy sweater fabric should do.  Just cut  a rectangle about 20x7, fold in half right-sides together and sew the 7" long ends together, then turn right side out and hem the top AND bottom with a zig-zag stitch.

And guess what?  It fits Little Sister, too!  Dang it, why is it so much cuter on her?

I plonked it on her while we ran errands this afternoon.


Thursday, January 9, 2014

Upcycled Sweater Dress


I've been meaning to make this dress for ages!  I bought the sweater months ago from Goodwill, knowing it would make a darling dress for Little Sister.  I finally got motivated to put it together when the holidays were rolling around and I knew it would be good to have an outfit that was festive AND comfy and not too formal for the types of events we participate in.

For example, visiting Santa.
And I finally got motivated to get pictures taken and blog about this dress when I saw that one of this season's Project Run and Play themes was upcycling!  I actually planned on making this dress back when last season had a "personal style" theme since upcycling is so inherent to most of my sewing projects, but I just ran out of time.  Oh, and by the way--the outfit the boy is wearing in the Santa photo is coincidentally all upcycled too!  He happened to wear these pants and this sweater.  How nice of him!


I used a basic t-shirt bodice pattern I had drawn up based on one of Little Sister's tees, and cut it out to empire length at the top of the sweater, sewing new shoulder seams so I could make the opening smaller while still using the ribbed sweater neckline.


When I drew that pattern originally I made a few sleeve variations--this one uses the puffed sleeve no hem sleeve pattern (since I cut the sleeve from the bottom of the sweater sleeve and didn't need to sew a hem).

The accessorizing is all her--she chose flower hair clips, zig-zag shoes, and purple pin-dot leggings.
I thought it would be cute to dip the waistline down a bit in the back--I like the rounded effect with the fair isle stripes.


Unfortunately (or maybe fortunately, as it turned out), I cut the neckline too small and it was kind of snug over Little Sister's head.  If an item is difficult to get on, she will NOT wear it, so I knew I had to remedy the situation if I wanted her to wear the dress.  So I cut a facing out of t-shirt fabric and made a little elastic loop button opening in the back.  Now it's easy to get on and off, even without undoing the button, and it's a cute little added detail.

As if we needed any extra cuteness.
So there you have it!  My upcycled sweater dress.  Quick, easy, comfy, super cute, and about $5 to make!

I'll update this link with the Project Run and Play sew-along  when it's ready (it's there now)--so fun to see what everyone has been making!

Wednesday, January 1, 2014

Holiday Outfit

This is the outfit that I made for Little Sister to wear on Christmas Eve, when we go to church and have all of our family over to our house for a Dungeness Crab feast and presents.  She refused to wear the blouse though, instead choosing a red turtleneck, which was a pretty cute outfit too, I have to hand it to her, so I let her win.


But eventually I got her to put on the full outfit (on New Years' Eve) so I could snap some photos, and it came together just how I pictured it.


The blouse is the Cece Top from Popolok Designs.  I got to be a pattern tester for this pattern a while back, and I made the sleeveless dress version.  When Little Sister was her auntie's flower girl back in October, I had decided to make another Cece Dress, this time with sleeves, but once I had the top cut out I decided it was too formal for that wedding (I decided to make the Leah dress from Craftiness is not Optional instead).  I finished the peplum top version, with short sleeves and a peter pan collar, in time for the holidays.


The gold-flecked tweed remnant I used to make the skirt had been in my stash for a while, and I just loved how it went with the shimmery gold blouse.

fabrics and trim
 I used the Milkmaid Skirt tutorial from Crafterhours, which I had made for Little Sister once before and the grown-up version for myself several times.  On this one, I added black piping to the pockets and some pretty ribbon trim to the hem (leftover from another skirt I made for myself).

tucked in to show off the skirt
We topped it off with a hand-me-down black cardi, some sparkly tights, the headband I made for the flower girl outfit, and since we weren't actually leaving the house, some black ballet slippers.  Pretty sweet little outfit!

When I made the top, I was trying to keep things easy on myself, so I skipped the invisible zipper, and just did a button-and-loop closure using the same method described in the Leah dress tutorial I had used before.


But this blouse is more fitted than the Leah dress, so it is a bit of a tight squeeze getting it on and off, even though it fits great once it's on her (I cut out the 3T, which is what she's mostly wearing in store-bought right now).  I also cut the peter pan collar smaller than the pattern, and it flips up a little--I might try topstitching it down so it lays a little better.  One of the things I love about this fabric is that the backside is not shimmery, so I can use it for a nice subtle contrast.  I used the backside for the collar and the bias trim that I made.


Once she had it on, she decided she liked it after all, so maybe we'll have some occasion where she can wear it even though it didn't make a holiday appearance this year.


Or maybe not--you never can tell with this girl!