Monday, November 28, 2011

Upcycled Pleat-pocket Jumper!

It's been over a week since my last post!  That hasn't happened for a while!  It's not because I haven't been making stuff though--I've got a backlog to show you, just as soon as I can find time for blogging about it.

This is beginning to be a problem for me (as you will see in this post)--the busier and more inspired I get with crafting, the less I want to stop and take pictures of my projects as I go.  I am trying very hard to make most of my holiday gifts this year, but oh my, I can work so much faster when I don't stop to snap pics!  Something I never realized when following other people's tutorials.  So I say THANK YOU, to all of you who take the time to make such great thorough tutorials!  I'm starting to get an inkling of how tough that is.

I had hoped to have a better holiday picture of the kids to show you by now, but...not yet.  We WILL have a good christmas card this year, dang it!  But for now I am reposting this photo to remind you why we are here:  the holiday jumper, made from an old pair of wide-leg cords.

Oh man, I really don't like this picture.

I started with this old pair of pants.  Actually, they have never even been worn, but I finally realized that I was just not ever going to wear a pair of forest green cords, however much I would have liked to believe I would.  I guess I am just a jeans and brown pants type of girl.


I realized that the wide legs gave me enough fabric to make a jumper, and I'd be able to reuse the hem on the pants.  Nice!  I was inspired by this adorable jumper from Boden:


But you know my girl loves some pockets, so that was going to have to figure in.  I also found some vintage '70's ribbon trim at this awesome craft thrift store in NE Portland called The Knitt'n Kitten that I knew I had to use.


When I bought it, the woman at the register said, "Out of all the trims we have back there, this is the one you picked, huh?"  But I like it anyway.

 So I started by cutting the legs  up the inseam, all the way around.


My typical "use a dress that fits as a template" method was a bit tricky, because I didn't have a dress that fits exactly the way I wanted this jumper to, so I had to cobble it together a bit:

One for length, one for width.
But once I'd cut out one side, I folded it along the center seam  (what used to be the pants' outseam) to cut out the other side.

Front jumper panel
I then used the cut-out front piece as a template for the back, with one important difference:


I left the straps on the back extra long, so I could put in buttonholes.


Here is where I sewed a piece of ribbon trim down the front and didn't take a picture of it.

Then I rolled the front neckline over, cutting little snips every so often so it would lay down flat.

I did it on the back, too.


Oh, and I made pockets using Made By Rae's great pleated pocket tutorial.  Except that I used ribbon instead of fabric for the rectangular top piece of the pocket--worked out great, and less folding/ironing to do.  I just folded the ribbon in half, right sides together, so it made a loop, then stitched a little seam at one end.  I turned it right-side out, ironed it flat, and sewed the top shut, then followed the rest of the tutorial directions.

For attaching the pockets, I waited until I had sewn the front and back panels of the jumper together because I wanted my pockets to be over the side seam.  If they had been only on the front panel of the jumper, I would have sewn them on before sewing the front and back panels together.


Here is where I got really lazy with the picture taking because I was in quite a hurry.  What is not photographed:

-Pinning the front and back panels right-sides together and sewing down the side seams
-While inside out, turning the edges on the arm opening and cutting little slits around the curve, just like on the neckline, then sewing them down
-Sewing on the buttons
-Making the buttonholes

So, after doing all of that, here is the finished product!


I thought I would manage a better picture of it at Thanksgiving, but our girl had an ear infection and four teeth coming in, so she was not really in the mood to model for me.  Here's the best shot.

Double binkies!  She won't leave home without them.
Luckily, the pockets are big enough for multiple binkies.  She LOVES the pockets, and put all kinds of things in them on Thanksgiving that she found around my parents' house.  I don't THINK anything made it home with her though--I'd better check before throwing it in the wash!

Posted by Picasa

Monday, November 21, 2011

A sweater for the boy, upcycled from Grandpa's sweater!

Well actually, it's upcycled from his great-grandpa's merino sweater.  The boy has a nice striped sweater that fits him well, but because I like to buy things with room to grow, this is the same sweater he wore for all holiday/dressy events LAST year.  So I wanted him to have something new to wear this year for all of the holiday pictures and events (that will probably still fit NEXT year, but I'll want him to have something new...) Good thing there's more than one holiday, huh?  He can wear the new stuff for the main events and the old for less-photographed occasions

Side Note:  Apologies in advance to my photographer friends.  Sigh.  I should not be tempted by the free free free photos and sittings and free free free from Major Department Store Photo Studio.  I tried it once, and it was pretty much a nightmare. The flashes freaked out the girl, the boy was super goofy (especially by the end when the little one was finally starting to calm down), waiting for the proofs took FOREVER because they have to put them into all of these cutesy collages that are not part of the FREE FREE FREE but I wouldn't want anyway, etc. But then they sent me an even better offer, including digital images and the rights to them, so I went back.  I thought maybe the second time around the little one wouldn't be so freaked out, and I brought a bag of Christmas props for them to play with in the photos, and...no.  It was worse than before.  The girl cried pretty much THE WHOLE TIME.  The whole time.  From the moment we walked into the studio room, she was like, Oh no, not this again!  Both times that I went, I felt like I was betraying my photographer friends, and both times my results showed me exactly why I should be using professional photographers, but man, that is just not in the budget very often, and bla bla bla, end of tangent, but the point of all this is that I wanted the kids to wear holiday outfits that I had made in the photos.  So here is (believe it or not) the very best picture we wrangled out of that session.  And you can barely see their outfits.  So it's a perfect sneak peek, I guess.

Not making the Christmas Card Cut.
Oh, and I didn't bring that giant pair of balls.  Those were
thoughtfully provided by the photo studio.

I don't make nearly as many things for the boy, you may have noticed.  He has definitely noticed.  So it was fun to tackle this project.  For the most part, it was very easy--just like downsizing a men's t-shirt, as I have done before.  But with one major challenge.


This sweater has a collar.  And I thought it would look funny to have a three-year-old wearing a boy-sized shirt with a man-sized collar.  So, here's how I tackled it.

First step, as always, was to find an appropriate template shirt to use, since I don't make patterns.

Then I chopped off the collar.  I really wasn't sure how I was going to reattach it, but don't fret--I figured out a way!  All by myself!  Without using all of the resources the internets have to offer, because I was in a hurry and just winging it!  I am usually not a spokesperson for reinventing the wheel, but this time, I just went for it.  If you have a link to a better/simpler/faster/more pro way to do this, please let me  know!

Amputated collar.
I left a small (1/4 inch or so) lip of fabric at the top for reattachment--
probably would do more like a half inch next time.
The next step was cutting up the side seams and removing the sleeves.  I was planning to leave the neck opening as-is (it was about the same size as my t-shirt template), so I wanted to keep the shoulder seams intact.

Maybe I should stop here and make a collared merino muscle shirt.
But alas...
Drat!  Foiled again.

There was a hole right next to the neckline.  So, I decided I should probably make the neckhole smaller anyway, since there's the button placket and all, and I trimmed a bit from the front and the back shoulder seams to eliminate the hole and shrink the neckline.  Just a tiny strip from the front and the back, probably a 1/4 inch each (since I'll need to leave seam allowance to sew them back together, and I don't want to make the neckline TOO much smaller).

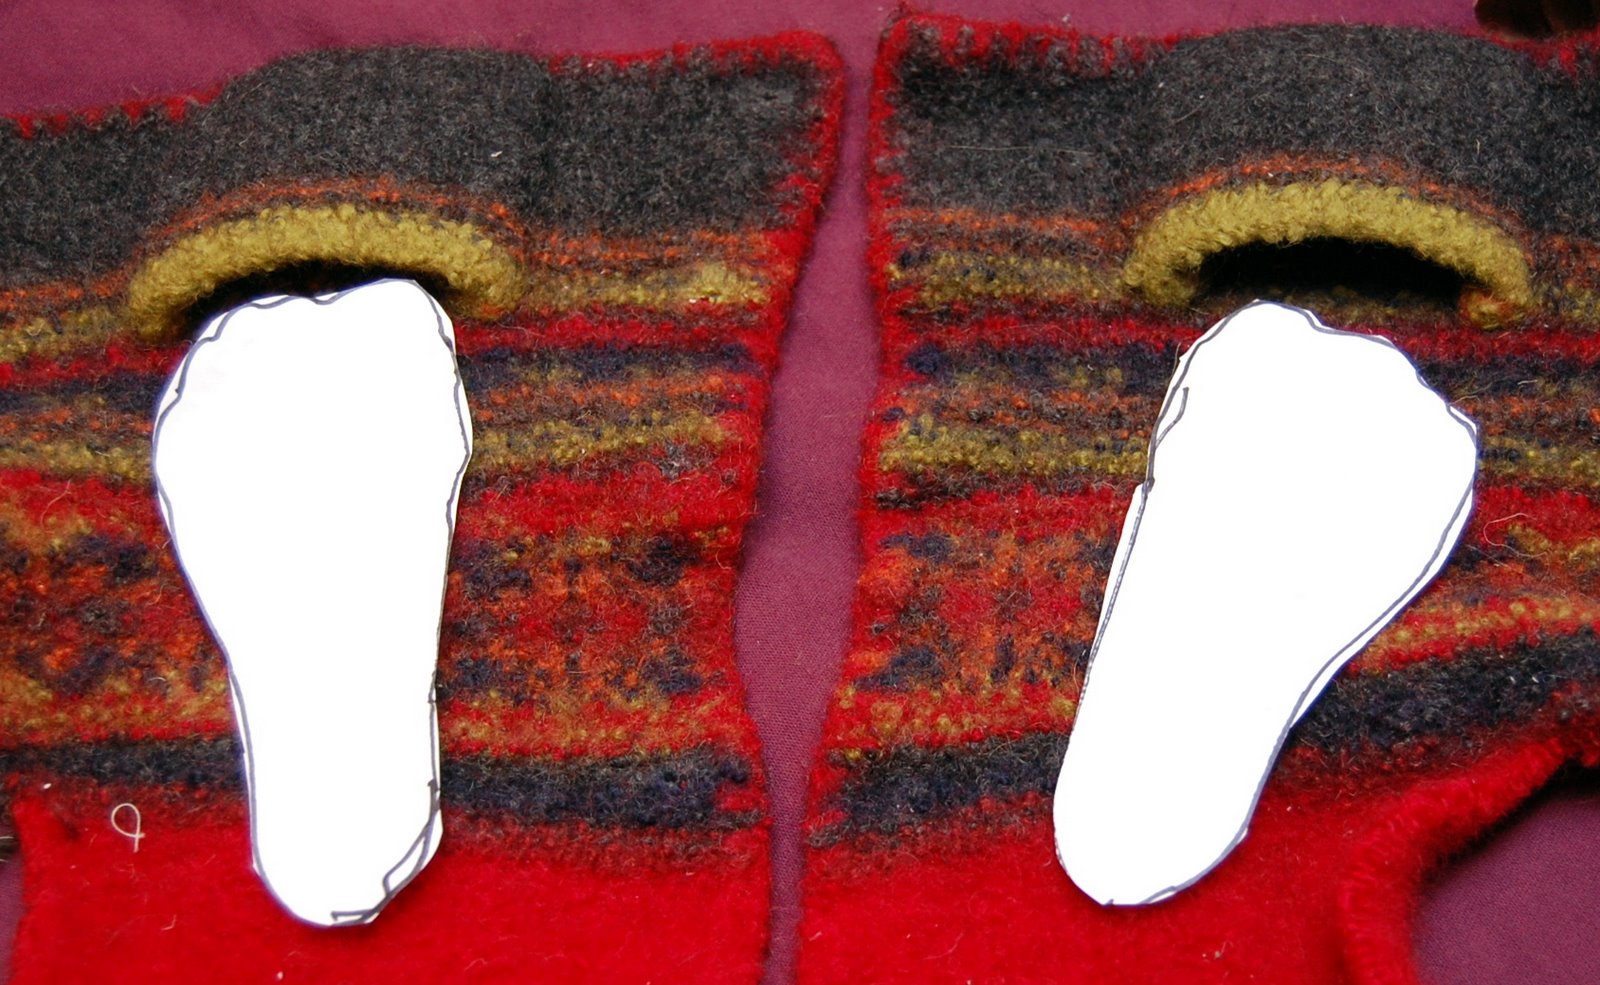
Then I used my template shirt to figure out where to cut the hole for the sleeve.  After doing one side, I folded it in half to cut the other side.


I then used the front piece as a template to cut out the back piece, and pinned them together (right sides together) at the shoulder and side seams, and sewed those together.

Don't sew the armholes shut!
Oh!  I should mention that I decided in the end to put little slits in each side of the bottom of the hem (not sure what that's called).  If you are planning to do that, leave an inch or two of the bottom of your side seams open (depending on how big you want your slit to be).   Mine are pretty tiny--you can look at the bottom of this post to see what I'm talking about.

Now at this point, I could have gone to the sleeves or the collar.  I decided to do the collar because the sleeves would be easy, and I wanted to make sure I could figure out the collar or if I'd have to scrap the whole project.  So first, I had to cut the collar down to size.  I trimmed about a 1/2 inch off the bottom of it (so it wouldn't be so tall), then I lined it up to the neckline of the shirt to figure out how much to cut out of the back of it.  Once I knew where I needed the back seam to be, I folded the collar piece in half (right sides together), sewed a straight seam from top to bottom (backstitching at both ends) and trimmed off the excess.  Now I was ready to pin my smaller collar (hey, that rhymes!) to the new sweater.

Back view--that's the seam in the middle where I shortened the collar.
I flipped the sweater right-side out, then pinned the collar to the neckline.  I placed the collar with the right side facing out (the side that I want to show when I'm done), and lined up the raw edges and pinned all around.

I lined up the front edges on both sides and pinned towards the back, making sure it was even.

Then I sewed those together, using a straight stitch.

Next, (and I hope I can explain this), I flipped the raw edges down towards the inside of the shirt, and sewed them down with another seam.  This is where I wished I'd left myself a little more raw edge at the top of the sweater, because it was hard to sew down such a tiny seam.  But it did work.

See how the pins are holding the sewn-together raw edges down, thereby flipping the collar up?
 That's where I sewed my new seam.
And the collar looks good!  I can make the rest of the shirt now.

The Smaller Collar.
Next was the sleeves.  Using my trusty template t-shirt to determine the length, I cut the sleeves out of the original sleeves, maintaining the original cuff.


Because this sweater had a ribbed cuff at the end of the sleeve, I mimicked the shape of the original sleeve to give it just a leeeetle fullness, rather than copying my template exactly.

I cut out sleeve number one while it was folded in half, cutting out the original sleeve seam.
I opened up the first sleeve and used it as a template to cut out the second sleeve:

Cut sleeve laying on top of the second sleeve
Then turned both inside out, pinned along the seam, and sewed them down.


Next was attaching to the sweater.  I remember the first time I read how to do this, it seemed a little confusing and backwards, but now that I've done it so many times it's really easy.  I should probably just have a link here (or copy and paste what I've written before about inserting sleeves) so I don't have to rewrite it every time, but here we go again:

Raw edges of sleeve and shirt, pinned together.

Turn the body of the shirt inside out.  Then turn your sleeves right-side out.  Insert the first sleeve into the armhole and line up the raw edges of the sleeve and body, and pin.  Then sew together.  Do the same for the other side.  When you pull the sleeves out, they will be attached the right direction, I promise!

Now all I had left was the hem!

Rather than replicating the ribbed hem from the original sweater, I decided to make a small flap in the sides--is this a shirttail hem?  No, that's where there's some sort of curve involved, I think...not sure what to call this type of hem, but since it was a sweater with just straight sides, and my son would most likely NOT be tucking it in, I wanted do something a little different than a typical t-shirt hem.


The only thing different about this than a typical hem is that if you didn't decide to do it ahead of time, you will need to use a seam ripper to remove a bit of the side seam at the bottom, then do a little backstitching at the end of the side seams.  Then hem your sweater in two pieces, the front and the back.

And it's done!
My little boy looks so grown-up in this sweater.  I guess that's what happens when you dress him in old man clothes.

Not without my racecar
Who's looking grown-up now?
(Portraits not taken in a department store.)

Thursday, November 17, 2011

Upcycled socks into mittens!

Kids outgrow socks so fast. Or they wear through the toes and heels. And most of the time, the socks just get thrown out. But every once in a while, there's a pair of socks that are too cute to get rid of. And I thought that the tops of socks would make nice snug little wrist cuffs for some easy fleece mittens. This is a super quick and easy project (as long as you cut out the fleece in the right size. As I did not the first time around.) The mittens you see here are my second attempt at this project.

I started with some navy blue fleece and these two pairs of socks.  You could totally upcycle old fleece pants or something for the mitten part of these, then they'd be totally free!


These were the favorite socks I had saved to figure out something to do with.  I had some plain pairs too, which I will be attaching to patterned fleece for the boy's preschool hat and mitten drive!  When I get around to making some hats, I'll show you those too.  Maybe they'll coordinate--but since I'll be upcycling I don't want to get ahead of myself.

The most difficult part of this project is cutting the mitten part out to the right size.  I had my kids hold their fingers together loosely and stick their thumbs way out, then I traced around their hands loosely.  Then I cut the paper out even bigger.  Then I cut the fleece even bigger than that.  Can you tell that the first time I tried, the mittens came out way too small?

You will need four pieces all together, two for each hand.  I'm lazy, so I cut all of mine out at once, and it worked out just fine.  Do make sure that if your fleece is different on the front and the back, that you cut out two fronts and two backs.

I didn't even pin the fronts and the backs together, since the fleece stays put pretty well; I just ran them through the machine with a tiny seam allowance, since fleece doesn't fray.  Then I trimmed off any wide parts in the seams, flipped them right-side-out and made the kids try them on, then proceeded.


I flipped the mittens back inside out and trimmed the wrist so that the mitten ends right under the palm of the hand.  The sock will form the rest, so you don't want the fleece getting in the way.


Decide how long you want the cuffs on your mittens to be, and cut off the rest of the sock.  I left the stripey ones a little longer because I can fold them over if I want to, and the skiiers a bit shorter since they can't be folded.

Then, leaving your mitten wrong-side out, slip the right-side-out sock inside the mitten so that the raw edges line up.  I didn't pin this either (and I am usually a religious pinner) because the sock fits right inside, and you are going to stretch the sock to fit the mitten anyway.

Ready to put the sock in

See the raw edge poking out?  I just left it that way so you could see it--
when I was ready to sew, I  lined the two raw edges up so they were flush.
It is a bit tricky to sew the cuff on, since the opening for the mitten is most likely smaller than the surface on your machine.  But, it is doable--just make sure you don't accidentally sew part of the opening together while you make your way around!  You could use a zig-zag for a bit more stretch, but I just used a straight stitch and made sure to stretch the fleece and the sock the whole time I was sewing.


And that's it! Turn them right side out, and you're done!


The gloves are really easy to pull on (the boy can easily do it himself), and the snug cuffs make them stay put when you're pulling a coat on over the top of them.

Peekaboo!
Peekaboo was by far the best way to get them to show off my handiwork.
And the snug cuffs also make toddler-glove-removal more difficult.  Which is a bonus, when your toddler likes to pull gloves off every chance she gets.

(insert diabolical laugh here)
Posted by Picasa

Tuesday, November 15, 2011

So in love with these upcycled slippers!

This is a story of how I turned a thrifted sweater into the cutest kids slippers I have ever seen.  Well, the cutest I have ever made, at least.  Well, actually, they're the only kids slippers I have ever made, but squee!  They are so cute.  And I will tell you how I made both kinds!
For the boy, and for the girl.

I had been searching the local Goodwills for a while for the perfect 100% wool sweater to make slippers out of, but I had a really hard time finding one that was interesting (i.e. not a solid color), good for a girl AND a boy since I wanted to make two pairs of slippers out of it, thick enough, AND was the price I wanted to pay (so not $7-$10).  I finally lucked out one day when I found this beauty in the plus-size section.  It was the half-off color of the week, making it $3.50--right in my price range.  So I took it home and felted (fulled?) it in the washing machine.

Help!  The sweater ate my baby!

To do this, I just washed the sweater on hot (my machine only has a hot/cold setting--I intended to take it out after the hot part ended, but I missed it and the entire cycle ended up running).  I dried it in the dryer, and still needed to let it dry on the rack for another day.  This sucker was DENSE.

After it finally dried out, I cut along the seams to make flat pieces.

Hindsight--I wish I would have cut it apart before felting it, because the sleeves
had very permanent creases in them.
Then I took a cheap disposable razor and shaved as much fuzz as I could off of the outside of the sweater.  I didn't shave the inside because I think it makes the slippers extra snuggly.


This step is optional, but I do think (in person, if not in photos) that it makes the felted wool look a little cleaner, and helps the pattern to reappear a bit more.

Can you tell which side has been shaved and which one hasn't?
Yeah, me neither.
Then I had my genius idea.


The boy's feet fit right in the pockets from the front of this cardigan, so I decided to use them as the toes of the slippers.

I traced around his feet as a template for the sole.


Then I stuck the template into the pockets and cut around them, leaving plenty of seam allowance because the fabric is REALLY, REALLY thick.


I first cut one, then used it to cut the same shape for the other.

To make the back of the slipper, I measured around the back of the sole, then cut a piece that was the right length.

Mine measured 10 inches.


Measuring my 10-inch strip for the back of the slipper
I decided to make the strip a little wider right in the middle so it would come up a little higher right at the heel.  The pin is marking the middle in the picture below.

As you can see, precision was not a priority.
I then cut out the second back piece using the first one as a template.


Then I pinned the back pieces to the toe, to hold them in place.


Looking more like shoes!


The backs are still loose at this point
Then I pinned the back piece to the sole all the way around.  I decided that come hell or high water, I was going to use my machine to sew these two pieces together, even though they were SO. THICK.  Have I mentioned how thick they were?  It was a bit of a pain to machine sew, but worth it to me because hand-sewing is my mortal enemy.  Pretty much every felted slipper tutorial I saw when I was trying to figure out how I would make these tells you to hand sew. Well, I am here to tell you that you CAN jam those two thick layers of wool into your machine, and it will work!  And because the felt was so thick, I didn't add any extra padding or layers to the sole, I just used it as-is.

The back piece of the top slipper has been sewn around the sole, but not attached to the toe yet.
The bottom slipper has only been pinned.
After attaching the back to the sole using the machine, I pinned the back piece under the toe.  And then I had to get out my old needle and thread and hand-sew that part together.  Sigh.

I tucked the two ends so that they just barely touched in the middle.


And here they are, on the boy's feet!  They seem to fit, they stay on, all is well with the world.


I was going to crop this one to show you the slippers, but had to leave little sister's foot
in there--she does NOT want to be left out!
 But wait...what have we here?

Another pair of chilly toes

I made a template of the girl's feet too, then used it to cut out these soles.  I left lots of seam allowance and narrowed the sole at the heel a bit.

Again, precision is not my strong suit.
  To make the upper, I just eyeballed the shape shown below--mimicking the shape of the sole, but a little bigger and squared off at the heel.  Then I cut a teardrop shaped opening in each one.

The uppers

I lined up the back edges of the upper and held them right next to eachother and sewed them together using a wide zig-zag stitch on my machine.  As I was only sewing one layer of fabric, this was no problem at all.

back view (also, upside down.  Not sure why I photographed it that way.)

The upper, once you have sewn the back seam.

Next, I pinned the upper to the sole, stretching the upper a bit at the back so it fit all the way around.

Pinned all the way around.
 Then I miraculously remembered to switch my machine back to a straight stitch, and sewed all the way around the edge.  And DONE!


I love these.  I think they are SO CUTE.  And they totally stay on, and they are warm and snuggly, and I want some.  Too bad there's not enough of the sweater left for me.  Isn't that always the way?


You could doll these up with some sort of decorative blanket stitch around the sole and the opening, but I try to avoid hand-sewing at all costs, so for me they are just fine the way they are.

Show me your shoe!
OH!  I almost forgot!  I saw this tip from Prudent Baby on Pinterest for making slippers non-skid.

They are...a little less slippery.
You just use your hot glue gun to draw a pattern on the sole of the slipper to make them a little grippier.  I have also seen puff paint recommended for this purpose.  If the glue gun doesn't seem sticky enough, I may add some puff paint to the design.

Posted by Picasa