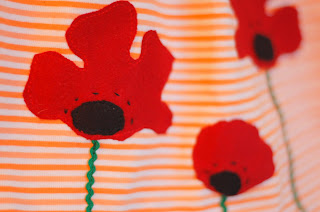
Isn't this appliqued poppy dress (from modcloth, no longer available) just adorable? I loved this idea and had to give it a try, using an old t-shirt (a few of them, actually) and elastic thread to make a dress for Little Sister.
 |
| Inspiration dress to toddler dress! |
If you're interested in how I got there, I'll go through it here. If you just want to see cute pics of Little Sister, hop on down to the bottom of the post! Seriously, you don't want to miss these :)
I started with this shirt that I picked up for $1 at Village Merchants (the consignment store in my neighborhood that I've mentioned before). It had kind of a weird neckline/shape, but I thought I could make it work.
 |
| See how the neckline and hem are rolled over? |
I started by ruching the sleeves using elastic thread, like in the two-minute dress tutorial by Prudent Baby. I sewed two rows of elastic thread on each side of the sleeve seam, all the way from the neckline to the band at the end of the sleeve. For a great, simple lesson on using elastic thread, check out Flossie Teacakes' tutorial here.

What I should have done from the beginning was cut off the neckline that kept rolling over, since t-shirt fabric doesn't fray. The picture below shows the neckline once the "hem" was cut off. I cut this off after sewing my elastic neckline, I recommend doing it first. Anyway, I sewed two rows of elastic thread all the way around the neckline, making sure I was only sewing on a single layer of fabric (the elastic thread won't gather right if you're sewing through the folded-over neckline. I wouldn't have had to worry about that if I'd cut it off in the first place.)
Your shoulder/neckline area will look something like this:
 |
| (this shows the neckline before I cut the extra fabric off) |

At this point, I thought the body of the shirt still looked like it had too much fabric. For reference, I was making approximately a size 2T.

So I just made a curved seam from the sleeve all the way to the hem. I made the sleeve opening a little smaller, then curved it in and back out to the original width at the hemline.

You could use a dress or shirt that fits well to approximate the width you want. I just eyeballed it, because the elastic waist is very forgiving. Then I trimmed the extra fabric from the sides of the dress.
Speaking of which, that elastic waist was the next step. I was delighted to notice that the stripes were lined up at the side seams, so I just decided to follow the stripe around with my elastic.
Unfortunately, the stripe that lined up with my seam was not the same stripe I started with. Um, oops.
 |
| Here's where I started and where I ended up after one trip around the dress on the sewing machine. |
Sooo, I would recommend marking the distance from the hem with pins to make sure your waistband goes straight across. Because I started at an angle, my shirring has a...let's call it "artsy" cris-crossed look in the back. But I did end up with a waistband that's the same width all the way across (wider than I originally planned, but hey, that's the way it goes sometimes).
 |
| The finished waistband |
To make the appliqued skirt, I used scraps from dark red and black t-shirts and green rick-rack. I went through my general process in doing applique in my last post, but I'll give an overview here too:

Looking at my inspiration dress, I drew my poppy shapes on paper and cut them out. I used those to cut out my red t-shirt fabric and iron-on webbing. I just eyeballed the black centers (and cut out iron-on webbing for those too).
Once I had the flowers cut out, I laid them out on the dress then cut the lengths of rick-rack I would need to reach the hem. I tucked the rick-rack under the flower so it would get stuck down when I ironed everything in place.
After everything was stuck together, I used black thread to sew down the centers first, then the red for around the edges of the flowers, then switched to green (sewing slowly) to attach the rick-rack. Then I just threaded a needle to add some black dots for accent. I would have used embroidery thread, but I didn't have black, so I just used regular thread and went over each spot twice.
And that was that! I love the way this applique turned out so much, I will probably do the same image to add some interest to a boring brown and white striped t-shirt of my own. I might use cording instead of rick-rack for the stems, to grow it up a bit. Or maybe I'll embroider them, like on the inspiration dress.

And then, for Little Sister's best photo shoot ever, here's my advice:


No comments:
Post a Comment
Note: Only a member of this blog may post a comment.