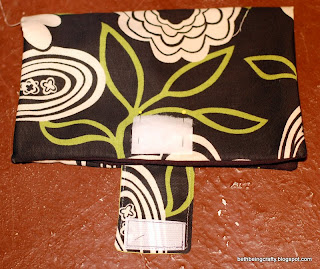
I had a pretty specific idea of the kind of diaper wallet I wanted to make, and I couldn't find an existing tutorial that made it this way--so I decided to document what I was doing so other people could make one. Mine is based on the diaper wallet I've been using for years now (and I only use for spare toddler undies now, NO MORE DIAPERS YAY!)--it's from Skiphop and I bought it at Target when the boy was a baby. I really loved the stretchy pockets on it--the diapers and wipes don't slip out, and there's extra room to tuck a few other things in there when you need to. I wasn't sure at first what I would use to make the pockets--my old Skiphop one has stretchy mesh--but then it came to me, like a vision: old t-shirts! Stretch! Lightweight! Finished edges! Upcycling! It was the perfect thing to use.
I didn't design the bag pictured with the diaper wallet--it's the Wasp Bag, tutorial found here--and I'll give a few notes at the bottom of the post if you're interested in making one. It turns out really cute! Love the handle detail.
So! Diaper wallet! Here's what you'll need:
Exterior and Interior panels, 14 inches x 10.5 inches each. I cut my exterior panel from a thick home-decor fabric; if you use regular quilting cotton you might want to use an interfacing.
2 pocket panels, 10 inches x 7.5 inches each, cut from a t-shirt, with the finished edge on one of the 7.5 inch sides. If you are cutting from fabric, add 3/4 inch to the length so you can fold over and hem.
Exterior and Interior Flap, 3.25 inches x 3.75 inches each. In my case, the "exterior" matched the lining of the main body of the wallet so that it would contrast.
2 4.5 inch pieces of 1/4 inch elastic
About 2 inches of velcro (I used 2 inch wide velcro so it would give more flexibility for closing the wallet more tightly or giving more room when you stuff a ton of things in there!)
Directions:
I started by making the flap. Decide which fabric you will use for the hidden side of the flap, and sew your velcro about 1/2 inch away from one of the 3.25 inch ends.
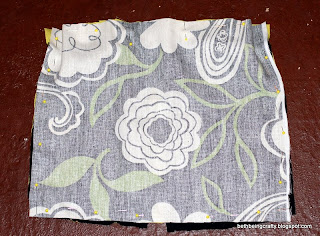
With right sides facing, sew around 3 sides of your two flap pieces. The velcro should be opposite the side of your flap that you left open (so, at the top of the photo below).
Clip the corners and flip your flap right-side out. I love the look of topstitching, so I added topstitching on the three sewn sides. Also, that lets me skip ironing!
Set the flap aside--it's time to make the pockets.
The finished edge of your pocket fabric will go at the top. Finish the left side on one pocket and the right side of the other with a simple folded-under hem. That's so that when you attach your pockets to the lining fabric, the edges of the pocket towards the middle of the diaper wallet will be finished. You don't have to worry about the outer edges at this point because they will be sewn into the outer seam.
Next, attach your elastic across the back side of the top of the pocket. I used the seam from the finished hem as my guide. Pin your elastic at both ends (I pinned mine in the middle too for good measure) and stretch the pocket fabric straight as you sew on the elastic. It will be nicely gathered when you let go!
See, all gathered up!
Now you're going to attach your pockets to the lining fabric. I am pretty lazy, so I only sewed down the inner edges of the pockets, since I would be pinning the bottom and outside edges in when I put the whole thing together. But I have to admit, it would have probably been easier to just sew all three sides of the pockets down so I didn't have to worry so much about catching all my layers when sewing the bag together. Just don't sew the top (gathered) edge closed! And if you sew the outside and bottom edges, do it really close to the edge so that your seam is hidden when you put it all together.
Oh! So I get nervous about placing my velcro panels accurately, so I rarely do it before the bag is assembled. But it really would be easier to do it right now--you will need the other side of your velcro on the exterior of your bag. It should go right in the middle on the short side of your exterior fabric, about 3/4 inch away from the edge of your right-side-up fabric.
Onward--time to put it all together! You have three pieces to assemble--the lining piece with attached pockets, your flap, and the exterior panel.
As I mentioned, I wanted the flap to contrast the main fabric so I flipped it. Your flap should be laying on top of the RIGHT SIDE UP lining/pocket panel, and it should be VELCRO SIDE DOWN with the raw edge lined up with the raw edges of the exterior and lining panels. Then your exterior fabric should lay face-down on top of that.
Pin carefully, especially if you didn't sew down the outsides of your pockets yet. Make sure to stretch out the elastic at the top of your pockets so everything lines up. Leave a hole large enough for your hand (4-5 inches or so) at the TOP of the bag, where there are no pockets or flaps to interfere.
After sewing around, clip your corners and flip it right-side out. You could press it if you want, but if you're topstitching, you can skip that step.
Here's where I attached my velcro after flipping the whole thing right-side-out:
I had to remove the sewing platform (no idea what that's really called, so I'm going with sewing platform) from my machine and fit the pocket over the arm. I got it in there and it worked, but let's just say I'm lucky that the pocket is a stretchy fabric.
Anyway, once your velcro is in place and you're right-side-out, go ahead and topstitch all the way around the outside of the bag. I love topstitching for three reasons:
1. The look is so clean and polished!
2. You get to skip ironing!
3. Maybe the best part--no invisible hand stitching necessary to close up the hole you left for turning--just topstitch it closed!
And there you go! A cute diaper wallet!
And if you've got plenty of time, you could make a bag to match!
I made The Wasp Bag, which is a good size for tucking a diaper wallet inside and still being able to use it as a purse.
I love the cute handle shape on this bag! I am still afraid of zippers (silly, I know, but it also means I never have zippers on hand for this type of project) so I just made ordinary patch pockets for the inside. Note to self (and to you all) though--if (when) I make this bag again, I will cut pattern pieces for the interior that are slightly narrower at the top than the exterior panels. I don't know if you can tell in my picture, but this bag has really cute little pleats where the bag body attaches to the top panels. But for the interior of the bag, using the same pattern pieces and pleats made the inside unneccesarily bulky in my opinion, and did weird things to my pockets. I would make the interior body pieces the same width at the top as the top rectangular panels. This explanation will probably make sense to no one, but at least maybe now I'll remember it for next time!
Little Sister needed to try out the bag:
Although when I showed her the diaper wallet she did seem to understand that this was for the baby and it wasn't too difficult to get her to give it up.
Incidentally, HOW TINY ARE THESE LITTLE BITTY NEWBORN DIAPERS?!?
I found a few of these left over from a gazillion years ago when there must have been a human in our house small enough to fit into one, but if that's true I don't remember it.
 |
| For comparison's sake. |


.JPG)


That was a great tutorial. I totally get it. Thanks for sharing. and I totally understand what you are talking about for the inside of the bag. That makes sense. :)
ReplyDeleteAmie
Phew! Glad it made sense! I get a little overwhelmed with explaining sometimes, since I'm more of a make-it-up-as-you-go kind of girl.
Delete