Showing posts with label refashion. Show all posts

Thursday, September 17, 2015

Upcycled T-Shirt

I got a new serger this weekend, which is so exciting!  It has gotten me in the mood to sew knits, so I went digging through my "to upcycle" box and found a mens t-shirt with a fun red stripe woven into it.

The Boy's turn for something new for school!

I found the original shirt in a free box in my neighborhood ages ago, and I didn't get around to making it into anything before we moved to Tokyo.  Now that we are back, I was ready to cut it up!

The Boy just learned to whistle.  Can't stop won't stop.

I wish I had taken a picture of the shirt before I sewed it into it's new form.  The side seams were SO crooked!  If I had owned that shirt it would have driven me crazy. I had planned on just folding the shirt front and back in half, lining up the side seams, and cutting out my new pieces, but lining up the side seams proved impossible so I cut the original shirt into pieces along all of the seams.


Turned out, because of the steep angle of the side seams, I wasn't able to fit my pattern pieces onto the fabric.  But I didn't give up!  I pulled another old t-shirt out of my upcycle bin and cut some black pieces to fill in the gaps.  I was using the existing hem on the red shirt, but since I had to hem the black patch at the bottom, I decided to use contrasting red thread in my double needle just for fun.

The patches could still use a pressing though!

I also used the ribbed neckband from the black t-shirt to create a new neckband for this shirt, bringing  more of the black into the look.

I think the angled blocks add a fun element to the shirt!  My son said the triangles are cool, so that's all the endorsement I need.


He's so sweet--he wore the shirt to school the next day since I made it for him.  I used one of his existing t-shirts to make the pattern--he's so long and lean in the torso, so I love being able to make shirts that fit right!  Seems like a lot of RTW shirts are too wide and short.

He's wishing he never taught Little Sister about the art of the photobomb.
I'm really looking forward to my shipment of fabric arriving from Japan--there are so many awesome knits in there along with everything else, and now that I've got an awesome serger I am so excited to start turning them into things!  

Sunday, September 21, 2014

Upcycling Challenge!

I really thought I was going to have to sit this week of Project Run and Play out, and I was reeeealllly disappointed, because the theme was Handmedowns (or using old clothes to make something new), and that is what I LOVE to do!  But my piles of clothes saved for upcycling...those did not make the cut for packing across the ocean when we moved to Japan.  And we've only been here four months, so the kids haven't started growing out of the things we brought yet (for the most part).  So I thought that with the limited items available for cutting up, I wasn't going to be able to make anything that either of my kids would actually want to wear.

But I just kept thinking about it!  I did NOT want to miss this week's sewalong! (You can see my Totoro submission from last week's '80s cartoon theme here.)  But I also didn't want to spend time making something that wouldn't get used.  And then...I spotted it.  While helping Little Sister choose her clothes for the next day, I was yet again urging her to choose a dress in her closet that I love, and that she NEVER wants to wear.  It's nothing special, just a sundress I got on clearance at Old Navy, but I have always loved the print and the trim and she has never given it the time of day.  But she does ask me almost every day when choosing clothes for school if she has any skirts with pockets.  And I sadly keep telling her that she doesn't.  BUT!  What if I could take this forlorn, unloved dress and turn it into a SKIRT WITH POCKETS?  I am Super Sewing Mama!  I can DO THAT!


In addition to the dress, I was able to use one of the hubby's dress shirts that doesn't work with his new Tokyo office style.  He had told me I could cut it up earlier, but Little Sister wasn't going to go for a dress made out of navy blue stripes.  However, it was a great accent fabric for the print on the dress, so it became the pockets and waistband!


While I was at it, I thought it would be fun to salvage the sweet bodice detail from the dress.  So I went through my own closet, and pulled out a workout tank with a  really unflattering ruched bodice. Why did I bring that with me?


But as luck would have it, the color coordinated nicely with the print, and there was enough fabric in the lower part of the top (and the bonus sports-bra layer under the ruching) that I was able to make the cute coordinating tee to go with the skirt!


I did have to piece the back of the shirt since I didn't have a big enough panel of the coral knit, and I used one of the straps from the sundress to add a cute detail in the back.  I love that part!


I love these pics of her--not necessarily the best clothing photo shoot, but her dad was just out of frame talking to her and making her laugh, and I love her expressions when she's chatting with Daddy!


The sundress hem was shorter on the sides, and I didn't mess with the hemline at all, so the skirt has that detail as well:


Over the years, I have made so many skirts based on The Milkmaid Skirt tutorial from Crafterhours that I could do it from memory this time!  I made a few changes since I was upcycling, so I'll show you my process here, but if you want to make a skirt like this I really recommend that Crafterhours tutorial.

Here's what I did:

First, I cut the bodice off of the dress, leaving as much length for the skirt as possible.  You could also do this with an old shirt or larger skirt--you don't have to start with a dress!  Then I lined up the side seams and cut a pocket shape out of the front of the skirt on both sides, stopping at the seam.

Ooh, this is a better picture of the hemline trim I wanted to keep intact, too.
Then I used my seam ripper to remove the pocket cut-out the rest of the way.


I laid my pocket fabric underneath and copied the curve I cut from the front of the skirt for my pocket...


Then cut two pieces using that curve for the pocket linings.


Then I cut my two remaining pocket pieces, copying the first pocket shape but leaving out the curve for the opening.  The fabric at the top of these second pocket pieces will show, so keep that in mind if you are using a directional fabric or want to highlight a certain part of your print!

You should have two of each of these shapes (one going in each direction)

Next, pin the right side of the pocket lining with the curve cut out along the curve you cut out of the front of the skirt, on the RIGHT side of the skirt fabric.


Sew along the curve only, and clip the seams.


Then turn the pocket piece to the inside of the skirt and press.


Now, line up your remaining pocket pieces and pin in place along the outer curve of the pocket.  Make sure you've got the right side of the fabric facing DOWN so that the visible part is the right side of the pocket fabric!  Sew along the outer curve of the pocket.  I like to reinforce this with a zig-zag, since I hate getting holes in my pockets!

If you want to know the truth, I usually wait until I GET a hole in my pocket then I FIX it with a reinforced seam.
 Oh, shoot, I didn't get a picture of this step.  But once you've gotten the pockets sewn together, then rip the skirt's existing side seams down far enough to get the side seams of the pockets sandwiched in-between the front and back of the skirt.  Then re-sew those seams from the top of the skirt down, making sure to line them up nicely with the existing side seams.

Ok, back to the pictures.  Next I cut out a waistband.  I used a waistband from a pull-on pant pattern I had laying around, but that Crafterhours tutorial I linked to above will give you some good guidelines on making your waistband.  It will have elastic in it, so it doesn't need to be really exact.   I pressed mine like a piece of double-fold bias tape--in half the long way, then folded the edges in and pressed again.  I think I cut it 3 inches wide and about 25 inches long.


Another step I forgot to photograph--sew a basting stitch across the top of the skirt front inbetween the two pockets, and gather it slightly.  Gather all the way across the back of the skirt.

Then I sewed the waistband into a loop and adjusted the gathers until the skirt was about the same width as the waistband.  I lined up one raw edge of the waistband with the top of the skirt, right sides together, and sewed along the line I pressed into the waistband.


Next I folded my waistband up and over to the inside.  I decided to close it up by making sure I pinned the inside of the waistband just over the stitch line from attaching the outer part of the waistband, then I just topstitched on the outside of the waistband to hold everything together.


Make sure to leave an opening in the back though, so you can insert your elastic!  Once that's in there, close the waistband up!

I just had to show you how she used her pockets today at the park:


Rock collector extraordinaire!  I am glad I reinforced those seams after all!


And for the record, friends--in Project Run and Play, there is no voting for the sew along competitors like me.  There is a panel of judges who select the Sew-along winner.  But there are some spectacular sewing bloggers who were selected to compete each week, and anyone can vote on those!  Check out their submissions here,  and you can see all of the sew-along submissions here!

Monday, February 17, 2014

Best Excuse for Shoe Shopping!

I knew that I'd eventually write about our family's upcoming adventure on my blog, but I didn't think it would come about in such a roundabout way.  But I can't think of any other way to write about the outfit I made for "Inspired by Shoes" week on Project Sewn other than to tell you why my shoe collection is in major overhaul right now.


I love shoes, but I have a hard time investing in the good quality shoes that are going to last me a while and be comfortable AND stylish.  So I usually end up buying lots and lots of cheap, cute, disposable shoes...except that I then hang onto them even when they are worn out and gross.  

Not even all of them.

So, when we decided that we would be moving our family to Tokyo this spring for 1-2 years (how's that for a lot of fanfare for such an announcement?), I knew that I would need to make some big changes in my shoe wardrobe.  I wear a size 9 (sometimes 9.5), which can be hard to find in Japan, so I wanted to get the basics that I would need while I was still in the states, and I wanted to get good stuff.  Which meant getting rid of 15 pairs of worn-out shoes, and buying (so far) 4 new pairs.  Which brings me to my outfit!  

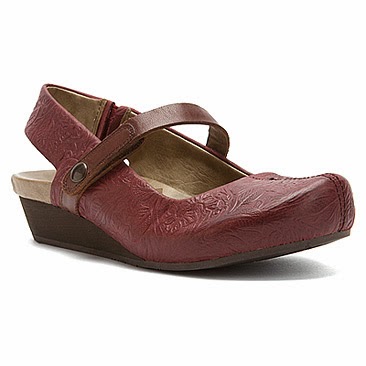
My outfit was inspired by this pair of shoes:

Image from Shoebuy.com, where I bought my pair

Burgundy, with a print (well, sort of) and an open back, and it can be dressed up or down.

Gotta watch my posture--looking a little maternity here!
I knew I wanted to make a casual skirt, because it would go well with the style of the shoe and also show the shoes off.  I made mine out of a much larger skirt that I found at goodwill--a nice, thick mini-striped interlock--and used Adrianna's tutorial from Crafterhours on making a fitted knit pencil skirt.  


This went really quickly, because I made the pattern a while back for my Mad Men-inspired skirt for last season's Project Sewn Era challenge.  I did a hidden elastic waistband this time though and (gasp!!) skipped the pockets for a more streamlined look.


To go with it, I made a top that I had been wanting to make for a while.  I saw this tutorial from Jess at Me Sew Crazy for an open-back knit tunic top, and thought it was so cute!  


Perfect with the pencil skirt or a pair of skinny jeans.  The burgundy and black bird print knit that I bought from Girl Charlee tied in the color of the shoe nicely, and of course the open back of the shirt mimics the slingback of the shoe.

The back looks pretty low, but I can actually wear a regular bra with this.
I made my sleeves more fitted and longer, and I lined the bottom part of the tunic as well as the bodice because the bird print knit was so thin, and I didn't want it to be see-through. I made the lining a tad longer so it would show at the bottom, but I left the sleeves unlined.

To top it off, I had a wrap dress that my friend passed into my upcycling pile that happened to be the same color as the shoes, so I made an open cardigan to tie the outfit together.  It was so simple--I saw the idea here, and adapted mine to my liking by curving the bottom edges and adding an elastic band to the back at the waistline.


I love the way the pieces work together, and that they are so versatile in other outfits!  And they go great with my new shoes!  Think this outfit will work for a mom-on-the-go in Tokyo?


And yes, there will be voting!  Starting Friday and running through Sunday, you can find my image along with all of the other sew-along submissions at the bottom of this page, where you can VOTE FOR ME (I'm lucky number 13)!!

My assistant did a great job of staying out of the photos until I was done :)

Silly girls!

Monday, September 9, 2013

My Popover Sundress Remix: The Reversible Bubble

This week marks the beginning of a fun sewing-for-kids contest known as Project Run & Play.  I've been an observer in the past, and then when the creators added a contest for women's clothing (Project Sewn), I joined the reader sewalongs, and had a great time posting my looks for the challenges and seeing other sewist's take on the same theme.  So when Project Run & Play got going this time around (you can see my dress linked up at the bottom of that link, by the way), I thought I'd give the sewalong a try!  The first week's theme is always doing a new take on a great existing pattern, and this year's pattern remix is the sweet Oliver + S free pattern The Popover Sundress.

I'd had this pattern pinned for a while since I can't resist a freebie.  But when I decided to take on the challenge I struggled.  One of the great things about this pattern to me IS it's simplicity, and a lot of the ideas I tossed around for remixing it just felt overworked to me.  I thought I might have something to upcycle that would inspire me to change up the pattern, and when I started digging around I found this skirt:

Pardon the wrinkly linen.
With this cool embroidered panel detail:


It would totally work perfectly for the Popover Sundress pattern, and give the dress lots of cool details with minimal effort from me.  Problem is, I still hadn't hit on an inspiration for how to remix it.  Oh well, I just decided to go ahead and make a straightforward Popover out of upcycled materials.  And I am so glad I did!
At some point between when that skirt photo was taken and this photo was taken, this fabric was ironed.  I swear.
I made a size 4 for my 3.5 year old daughter, but I cut out the size 6 length because she wants all of her dresses to be long.  And I used the original hem from the skirt so I kept all of that length--nothing folded under for a hem.  The size 4 was a little big on her, and while *I* would have liked the way it looked better at knee-length, she loves it this way. I thought it turned out pretty cool--the skirt was cut on the bias, so the dress is cut that way too, and I like the embroidery that only goes halfway around the back.


I had to reeeally squeeze to get enough fabric for the straps, but that worked out fine too.  And how could I possibly resist making a matching doll dress with that little pattern they included?  So stinking cute.


But, to make a long story even longer, the real reason I'm now writing this post is that in making the first dress, I found my inspiration for a remix!  I loved how nicely finished this pattern is on the inside--so much that I thought it would be a perfect pattern to make reversible.  My wheels started turning, and I remembered this post that I had seen on Alida Makes for a bubble sundress.  I love the look of bubble dresses, but most have some sort of strange inner workings to create the effect that I can't get my head around.  When I read Alida's tutorial, it seemed so simple!  So I adapted her idea slightly to make a reversible bubble version of the Popover sundress.

I am totally in love with the results!

When can I draw on the chalkboard?

Options
What's that you say?  Look at the camera?  But I'm drawing!
Oh, I guess I might as well show you the back:
Artsy

No piping on the back side--helped with reversibility.

A few tips on how I adapted the pattern:

-When cutting out my pattern, I mixed sizing a little.  My dress pattern was a size 3 width at the top, a size 4 length, but I angled out to a size 6 width at the bottom (so a little extra length for making the bubble, and some extra width for blousiness).  For reference, my daughter is 3.5 years old and a smidge on the small side, and I am thrilled with the way the fit came out.

-I cut two dress panels out of fabric A and two out of fabric B.  For the bodice panel, I still only cut two like in the original pattern.  I used premade bias tape for the straps and added piping under the bodice panels.

-When I started sewing, I referred to the Alida Makes bubble sundress tutorial for how to assemble my pieces.  I made some adaptations here too to make it more reversible--namely I cut a 29" piece of baby elastic to make my bubble (it was just under 3/4ths of the total width of the skirt) and sewed it right to the seam where I joined my two fabrics together (on the wrong side of the fabric where the seam allowances are pressed open)--instead of sewing with elastic thread on the lining panel.

-Then, when I sewed the tops of the two fabrics together, I first pinned the bodice panels into place so they would already be sewn in and nicely finished.  You could totally just sew across the tops of the two panels to join them, following the curves for the armholes and everything, and just finish the top of the sundress exactly as the Oliver + S pattern directions say though.  In retrospect, that probably would have been the way to go--I ended up with lots of finagling to do with the straps and seam-ripping tiny holes to insert them and whatnot.

-After turning the dress right-side out, I jumped back to the Oliver + S pattern to finish the top.  Like I said, I had already inserted my bodice panel, but that ended up being more of a pain than it was worth to have the finished armpits without bias tape--I would say to just follow the directions in the Popover pattern to finish the top, but with one caveat--make sure you use thread that will be disguised on your second fabric when attaching the bodice (rather than matching the bodice fabric).

This shows the back of the dress--see that tiny black seam about 1/2 inch below the red bodice? Yeah, I didn't think so :)
-To help both sides look equally finished, I used my zipper foot and added piping to what would be the front of each bodice.  I made the front of one fabric be the back of the other when reversed, so that there would always be the nice finished piping look on the front, and the subtle seam just under the join of the bodice to the rest of the dress on the back.

Piping pinned into place--one "front" is currently on the outside, the other "front" is on the inside.

I ended up opening up the seam just under the bodice enough to slip the bias tape inside, but I think it would have looked nicer to just have the bias tape all the way around the armpit.  I was distracted by how the reversible dress made for a nice finished armhole.

I can't wait to head over to this week's challenge page now that the link-up is open--check out my reversible bubble dress as well as loads of other fantastic takes on this sweet sundress on the Project Run & Play Season 7 Pattern Remix post!

For now this is just a few tips, but I could probably do a more cohesive tutorial on how to make this dress if there is any interest for that.  Let me know if you have any questions about the process or if you'd like me to do it a tutorial!