Showing posts with label repurpose. Show all posts

Thursday, September 17, 2015

Upcycled T-Shirt

I got a new serger this weekend, which is so exciting!  It has gotten me in the mood to sew knits, so I went digging through my "to upcycle" box and found a mens t-shirt with a fun red stripe woven into it.

The Boy's turn for something new for school!

I found the original shirt in a free box in my neighborhood ages ago, and I didn't get around to making it into anything before we moved to Tokyo.  Now that we are back, I was ready to cut it up!

The Boy just learned to whistle.  Can't stop won't stop.

I wish I had taken a picture of the shirt before I sewed it into it's new form.  The side seams were SO crooked!  If I had owned that shirt it would have driven me crazy. I had planned on just folding the shirt front and back in half, lining up the side seams, and cutting out my new pieces, but lining up the side seams proved impossible so I cut the original shirt into pieces along all of the seams.


Turned out, because of the steep angle of the side seams, I wasn't able to fit my pattern pieces onto the fabric.  But I didn't give up!  I pulled another old t-shirt out of my upcycle bin and cut some black pieces to fill in the gaps.  I was using the existing hem on the red shirt, but since I had to hem the black patch at the bottom, I decided to use contrasting red thread in my double needle just for fun.

The patches could still use a pressing though!

I also used the ribbed neckband from the black t-shirt to create a new neckband for this shirt, bringing  more of the black into the look.

I think the angled blocks add a fun element to the shirt!  My son said the triangles are cool, so that's all the endorsement I need.


He's so sweet--he wore the shirt to school the next day since I made it for him.  I used one of his existing t-shirts to make the pattern--he's so long and lean in the torso, so I love being able to make shirts that fit right!  Seems like a lot of RTW shirts are too wide and short.

He's wishing he never taught Little Sister about the art of the photobomb.
I'm really looking forward to my shipment of fabric arriving from Japan--there are so many awesome knits in there along with everything else, and now that I've got an awesome serger I am so excited to start turning them into things!  

Thursday, April 23, 2015

Beach Sling Bag

Guess what?  In less than 2 weeks we are headed to Hawaii on vacation!  This month's Project Run and Play theme of a reversible sling bag helped me decide that the kids would definitely need beach bags for this trip.


I followed the free Reversible Sling Bag pattern from SugarBee Crafts pretty closely, only making a few adaptations in order to incorporate the materials that I was using--reusable shopping bags and towels from the 100Y store!  I spent 400 yen on materials, which is a little over $3.  If I'd been in the states, I would have looked for some thrifted towels that were a little more substantial, but this did the trick.

The supplies

The microfiber towel I used for the contrast on the lining had stripes, but I liked this description better ;)

"A soft towel with the feeling that the touch is very sufficient."
I have been wanting to make a towel-lined bag for a long time, and since this easy bag consists of an outer and a lining, I went for it.

I'm experimenting with putting in a jump so that more posts appear on my main page--read the rest after you click, and let me know if you love/hate having a jump!

Sunday, September 21, 2014

Upcycling Challenge!

I really thought I was going to have to sit this week of Project Run and Play out, and I was reeeealllly disappointed, because the theme was Handmedowns (or using old clothes to make something new), and that is what I LOVE to do!  But my piles of clothes saved for upcycling...those did not make the cut for packing across the ocean when we moved to Japan.  And we've only been here four months, so the kids haven't started growing out of the things we brought yet (for the most part).  So I thought that with the limited items available for cutting up, I wasn't going to be able to make anything that either of my kids would actually want to wear.

But I just kept thinking about it!  I did NOT want to miss this week's sewalong! (You can see my Totoro submission from last week's '80s cartoon theme here.)  But I also didn't want to spend time making something that wouldn't get used.  And then...I spotted it.  While helping Little Sister choose her clothes for the next day, I was yet again urging her to choose a dress in her closet that I love, and that she NEVER wants to wear.  It's nothing special, just a sundress I got on clearance at Old Navy, but I have always loved the print and the trim and she has never given it the time of day.  But she does ask me almost every day when choosing clothes for school if she has any skirts with pockets.  And I sadly keep telling her that she doesn't.  BUT!  What if I could take this forlorn, unloved dress and turn it into a SKIRT WITH POCKETS?  I am Super Sewing Mama!  I can DO THAT!


In addition to the dress, I was able to use one of the hubby's dress shirts that doesn't work with his new Tokyo office style.  He had told me I could cut it up earlier, but Little Sister wasn't going to go for a dress made out of navy blue stripes.  However, it was a great accent fabric for the print on the dress, so it became the pockets and waistband!


While I was at it, I thought it would be fun to salvage the sweet bodice detail from the dress.  So I went through my own closet, and pulled out a workout tank with a  really unflattering ruched bodice. Why did I bring that with me?


But as luck would have it, the color coordinated nicely with the print, and there was enough fabric in the lower part of the top (and the bonus sports-bra layer under the ruching) that I was able to make the cute coordinating tee to go with the skirt!


I did have to piece the back of the shirt since I didn't have a big enough panel of the coral knit, and I used one of the straps from the sundress to add a cute detail in the back.  I love that part!


I love these pics of her--not necessarily the best clothing photo shoot, but her dad was just out of frame talking to her and making her laugh, and I love her expressions when she's chatting with Daddy!


The sundress hem was shorter on the sides, and I didn't mess with the hemline at all, so the skirt has that detail as well:


Over the years, I have made so many skirts based on The Milkmaid Skirt tutorial from Crafterhours that I could do it from memory this time!  I made a few changes since I was upcycling, so I'll show you my process here, but if you want to make a skirt like this I really recommend that Crafterhours tutorial.

Here's what I did:

First, I cut the bodice off of the dress, leaving as much length for the skirt as possible.  You could also do this with an old shirt or larger skirt--you don't have to start with a dress!  Then I lined up the side seams and cut a pocket shape out of the front of the skirt on both sides, stopping at the seam.

Ooh, this is a better picture of the hemline trim I wanted to keep intact, too.
Then I used my seam ripper to remove the pocket cut-out the rest of the way.


I laid my pocket fabric underneath and copied the curve I cut from the front of the skirt for my pocket...


Then cut two pieces using that curve for the pocket linings.


Then I cut my two remaining pocket pieces, copying the first pocket shape but leaving out the curve for the opening.  The fabric at the top of these second pocket pieces will show, so keep that in mind if you are using a directional fabric or want to highlight a certain part of your print!

You should have two of each of these shapes (one going in each direction)

Next, pin the right side of the pocket lining with the curve cut out along the curve you cut out of the front of the skirt, on the RIGHT side of the skirt fabric.


Sew along the curve only, and clip the seams.


Then turn the pocket piece to the inside of the skirt and press.


Now, line up your remaining pocket pieces and pin in place along the outer curve of the pocket.  Make sure you've got the right side of the fabric facing DOWN so that the visible part is the right side of the pocket fabric!  Sew along the outer curve of the pocket.  I like to reinforce this with a zig-zag, since I hate getting holes in my pockets!

If you want to know the truth, I usually wait until I GET a hole in my pocket then I FIX it with a reinforced seam.
 Oh, shoot, I didn't get a picture of this step.  But once you've gotten the pockets sewn together, then rip the skirt's existing side seams down far enough to get the side seams of the pockets sandwiched in-between the front and back of the skirt.  Then re-sew those seams from the top of the skirt down, making sure to line them up nicely with the existing side seams.

Ok, back to the pictures.  Next I cut out a waistband.  I used a waistband from a pull-on pant pattern I had laying around, but that Crafterhours tutorial I linked to above will give you some good guidelines on making your waistband.  It will have elastic in it, so it doesn't need to be really exact.   I pressed mine like a piece of double-fold bias tape--in half the long way, then folded the edges in and pressed again.  I think I cut it 3 inches wide and about 25 inches long.


Another step I forgot to photograph--sew a basting stitch across the top of the skirt front inbetween the two pockets, and gather it slightly.  Gather all the way across the back of the skirt.

Then I sewed the waistband into a loop and adjusted the gathers until the skirt was about the same width as the waistband.  I lined up one raw edge of the waistband with the top of the skirt, right sides together, and sewed along the line I pressed into the waistband.


Next I folded my waistband up and over to the inside.  I decided to close it up by making sure I pinned the inside of the waistband just over the stitch line from attaching the outer part of the waistband, then I just topstitched on the outside of the waistband to hold everything together.


Make sure to leave an opening in the back though, so you can insert your elastic!  Once that's in there, close the waistband up!

I just had to show you how she used her pockets today at the park:


Rock collector extraordinaire!  I am glad I reinforced those seams after all!


And for the record, friends--in Project Run and Play, there is no voting for the sew along competitors like me.  There is a panel of judges who select the Sew-along winner.  But there are some spectacular sewing bloggers who were selected to compete each week, and anyone can vote on those!  Check out their submissions here,  and you can see all of the sew-along submissions here!

Monday, May 5, 2014

Upcycled Twirly Dress!

I've just finished what will be my last sewing project before we move to Tokyo!  Well, probably.  Most likely.  Maybe some last-minute alterations or repairs.  But I have packed up my fabric, and there just isn't any more time!  I have several other projects that I have finished but not blogged about, so you may see a few more posts before we leave in a few weeks, but I will not be sewing anything new now that this dress is done.


Little Sister wore this dress three days in a row after I completed it, so I would say she likes it.  And that's saying a lot these days, because girlfriend is PICKY.  I had a feeling, though, that she would be a sucker for this full twirly skirt.  I mean, who wouldn't be?


I have been wanting to make her something like this for a while, but I can't bring myself to buy enough fabric to make a skirt this full.  Especially in a  nice drapey knit like this--that would be so expensive!  But as I've been sorting and packing for our move, I came across this dress in my closet.  I think I shrunk it, because it's way shorter on me than I am comfortable with but I am certain this was not always the case.  I used to LOVE this dress, which is why I still have it--I couldn't bear to part with it.

The last time I wore it--at a VERY fun party for a VERY dear friend
But cutting it down for Little Sister--now I could live with that.


I kept all of the fullness in the skirt--the knit is lightweight, so it's not too heavy even with all that fabric.  I cut the skirt right at the top of the existing pockets (this was the first dress I owned with side-seam pockets--what a game-changer!) so that Sis could have pockets in her dress too.

Back view, with pockets deployed

Then I made the necessary modifications to bodice, straps, etc, added elastic to the waistband on the inside, and voila--twirly fancy little girl heaven!


I love that it's long enough so that she doesn't risk exposing herself when she twirls, but short enough that she doesn't trip over it.  And I think the sizing is forgiving enough that it should last her a while!  Should be a winner.

Monday, April 7, 2014

DIY Elsa and Anna Barbie Clothes

Try not to be too jealous--I actually got my hands on an Elsa doll, at a reasonable price, and in time for my daughter's 4th birthday!  After a few weeks of calling the Disney store and checking Amazon, this just happened to be on the shelf at Target for $25:

Luckily we didn't have an Anna doll yet either.

Problem is...no signature sparkly Elsa dress.  But this presented a fun challenge for me!  Because I KNEW that the outfit would be an issue, I would have to make a dress for this doll myself.  And while I was at it, I might as well make Anna's outfit more like the movie too, right?


And what do you know--as soon as she opened her present, she asked if Elsa had another dress.  And then, lo and behold, she pulled the handmade one out of the bag and oohed and aaahed!  So satisfying.

Craftiness is not Optional has a great tutorial for a fancy Barbie dress that I was able to modify into Elsa's look pretty easily.  I had a too-small Cinderella dress-up costume that I could cut up (so the color isn't exactly right, but close enough) so I didn't have to buy any fabrics!
This is the exact dress--couldn't find any pictures of it out of the box!  But I used the darker blue with sparkly swirls for the bodice, and the light blue for the skirt.  One sleeve was enough for the band at the top and sleeves, and I needed both of the sheer "poofs" from the hips of the dress to make Elsa's cape.  

The modifications that I made to the tutorial are pretty simple (and obvious):

1.  When attaching the band at the shoulders, I pulled it down in the center to create the sweetheart neckline.  Then I just folded the blue fabric and stitched it down on the wrong side so that it didn't show.


2.  I made two small rectangles for sleeves.  I sewed the top of the sleeves right on to the shoulder band, then sewed them closed and turned them right side out.


3.  I made the cape in two pieces.  It's serged then sewn directly to the dress--I attached it under the arms (on the blue fabric--it doesn't actually touch the sleeves) and across to the velcro closure.


Then I sewed it down on each side of the velcro, and underneath the closure I sewed the two sides of the cape together.  I didn't have to finish the edges since I cut it from the existing Cinderella costume.


Anna's cape was really fun and SUPER easy!  Sorry I didn't take any pictures--I was in a hurry to get this all done for the girl's birthday present.  All the photos below are of the finished product.  I made it from a piece of knit jersey I had in my stash.  

1.  I cut an oval shape out of a piece of printer paper for my pattern, then pinned it to my fabric and cut it out using pinking shears (to give it some detail--the knit won't fray even if you use regular scissors).


2.  I decided where I wanted my cape to fold over; about 2" from the top of the oval, and marked both sides with pins.


3.  Using a double needle and two colors of top thread, I sewed a scalloped design around first the top part of the cape, then flipped it over and sewed the rest of the way around.  This is not necessary but it mimics the design on Anna's cape in the movie in a really easy way.


4.  Cut a piece of thin elastic so that it will reach across the top of your cape (where you marked with pins) when stretched all the way out.  Mine was about 4" long.

5.  Sew the piece of elastic on the cape so that it will be hidden by the collar when you fold it over (so, if you're looking at the right side of the cape that will hang down on Anna's back, your elastic should be on the same side as your decorative stitching that goes around the bottom of the cape.)


6.  Flip the top part of the cape so that it hides the elastic.  Stitch the cape together in the front and add a button.  It's super easy for little ones to pull the cape off and on over the doll's head without Mommy's help!

This was my first foray into Barbie dresses, and I have to say it was pretty fun.  I loved dressing my dolls up in the dresses my grandmother made, and I hope Little Sister enjoys it too!

I also have a small vent about the Disney Princess dolls.  Little Sister likes the princess dolls better than regular Barbies, since she knows their stories from the movies (I like that too.)  And while I appreciate Disney trying to make the dolls individuals, it's a little maddening that their bodies are shaped so differently.  A huge part of the fun of these dolls is dressing them up, and when the dresses don't fit all of the dolls it's frustrating for both of us!  She likes to switch their dresses and have the dolls play dress-up, but our Merida dress is totally ripped from squeezing Tiana into it.  Why can't they all be the same size?!  At least everyone can trade shoes.


Thursday, January 23, 2014

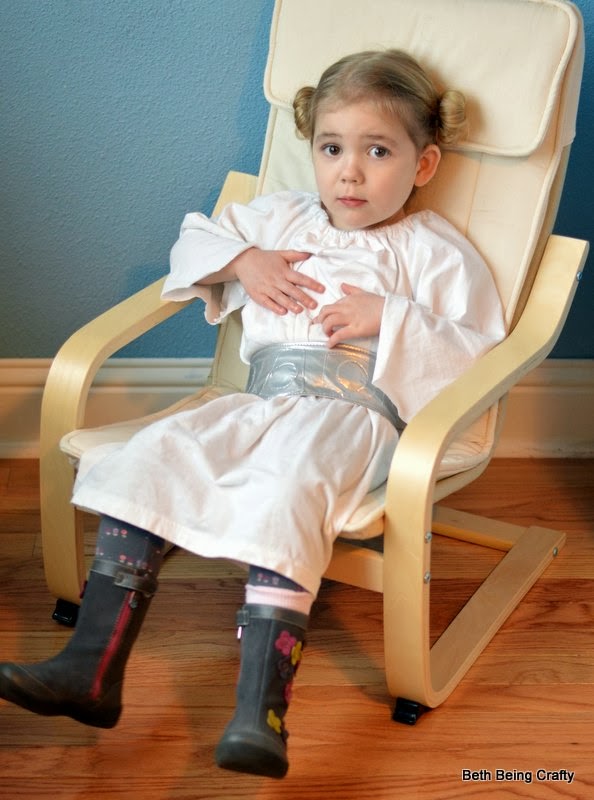
Little Leia Costume

Oh, I am so mad at myself!  I meant to finish this blog post last night so that I could upload it into the "Movie Inspired" week for Project Run and Play, and now submissions are closed.  Boo.  But I'm going to post it here anyway, since it's done and everything.


The Boy is having a Star Wars themed (SIXTH!!!) birthday party next weekend, and he already has his Luke Skywalker costume since that's what he wore for Halloween.  Little Sister will be the only girl at the party, so it seemed fitting that she have a Princess Leia costume to wear.  IF I could make it quickly, easily, and cheaply.


Well, check, check, and check!

I know, I know, Leia doesn't have a light saber, let alone a purple one, but give a girl a break!
Light saber is made from a wrapping paper tube covered in fabric from an old sheet and duct tape.
This costume is made from a couple of old t-shirts that I cut up and sewed together using a couple of free peasant top/dress tutorials.  Here are the links I looked at (free peasant dress tutorial from Trendy Treehouse and free peasant top tutorial from indietutes), and for reference, I cut the body panels out at 16" wide at the top, widening to about 18 inches at the bottom, and 25 inches in length.  I used the existing hem of the old t-shirts so I didn't lose any of that length to hemming.

I didn't have quite enough length so I had to sew two t-shirt pieces
together to get one of the panels.  I thought the belt would cover the seam...
maybe we should turn the dress around the other way!

For the sleeves I cut out two rectangles that were 12.5 inches wide and 18 inches long, and ended up cutting them off at an angle to mimic Leia's sleeves.  I didn't hem the sleeves since jersey doesn't fray.


The belt is obviously a defining feature.  It's the only thing I spent money on--I spent $1.35 on a quarter yard of silver vinyl fabric at Joann's.  I already had the velcro I used for the closure in the back on hand.  And Jess from Craftiness is Not Optional was nice enough to provide a free printable template and tutorial that I followed (except that I added a few extra inches to the belt's length).  Oh, and I didn't have any stitch witchery on hand, so I used regular double-stick tape to hold the pieces together while sewing.  It won't dissolve when washed, but since I'm not planning on washing or drying this belt in the machine anyway it should be fine.  I was surprised at how easy the vinyl was to sew--I expected more stickiness or something.  But you do have to be careful because every hole your needle pokes in that stuff is permanent!


And what kind of a Leia costume would this be without the hairdo?  I cut the toes off of a pair of too-small baby socks and made these mini-sock buns!  So crazy cute.

Ready to take on the galaxy!

And then have a rest.