Showing posts with label links. Show all posts

Wednesday, August 26, 2015

Sashiko Embroidered Double Gauze Shirts

Oh, I am so excited about this post!


This month's Project Run and Play theme was handwork, something I typically don't do.  BUT one of the last things I did before leaving Tokyo was to sign up for a sashiko embroidery class.  It was such a fun experience--a friend and I did it together, and it really felt like sitting in on a sewing circle with several Japanese ladies.  Most of the people in the class were repeat customers, bringing their ongoing projects back to work on them with some company.  I started a great embroidered panel (that I've since finished; not sure what I'm going to do with it yet!) while getting tips on the technique from the woman teaching the class.

Just getting started!

Making progress--a great project for sitting on the patio with a  friend!

Those of you in Tokyo, I recommend it--the class is on the first Thursday of the month at the Blue and White Store in Azabu-Juban!

In any case, my new sashiko skills were fresh in my mind when the ladies behind Frances Suzanne posted their challenge for Project Run and Play this month.  So while a couple of months ago I probably would have passed on this one, I actually had some excellent inspiration.


Unfortunately, the timing was a little difficult--on August 9th, we left Tokyo after living there for 15 months, so I sold my machine and packed up all of my fabric and kissed it goodbye until our shipment arrives in Portland in October.  But I held out a special piece of double gauze from Kokka--it's called Ihme Chamber, and when I visited the Kokka showroom in Tokyo I got to see the original watercolor for this print hanging on the wall!

So cool!

The display of the different colorways

I thought it would be perfect with my sashiko accents to make a really special item for returning to school this fall.  I was planning on making a top for The Boy, but Little Sister really wanted to get in on the action too, and so I made one for her as well.

Little Sister's top is the Norah Dress/Tunic pattern from Mouse House Creations, and
The Boy has the Prepster Pullover from Blank Slate Patterns.
I apologize in advance, but this is going to be a pretty long post since I used new patterns for both The Boy and Little Sister's tops, and I want to tell you about how they went together.  The pictures are really cute though--you should scroll through just for those! ;)

Both tops have the same sashiko embroidery detail on the pockets and the back yoke.

The Boy's shirt is the Prepster Pullover from Blank Slate Patterns in size 8, with some extra length (instead of doing a standard folded under hem, I just did a bias facing so I didn't lose any length from the cut pattern piece).  Otherwise I made the pattern exactly as written, and I really liked it!  I was nervous about doing the placket (I've never done one before), but it came out perfectly and the method was ingenious and very simple!  It made me want to start putting plackets on all the things.

About to start 2nd grade!
My only complaint is that size 8 is the largest size, and I just bought the pattern--I wish there were more sizes so that it would last me longer!  My guy is 7 and a half and slim, and the size 8 fits really well in the body but I did add length as I mentioned--but he is tall for his age (and long of torso, which he gets from me).  I have to say, it was nice to start with the short sleeved version since the long sleeves do involve a lot more steps--although I wonder if the long sleeves will need extra length for him too?  The size chart doesn't give a shoulder-to-wrist measurement, just chest, waist, and hip, so you have to kind of guess on lengths.

I got the free printable sashiko embroidery pattern from the tutorial posted by Jo of Dotta on Imagine Gnats.  There are lots to choose from--I'm excited to try more of them!  I printed the pattern out at 100% and it was a perfect fit on my pocket pattern piece for the Prepster Pullover.


I can't remember now where I found this tip, but it worked so well--I traced the sashiko pattern on to a piece of the thinnest fusible interfacing I could find, then ironed it to the backside of my fabric.  Then I had the design right there on the back!

I love all the little characters in this print--there's a cow, a swan, a fox, a frowny bird,
and of course the little guy poking his head out of a garbage can...

The embroidery on the back yoke was kind of an afterthought--as I was putting it together I thought that some extra detail would look nice there, but I had already partially sewn things together and didn't want to attach interfacing.  So I just traced the pattern with an air erasable marker and worked quickly!  I'm so glad I added it back there--I think it makes a huge difference.


I had originally planned to make a dress for Little Sister.  I just bought the Norah pattern when it was a Friday Fiver (yay!) and showed all of the cute options for collars and sleeves to Little Sister.  She chose short sleeves, and she adamantly did NOT want any kind of collar.   I made a mental plan to make the short sleeved dress with a  center panel of sashiko embroidery down the front, and had my fabrics all cut and prepped for that, but...

Starting Kindergarten!

She really wanted a shirt, not a dress, since she wanted hers to be a close match to her brother's.  She also vetoed the center panel (thankfully I hadn't started embroidering yet, or she would have been out of luck) in favor of a pocket like Big Brother's.  I re-cut the front to put that big tree front and center for the tunic length with no embroidered center panel.  Then she wanted a button placket too, but I didn't have enough fabric to cut another front panel out and I wasn't going to chop the focal point tree in half, so we compromised on the red bias tape neckline instead of the clean neckline with lining.  Honestly, even though I would have loved to do a few things differently design-wise on this dress, it's so worth it to listen to her input because then we end up with a garment that she will actually wear.  It's not worth it to make a dress my way that sits in the closet because I ignored what she wanted!

Turns out the pocket placement is PERFECT--she keeps putting things in there!
I used the same pocket pattern from the Prepster Pullover pattern.
 I did line the back yoke using the same method as in the Prepster Pullover, so it's nice and clean on the inside.  And of course she got the back yoke embroidery as well!


I love the fit on this top--I was worried that the sleeves might be too full, but they are just right.  I did french seams since I was using double gauze, so that did take the side seams in a tiny bit more.  My kids are opposites in sizing--the 7-year-old is almost too big for the size 8, and the 5-year-old is almost too small for the size 4!

Oh, and speaking of fit, since I added the embroidery, I shortened the opening in the back of the tunic.  But I shortened it too much--oops!  I had to widen the neckline slightly so that Little Sister's head could fit through.  But all's well that ends well!

Back to school
There was something so soothing about doing the embroidery.  First of all, the project was so portable!  We have been enjoying being back in our Portland house with a big front porch where we watch the neighbors go by, and it felt pretty idyllic to watch the kids eat ice cream on the porch swing while I sat and embroidered and drank craft beer.  It's also a great thing to do while watching a movie (although you may miss some key visual effects while you're looking at your stitching).  The longer I sew, the further down the path of special details and nice finishes I go--I'm working on being less slapdash and instant-gratification oriented, and this handwork inspiration project was really very enjoyable, and I love the results.

Can you tell we enjoyed our photo shoot today?

Sunday, July 19, 2015

Skirting the Issue 2015: My contribution

Hi!  This is a quick post to show you a couple of quick skirts that I made and tell you about a really cool project going on this month, Skirting the Issue.  Simple Simon and Company host this event in order to inspire sewists to donate skirts to kids in foster care, just in time for the start of the new school year, and they are collaborating with several sewing bloggers this month to provide lots of free skirt patterns and tutorials.  The goal is to collect 1000 skirts this year, and if you'd like to participate the details are in the link I provided above--the basics are that you sew a skirt (or several) by August 15th and donate it to an organization in your area that provides clothing to foster kids.  Then you let the ladies at Simple Simon know how many skirts you made so that they can keep track.

I made this simple elastic-waist full skirt from some fun Melody Miller Rubystar fabric:


size 3T

And this knit a-line skirt with a yoga waistband, using this tutorial from Craftiness is not Optional:

this one is a size 5, but was totally too big for my skinny 5-year-old!
I'll be mailing my skirts to With Love Oregon, an awesome organization that helps set up foster parents with great quality clothing and other supplies they need to help them successfully bring a foster child into their family.  I'd be happy to provide you with a mailing address for your donations if you'd like to participate!


Friday, July 17, 2015

Summer Outfit from Free Patterns!


I have been struggling with getting decent pictures lately, which makes me less motivated to get new things up on my blog.  For some reason, I just could NOT get the photos of this outfit in focus.  My least favorite thing about doing this blog is getting photos of myself--sometimes, using the remote is easy, but more often than not I just can't get the focus or exposure right when I don't have anything to focus on.  As I was going through these photos, I can see my facial expression getting more and more strained as I failed to get the shots I wanted, and of course I feel weird whenever people walk by.

BUT!  I will still share the outfit, because these are good patterns and you should try them out.

You get the idea.
First, the skirt.  This is the free Simple Summer Pleated Skirt pattern from Sew So Easy, and here are my thoughts about it.

1.  The pattern goes together easily and looks really professional.  Here's my back zip!  I really liked putting it together.

Pattern matching WHAT!
2.  The pattern suggests using a lightweight drapey fabric, and I concur.  I used a stiffer Japanese linen/cotton blend, and I'm not in love with the way it falls.  This pattern is not meant for a structured skirt.  You could, however, use a more structured fabric for the waistband but something with drape for the skirt.  I was thinking the structured fabric would give the skirt more of a pencil look, but it doesn't.  I'm thinking of trying Delia's pleated pencil skirt to get the effect I was going for here.

3.  The pattern runs big.  I cut out the appropriate waistband based on my measurements, and had to cut out over 3 inches altogether.  Be sure to test your waistband size before you attach it to the skirt.

4.  There are POCKETS!  Yay.

The top is the free Perfect Cap Sleeve Tee from iCandy Homemade.  I have made this top a few times before, and I love its simplicity.  The free pattern is a size medium, and it works well for a loose top on me.  This time though, I was going for a more fitted look, so I tried cutting this one smaller just by placing the pattern off the fold a little bit.  That was not the best way to do the fit adjustment because now I don't like the neckline quite as much and the sleeves fit a little weird (I added the sleeve bands, but that's not the problem), but it's still baggier than I want in the torso.  I will have to play around with resizing this pattern differently to get the fit I want.


This fabric is a slub knit from Girl Charlee.  It's almost see through but not quite--I can get away with it if I wear a nude bra.  Anyway, I like this outfit better with the shirt tucked in (NOT my usual M.O. but in this case...)


Anyway, there's an outfit I made lately and am moderately happy with but not excited.  It can't all be perfect!

Tuesday, June 23, 2015

Nani Iro Pajama Shorts

I have to admit, I am not much of a shorts person.  But after seeing Shorts on the Line, hosted by Rachael at Imagine Gnats for the last few years, I've been thinking it might be fun to try making some.


Now, these are pj's, so it's still baby steps--I'm not ready to try making shorts to be worn in public yet.  But as pajamas go, these are maybe the best I've ever had.  As a matter of fact, I made two pairs--one to try out the pattern before cutting into my Nani Iro double gauze (it's Pocho Adzuki Bean, a dark eggplant color--love it!)


The first pair is made from double gauze printed in Japan.  I love this fun print and I have bought it in several different colors!


I used the free Bias Trim Shorts pattern from Melly Sews, and since I was using a woven instead of a knit, I followed her instructions from this tutorial, where she makes a pair out of a satiny fabric.  Basically I slit the pattern pieces in the middle and added another half-inch of width to both pieces.  She says to add a quarter of an inch, but I'm slightly larger than the measurements she gives for the pattern so I bumped it up a little extra.  I also added about .75 inch to the length just for the heck of it.

Just what you want to see, right? A couple of pictures of my butt.
Maybe this is the real reason why I don't sew more pants...

I made both pairs exactly the same way--I was so pleased with how the first pair came out that I didn't change a thing for the Nani Iro pair!

In addition to changing the sizing slightly, I also used single fold bias tape instead of double fold.  This was mostly for practical reasons--the bias tape I wanted to use just happened to be single fold!  For the first pair, I had a package of vintage bias tape in exactly the right color, and it was a little bit silky, not a basic cotton kind.  Nice for pajamas, right?


And for the second pair, I knew I wanted to use the bias tape I found at my local 100 yen store, made from traditional Japanese print fabric.  Unfortunately, it only came in 1 meter packs, and I couldn't find more than 2 packs of any one print.  The pattern calls for 3 meters, but after making the first pair I thought I might be able to fudge it, since some of the bias tape ends up hidden on the inside when you sew the side seams together.


This worked great--I used exactly one meter on each side of the shorts, and was able to hide the unfinished edges on the inside.  As a matter of fact, I cut the back pattern pieces so that the exposed edge was on the selvage, so there weren't any raw edges to speak of.

Here is the front and back pieces for one side, sewn together and with bias tape attached.
You can see the white selvage edge where I ran out of bias tape.

Here's how the inside looks when you use single fold bias tape instead of double.

The Nani Iro double gauze I used was a great deal--I found two .6 meter cuts of it for 360 yen each (about $3) since there was a little bit of a print error.  I don't know if you can tell, but some of the dots have a tiny dot of the background color on them.  I think it looks fine!

Pre-sewing it all together
And I still have enough left to make a pair of shorts for Little Sister (although I'll have to find a different bias tape to use on hers.)  I'm actually hoping more of this bias tape will turn up, because I'd love to make a bias-trimmed tank top to go with these.

One final shot, to show how they look proportionally.  It felt weird to have a whole post with no pictures of my face!


Sunday, June 21, 2015

Everyday Elsa

I have a confession to make--I am linking this dress up to this month's Project Run and Play, but I didn't make it specifically for that. Edited--I planned to link it up, but I was too late!  Just missed the collection. Boo.

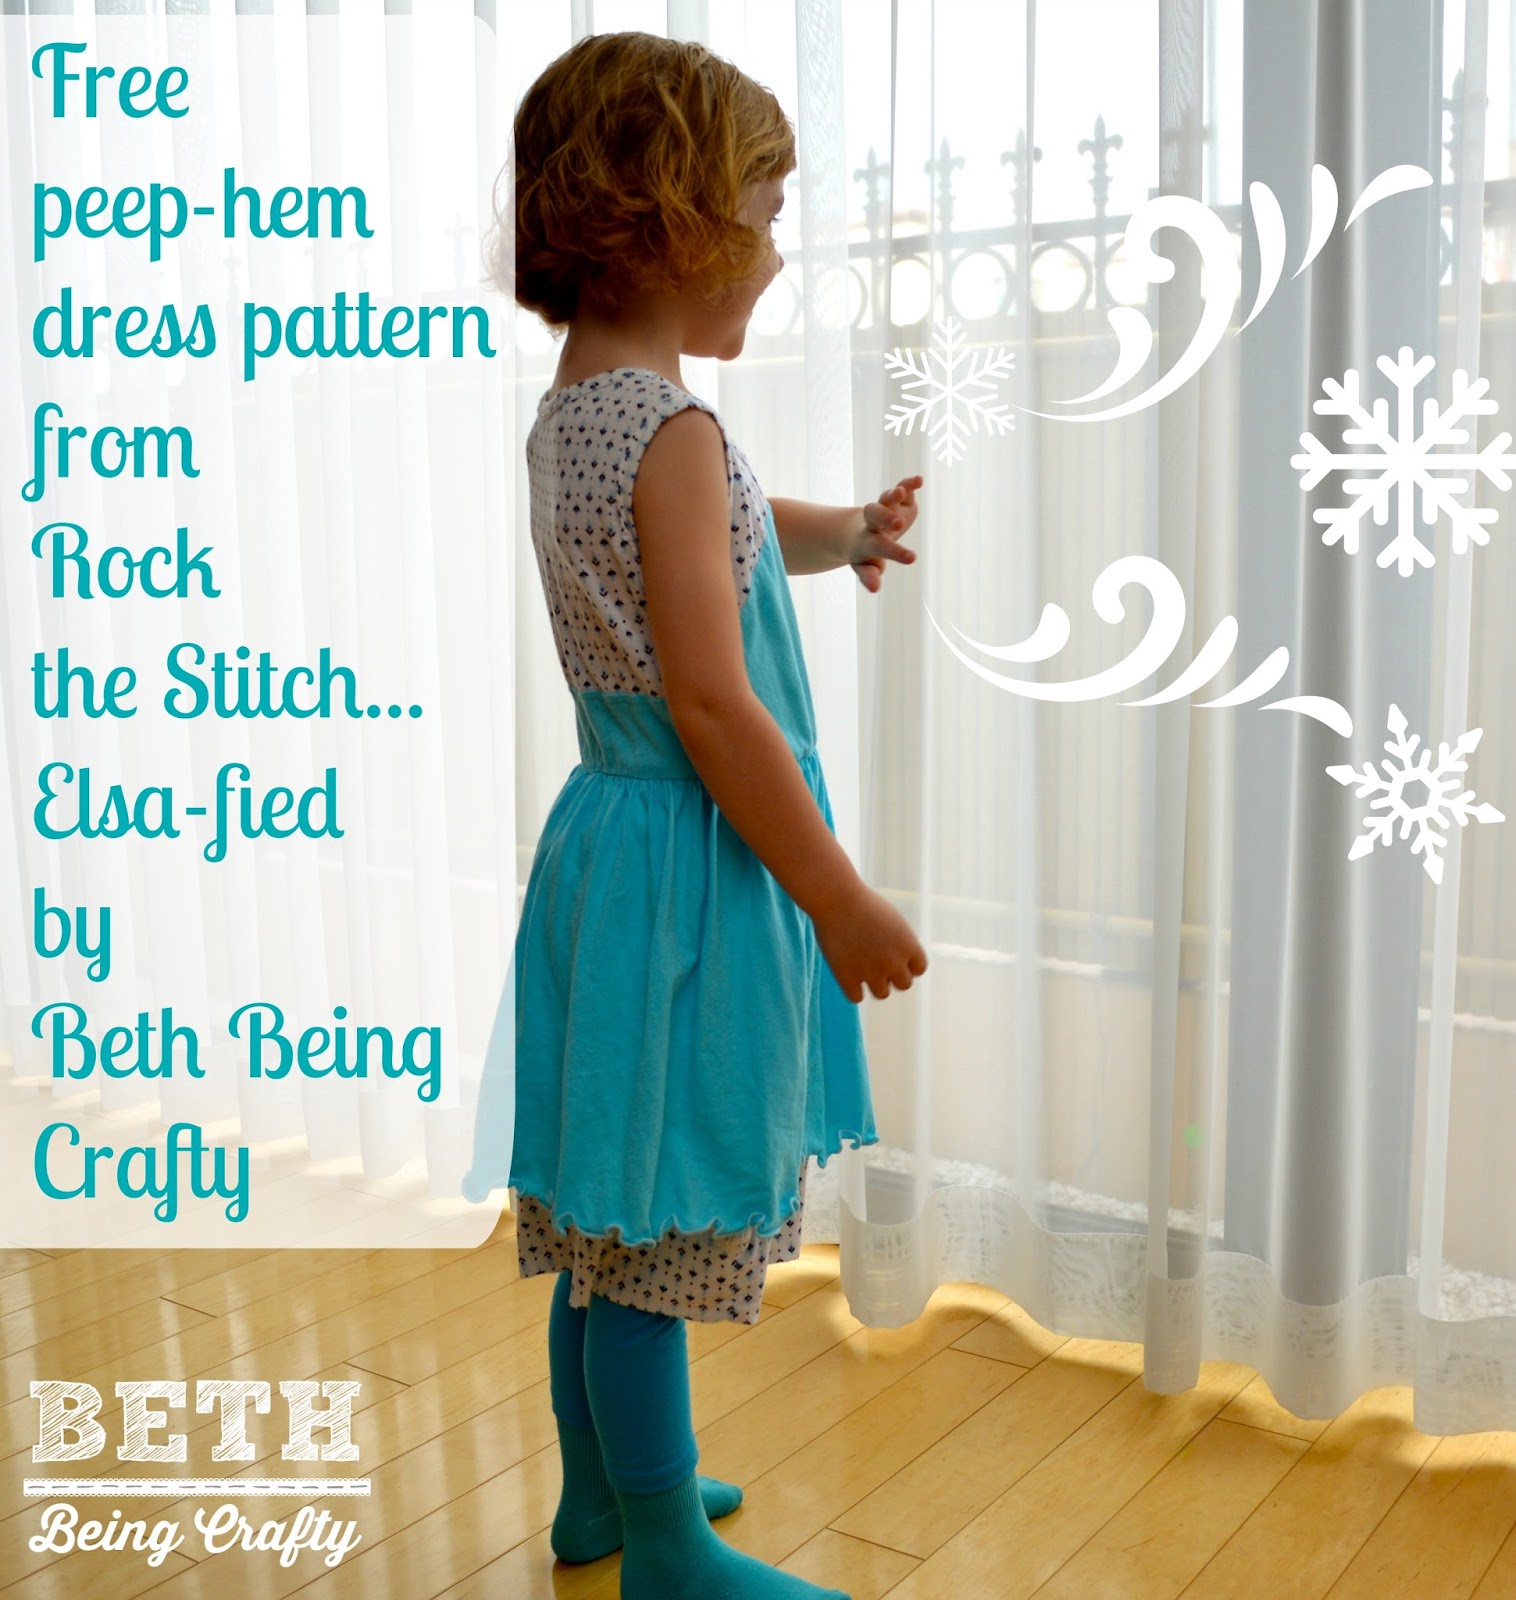
As a matter of fact, I had been checking frequently to find out what June's pattern would be, and when I saw the Elsa pattern chosen by this month's host, Kiki from Kiki and Company, I laughed, because I had just finished an Elsa dress for Little Sister literally the day before.  I figured it was meant to be, even if I didn't use the actual pattern, so I'm linking up anyway! (uh...not so much meant to be after all.)

It still took me 3 weeks to get photos taken of it though, so I'm finally getting the blog post up.  And another confession--I started getting worried that I wouldn't get photos done at all, so when Little Sister chose this dress to wear on her first day of summer camp today, I told her we were going to take a few pics before school.

Luckily she was mostly game, and as a matter of fact she was inspired--she pulled the curtains back and told me we should use the white sheers and pretend it was snow!  We gave it a try, so these photos are her own idea.


The fabrics are knits from Girl Charlee that I brought with me when we moved to Japan.  The print on the white fabric has a slightly Scandinavian feel to me, so I thought it would be fun to make a casual dress that was inspired by Elsa.


The free Peep-Hem Dress pattern from Rock the Stitch was perfect for it--I just color-blocked the bodice (and did a lettuce hem on the top layer--something I've never tried before!)


I've had my eye on this free pattern for a long time, but it's finally a perfect fit for my 5-year-old, so the time was right!


I can see making this dress in lots of other fun fabric combinations--with the color blocked bodice, I could even see using wovens and keeping the top of the bodice in a knit.

The back--I just cut straight across to match up with the curved color blocking I did on the front of the bodice.
These particular knits from Girl Charlee are really light and soft, so even the two-layer skirt will be great for the hot summer weather.


I always love linking up to Project Run and Play, especially to see the other interpretations of the theme!  Take a look at this month's contributors here.

Also, take a look at this dress in action--perfect for our final visit to Tokyo Disneyland!  We made it there twice in our year in Tokyo, and really had great visits both times.


Wednesday, June 3, 2015

Me-Made May 2015 Wrap Up

I finished the rest of Me Made May without repeating my handmade clothes!  Before going into this I hadn't realized how much of my wardrobe is actually made by me.  And actually now that May is over I still have a few more things that I never wore during the month, but that I have worn since.  Not even including things that are for colder weather!

Here are the outfits I wore in the second half of the month (most pics from Instagram although some are pre-square-cropping so I can show you more of the proportions!)

May 17th:  I wore this dress out to tea at the Park Hyatt Hotel in Shinjuku (where Lost in Translation was filmed, although we were on a different floor) with some lady friends of mine.  I haven't worn this dress much, because I struggled a lot with the fit when making it.  Let's just say this is the dress that taught me the importance of making a muslin, especially when the project has multiple darts, piping, a full lining, invisible zip, and fitted waistband--pretty much impossible to alter without taking the whole thing apart!  I blogged about it when I first made it, and I don't know if I'll ever wear it again.


May 18:  Foldover waist yoga skirt.  I made this one out of a thrifted t-shirt and I thought I was pretty ingenious to use the square neckline to make the topstitched pockets.


 May 19th:  Railroad-Stripe Milkmaid Skirt (from this Crafterhours tutorial) and a cardigan I made out of a hand-me-down wrap dress, with a RTW tank and scarf


May 20th:  This is a Sorbetto Top but with a reverse pleat (blogged here) and a Boyfriend Cardi in some fun 100 yen per meter double-sided knit, from the free iCandy Handmade pattern.  I wore it to the Dirty Dish Shop in Tokyo (pictured), an awesome ceramics warehouse where everything is 40% off of retail price!


May 21st:  This was the first new item I made for Me Made May--a sleeveless Washi dress with some bodice alterations that I blogged about here.  It's also my favorite item of the month, and the one I was most excited to wear again when the month was over.


I had to show you a better close-up of the fabric too, because I love it--it's a little crinkly so it has some stretch, and it's nice and airy for hot weather.  Plus it was only 100 yen per meter--can't beat that!  This dress cost me about $2 to make! 


I wore it for our trip to a Sumo match, one of our bucket list items before we move away from Japan! Near the stadium we happened across this giant yarn ball and I couldn't resist the photo op.


May 22nd:  This dress was my Easter dress a few years ago.  It was one of my first splurge fabrics--a silky feeling cotton that was an end-of-bolt cut from Mood.  I think it also marks the first time I actually paid money for a women's pattern!  It's the Gathered Sundress from Pattern Runway.  I didn't make a muslin for this dress so the fit isn't great, but it still gets a lot of wear due to the beautiful print and the roomy pockets!  I think it's about time to give this pattern another try, now that my technique has improved quite a bit.


May 23rd:  Another Washi Dress :)  I LOVE this one in the Melody Miller border print arrow fabric, but being my first Washi Dress I wasn't sure how long to make it, and because of the border print I couldn't shorten it as much as I wanted to when hemming.  Still a winner though!


May 24th:  This skirt is another Milkmaid Skirt, this time made from a thrifted nightgown.  I rarely wear it since it's white, but I did manage to get through the whole day without spilling on it so maybe I'm getting less clumsy!  Or maybe my kids are older now and don't wipe their hands and faces on me as much anymore.  In any case, I think I can bring this skirt into more regular rotation now.  In other news, I loved this t-shirt Merchant and Mills made for Uniqlo--it has a faux measuring tape draped around it!  Of course, it's in centimeters...


May 25th:  Another take on the Scoop Top from Skirt as Top's free pattern.   Hmm, I guess I never blogged about this one.  It uses some sheer woven fabric from a blouse I ordered online that was a terrible fit.  This month made me realize how often I like to make the same pattern over and over--I have three milkmaid skirts, three (at least!) scoop tops, several Washi's, plenty of Plantains, and so on.


May 26th:  The 2nd NEW item of the month!  I found this fun strawberry print jersey for 200 yen per meter, and it made a great sundress for Little Sister but I was a little afraid of it for myself.  But I liked it so much I had to give it a try!  I think the black and white stripe mellows it out enough to be at least somewhat appropriate for a grown-up--but it's still a little crazy!  The pattern is the free Fun Summer tee from iCandy Handmade, and I haven't had a chance to blog about it yet.


May 27th:  Another dress I never blogged about!  I made this one here in Tokyo out of thrifted fabric that I brought with me from home.  The bodice is based on the Sorbetto Tank pattern again, but I'm pretty sure I used the Milkmaid skirt dimensions to figure out the skirt.  It has an elastic waist with bias casing.  And pockets, because duh.


This is another fabric that deserves a closer look, because it's printed on top of thin stripes.  Pretty cool!


May 28th:  A basic RTW black tee with a simple elastic waist a-line skirt (with pockets, of course!).  I  like the ribbon detail on the hem--you can get a closer look on my blog post about this skirt.


May 29th:  What's that, another Washi?  This time with long sleeves!  I made the elastic slightly too tight in the ends of the sleeves on this dress, so I ripped them out in the morning before putting this dress on--now they might be a bit TOO loose?  Maybe I'll put in a bit more elastic and try again.  This was my 2nd Washi dress and since I made the first one too long I overcompensated on this one and made it too short--and of course, I did a visible hem facing so no easy way to lengthen it either.  Grr!  It seems I never blogged about this one, either!

Cool double-sided 100-yen-per-meter fabric!

May 30th:   I based this top off of iCandy Handmade's free cap-sleeve tee pattern.  At first I just cut the yoke straight across, but it felt like it needed more so I re-did it with the sweetheart shape and was so happy with how it came out.  The knit has a subtle stripe that coordinated really well with the slate-gray cotton lace.  And what do you know--this is another project I never blogged about!

Sorry about the blurry pic of the back--it's hard to know when you're in focus using a phone self-timer!

May 31st:  My final outfit of the month was my 100-yen-per-meter Bess Top from Imagine Gnats in this weird map print!  I was pretty surprised to find that I had enough items to get me through an entire month without repeats (and then some!)


And that's it!  You can see my outfits from the first half of Me Made May here.  This was my first year participating in earnest, and I'm pretty happy with the results--the most major of which is realizing that a lot of my favorite things to wear are actually things that I made myself.

I have a few more projects on my to-do list now, some inspired by the great looks I saw from other sewists on Instagram, and some coming from the realization that I have a few dresses in my closet that I wanted to wear all the time, and I only avoided since I was trying not to repeat myself.  That tells me I need to make those patterns a few more times!