Tuesday, May 5, 2015

Nani Iro Bess Alder Mash-Up Dress

When I found this 2-meter cut of Nani Iro double gauze in a Nippori fabric store about a month ago, I knew I would use it to make a dress for myself.  I love the loose, casual style of Japanese patterns (like this, or this), and they are so tempting, especially because that style looks so cute on the Japanese women I see walking around here in Tokyo all the time!  BUT every time I have tried on that type of garment in a store, it just looks terribly unflattering on me.  So I have managed to resist--but I still feel like this dress has a bit of that Japanese style as an inspiration, especially in this beautiful Japanese fabric, while finding a design that flatters my figure more.

The fabric is Nani Iro Pierre Pocho Fortune Stones Double Gauze in Forest.

This dress is a combination of two patterns from Imagine Gnats.  When I guest posted on her site for Selfish Sewing Week, I got to spend some money in her shop, and when I saw this tutorial from Teresa of Dandelion Drift about how to combine the Bess Top and Alder Skirt pattern into a dress, I bought the two patterns right away!


I definitely feel like I achieved the look that I was going for--casual, comfortable, loose and breathable (the double gauze feels amazing and will be so great when the weather gets so hot and humid here), while still skimming my figure enough to be flattering.


The skirt has darts in the back, which helps with the shaping, and I chose a smaller size top than my measurements suggested (I made a wearable muslin first to make sure it would work!) since the Bess Top is meant to be rather loose.


I love the pockets, too--nice and wide and comfy, and I love the angle that adds a nice design element.  I would probably extend my pocket bags by just a little bit the next time I make this--they seem a little shallow for my taste.  But I just love a pattern where I don't have to add my own pockets!


In case you're not familiar with the Bess Top pattern, it has a cool shoulder design where the back panel wraps around to create the armhole.  On my muslin, I used a different fabric for the back and front so it's a nice way to add an accent fabric.

By the way, my mom is a jewelry designer--she made me this necklace for Christmas!
 Here's her website :)
Since I only had 2 meters of this fabric, I got nervous that I wouldn't be able to fit all my pattern pieces in--but I managed to squeeze it out by turning the fabric for the back panel in the opposite direction!  Phew!  Although it would have looked cool with an accent back as well--I think I would have made the visible pocket lining match the back/sleeve fabric if that had been the case.  Maybe I'll try that next time!

OH, and when I was trying out the fit before I sewed the neck binding, I decided to lower the neckline a bit--pretty typical for me.  There are two neckline options with this pattern and I had cut out the lower one but I like just a little bit more scoop even than that.


I'm really happy with how it came out, and I'll have to add my neckline adjustment to my pattern!

I wore this dress today running errands on my bike, and I have to report that the skirt width is perfect for riding--not tight enough to restrict pedaling, not loose enough to blow around with every gust of wind.  I imagine this dress will be getting a lot of wear this summer, and the color palette will be great with tights and boots come fall as well!  

Thursday, April 30, 2015

I'm In: Me Made May 2015

Ok, I'm signing up--I'm challenging myself to wear one self-made garment every day in May!


What is it you ask?  Sign up here!

I played along unofficially last year, not even really realizing there was more going on behind the scenes, but this time around I think I'm ready to participate for real.  I've been sewing for myself so much more in the last year, and this will be a good test of which items I feel are good enough for the real world :)

I'm going to try to take pictures every day, although they will most often probably be iPhone pics, either bad selfies or taken by my children!  But my goal is to post weekly summaries, since the idea blogging every day about stuff I've already blogged about when it was made is a little overwhelming to me.  Although this will be a good opportunity to get some photos of the things I've sewn that never made it to the blog!

In honor of day 1, I'm wearing the first top I made for myself when we arrived in Japan.  First photo courtesy of my 5 year old, second one taken by my husband :)


This is the Ruby Top pattern (tunic length) from Made by Rae.  After making this first one, I sized the pattern down and have made several different versions, including a dress, adding sleeves and altering the neckline. I prefer this top belted, but there are times when I like it loose, usually with leggings and a cardigan.  Looking back on this piece, I wish I would have used a softer fabric for the yoke--I like the color, but it feels a little stiff with the drapey fabric of the rest of the top.

Matching Map Tops

Who says I can only make matching outfits for my daughter and me?


My husband would probably die if my son and I decided to wear these shirts at the same time, but sometimes the fabric I find appeals to both me and Little Sister, and other times, not as often, it appeals to me and The Boy!


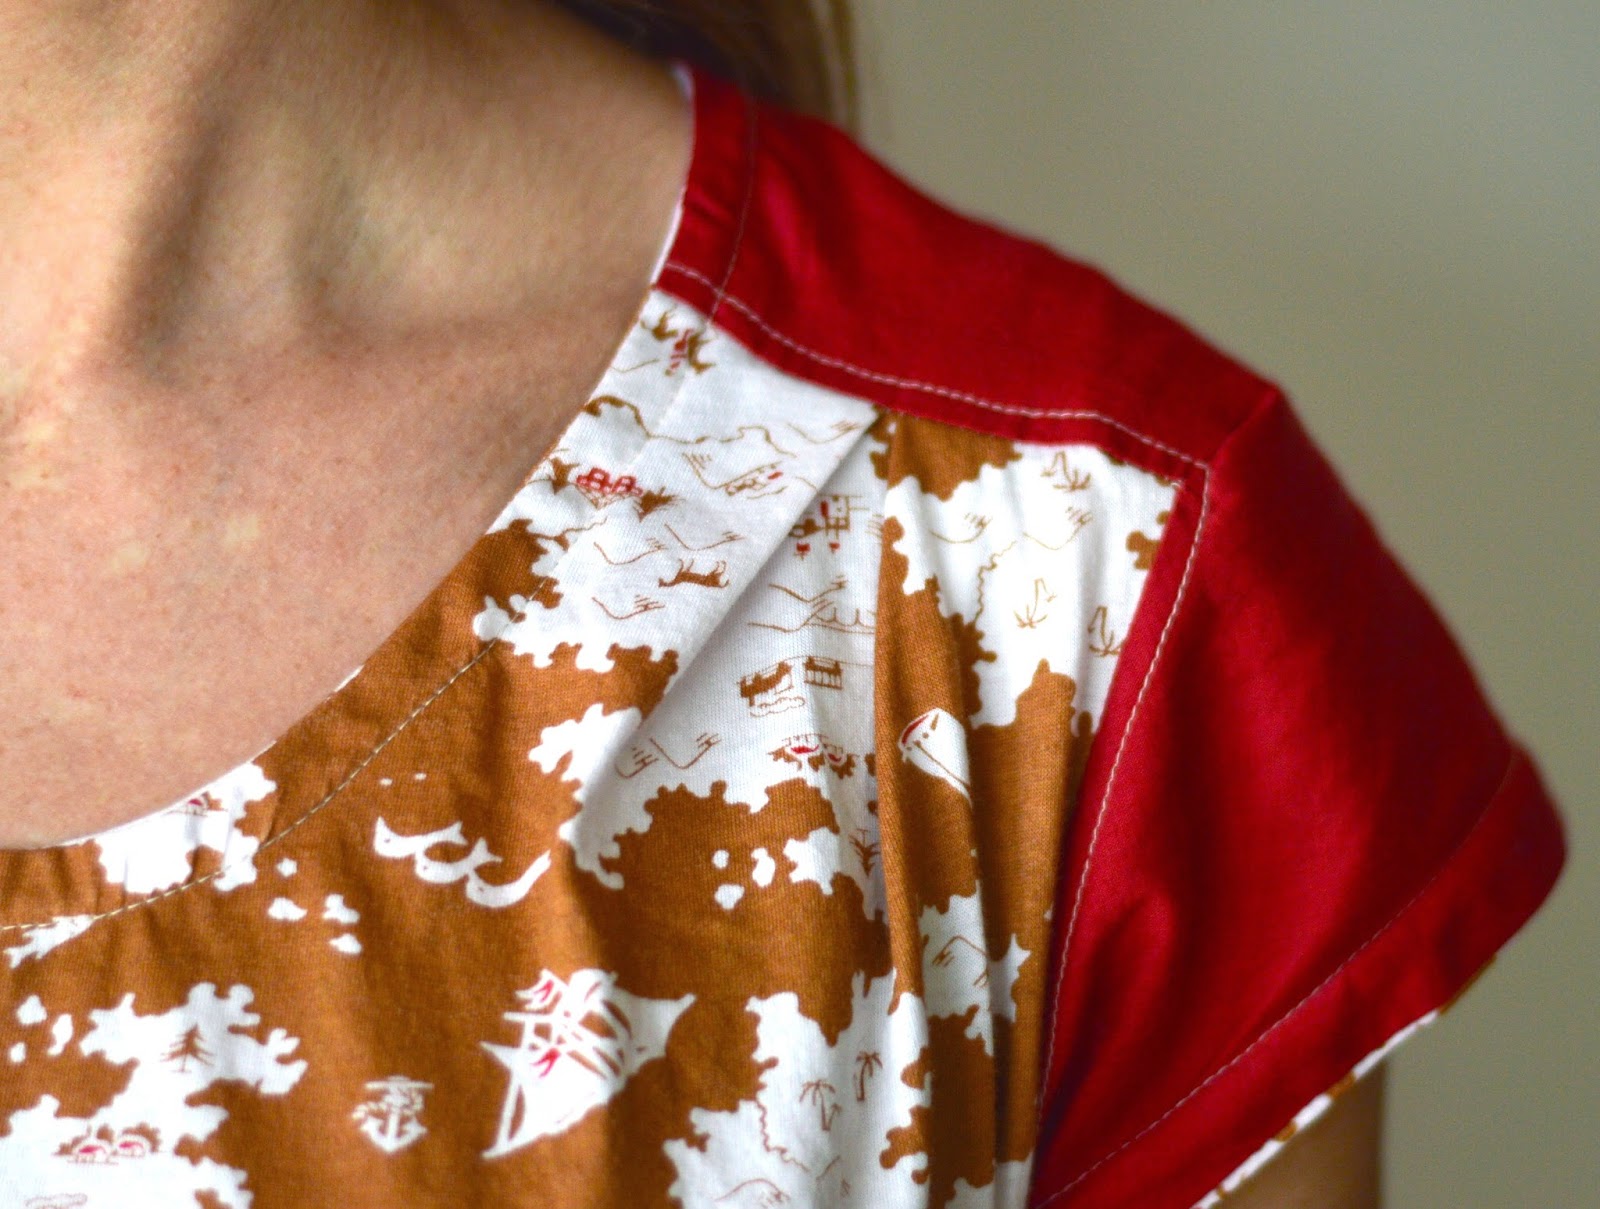
This fabric was another of my 100 yen per meter finds, so I used it to make a Bess Top from Imagine Gnats.  This is the tunic length with the lower neckline.  I sized down from what my measurements said and I'm happy that I did--it turned out figure-flattering without being tight.  The map print on the front is a knit fabric, although not a very stretchy one, and the back is a lightweight woven.


I love being able to use two fabrics on this pattern!  I had a little trouble turning the corner on my shoulder detail (can you see that little pleat at the corner?) but when I made this pattern a second time I followed the directions more closely and it came out just right.


It didn't turn out to be the best day for a photo session but I managed to get a few shots to show you.  The Bess Top is definitely a pattern I can see myself making multiple times!

The Boy's shirt is just a self-drafted tee based on a shirt that fits him well.  The sleeves, pocket, and binding are from an Old Navy shirt of mine that had gotten stained.

This is the temple that's next door to our house.
I make his tops long and narrow, like him.  Gotta keep the top of those pants covered!  Being able to adjust the proportions on a basic tee is definitely a benefit of being a sewing mom.


So this post is probably the only time you'll see us both wearing our shirts, but it's enough for me to know that we have them!

Monday, April 27, 2015

Strawberry Slip Dress

When I spotted this fabric on the knits floor at Tomato in Nippori, I knew I should get it, even though it's much crazier than the stuff I usually sew with.  I didn't know what I would make, but I knew I'd regret it if I didn't bring it home (especially at 200 yen per meter!)  And bonus--it's really soft, a good thickness, and stretches in both directions!

Also a good pic of Little Sister's new short haircut!
When Little Sister spotted it at home, it was love at first sight--she was immediately on me to make something for her out of it.  She started thinking about it and had some specific details in mind--tank top dress, not too long, with skinny straps.

She also wanted to call it the Silly Strawberry dress.

I had printed, taped, and cut out the free Baby Slip Dress pattern from Suburbia Soup a few months ago, but hadn't made one yet.  Even though that pattern is for a woven, I figured I'd give it a try, making a few adjustments for knit fabric.  


 I had cut out a size 4, and if I was making it with a woven I  probably would have made a 5 but since I was using knit I figured the smaller size would be just fine. 

I might add a little more length next time I make this dress.

Really though, this pattern is very flexible and forgiving--you can adjust the gathers to be as tight or loose as you want, essentially making the dress bigger or smaller.  And the free pattern is available in sizes 6 months to 6 years--nice!


The main two adjustments I made to the pattern were 1. to make the back in one piece, and 2. to shorten the straps around the arms by about 2 inches--I used rib knit for the binding as well.  I was a little nervous about being able to get it over her head without the opening in the back, but it was no problem at all.  I didn't even use a stretch stitch sewing on my knit binding--it just didn't need it.


And now I'm one more dress closer to my goal of bringing some new sundresses with us on our trip to Hawaii next week!  Maybe I'll get one done for myself, too!


Oh, and I almost forgot--when Little Sister saw the completed dress, she ran over to me, gave me a big hug and gushed, "THANK you mommy, I LOVE it!"  Perhaps the most excited she's ever been about something I made for her!  It was pretty gratifying, I have to say.  She wore it to school today--I snapped these quick pictures before we left this morning!

Thursday, April 23, 2015

Beach Sling Bag

Guess what?  In less than 2 weeks we are headed to Hawaii on vacation!  This month's Project Run and Play theme of a reversible sling bag helped me decide that the kids would definitely need beach bags for this trip.


I followed the free Reversible Sling Bag pattern from SugarBee Crafts pretty closely, only making a few adaptations in order to incorporate the materials that I was using--reusable shopping bags and towels from the 100Y store!  I spent 400 yen on materials, which is a little over $3.  If I'd been in the states, I would have looked for some thrifted towels that were a little more substantial, but this did the trick.

The supplies

The microfiber towel I used for the contrast on the lining had stripes, but I liked this description better ;)

"A soft towel with the feeling that the touch is very sufficient."
I have been wanting to make a towel-lined bag for a long time, and since this easy bag consists of an outer and a lining, I went for it.

I'm experimenting with putting in a jump so that more posts appear on my main page--read the rest after you click, and let me know if you love/hate having a jump!

Tuesday, April 21, 2015

Vintage Kimono Hanami Dress

A few months ago, I bought a bag of scrap fabric from a store that sells and alters vintage kimonos in my neighborhood.  Mostly, the pieces really were scraps (I have used some to make doll kimonos and a table runner) but there was one piece of an amazing deep purple shibori-dyed fabric that I thought would be large enough to make a girls' dress.

And I was right!


The pattern is the Hanami Dress from StraightGrain Patterns, which I thought was just perfect, as Hanami is the name for the Japanese Sakura (cherry blossom) viewing time which has just come to an end.  So I really wanted to use a Japanese fabric to make this dress!


This panel of fabric was prepped to be made into a kimono, but for some reason was abandoned.  The snips and basting stitches were still present in the fabric:


I'm experimenting with putting a jump into my longer posts so that more posts appear on my main page--read the rest after you click, and let me know if you love/hate having a jump!

Sunday, April 19, 2015

Lucky #7 Pajamas

I haven't been able to get photos of most of my recent sewing projects other than the quick selfies I've been posting to Instagram, so I was looking through my iPhoto albums to see what projects I hadn't managed to blog about yet.


I made this pair of pajamas for The Boy's 7th birthday, which was in January.  Every time I saw him wearing the pajamas I made for him for his 6th birthday, I was cringing at his bare ankles and belly hanging out, promising myself I would get him some new pj's sewn up.  As a matter of fact, I don't think I ever blogged about those old pajamas either!  I just dug around and found some pics of one of the pairs I made but have no photo evidence of the cute moose pj's.  At least I can show you the Rebel Alliance pj's I made from a clearance Target men's t-shirt and scraps of black and neon green tees from my upcycling pile:

So, I may have been cutting it close on size even when they were new...

I'm experimenting with putting in a jump so that more posts appear on my main page--read the rest after you click, and let me know if you love/hate having a jump!