Wednesday, July 10, 2013

Quickest Upcycle Ever!

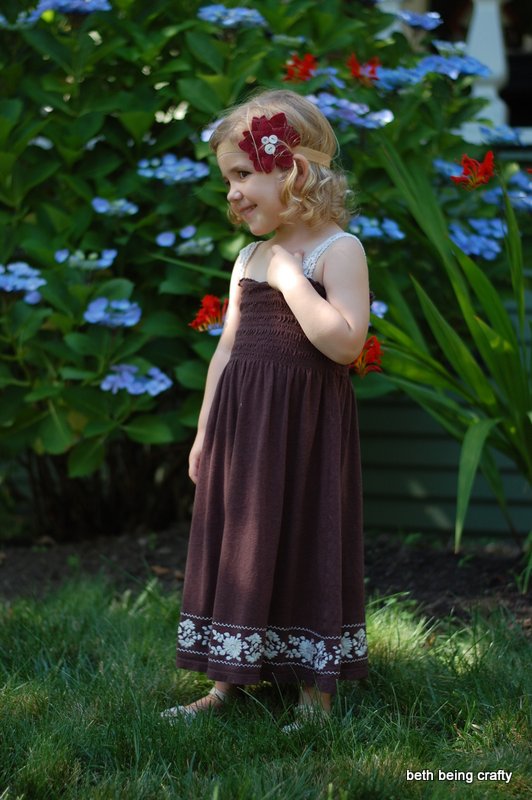
I wasn't even going to blog about this "dress," but then Little Sister went and styled herself with the linen flower espadrilles and boho-style headband (so what if it's a Christmas poinsettia?) and I just couldn't help snapping a few pics, and as long as I had some pictures I might as well tell you about the dress, right?


My friend was getting rid of this top, and I found a 3-yard roll of the wide crocheted lace at Joann's for $1, so the whole thing cost me less than fifty cents.

All I did was put the top on my kiddo, figure out where to attach the straps and how long to make them, and then I actually did cut four little squares of knit fabric and sewed them over the lace on the inside of the dress, in case it was itchy--but that last part is totally optional.

She loves this dress, because it's "long long to the floor," which is her favorite thing.


Those curls with the headband are just killing me!

Sorry you can't see how cute those shoes are (and perfect with the dress)--they are natural-colored linen espadrilles with a flower cut from the same fabric that I got at Old Navy on super clearance ages ago that finally fit.  I have since quit buying ahead for this girl, because she's so dang picky now that I have no idea what she'll want to wear a year from now, but I got lucky with these ones. Oh!  I might have a picture still from when I bought them:

Yup!  That's them!  And my final price on these babies was $1.18.

Anyway, she had fun being sassy for my pictures in her boho getup, then we went to the grocery store and she was admired by many.  This outfit is a win.


Saturday, July 6, 2013

Piped Sundress

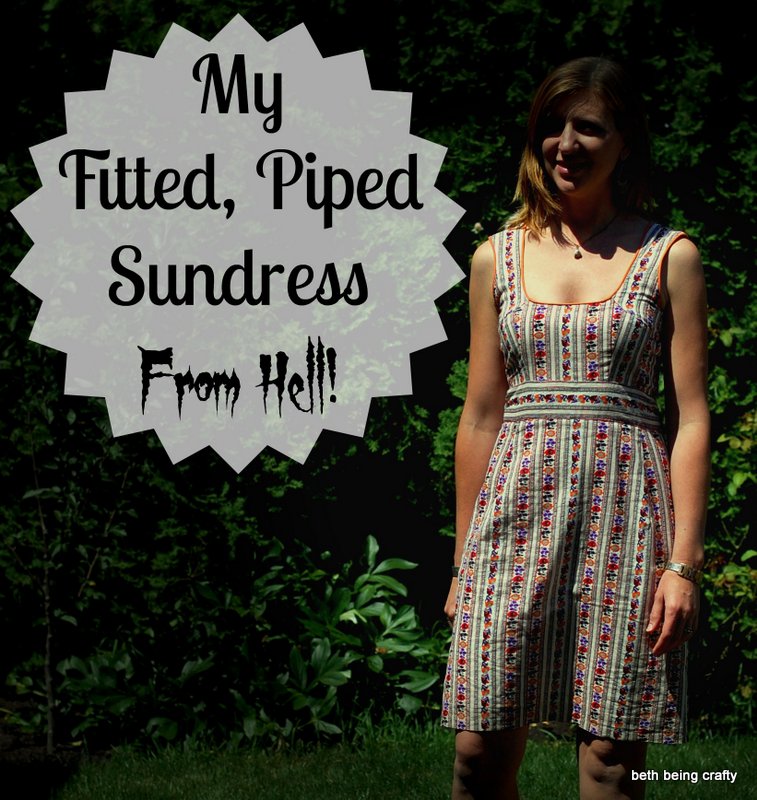
I have a confession to make--this dress does NOT HAVE POCKETS.  Don't worry--my blog has not been hijacked, I really did make this, but it is a case of the pockets becoming too much hassle in light of every other hassle I encountered while making this dress, and instead of giving up and tossing it in the scrap bin, I decided to overcome everything else but leave the pockets out.  Maybe someday, after wearing it a few times and being irritated at the lack of pockets, I will figure out a way to work them in.  But for now, it is such a relief to say it is DONE that I am out of motivation to add one more thing.

Oh my goodness, this dress has been such a case of "Keep Calm and Grab the Seam Ripper."  Why is it that it's never just one or two little things that go wrong?  In my experience, putting a garment together either goes pretty darn swimmingly, or else it's a complete and total mess from beginning to end.  Guess which kind this project was?

Don't just hang there, looking all innocent.

Here's the part of this post I wrote before the dress was finished:    It's time to forget it for the night and hopefully have better luck when I start fresh tomorrow (or, as fresh as I can be after the kids have gone to bed for the night, my sewing time) [Edited:  I waited a good two weeks after this to pick it up again and hem the damn thing].  After inserting an invisible zipper TWISTED rendering it unusable not once but TWICE, I have to throw up my hands and give up.  And that's after taking off then reattaching the skirt, undoing the side seams, pulling the bodice through a narrow strap the wrong way, undoing and reattaching the waistband,  accidentally unpicking 6 inches of piping from the neckline while taking out the zipper for the second time, creating the lining as a muslin that ended up being ridiculously too small and had to be pretty much completely resized (actually a genius move in my opinion, since I don't mind a frankensteined lining and it allowed me to redraw the self-drafted pattern before cutting the dress fabric. [Edited to add--however now the side seams on the lining don't line up with the side seams on the dress, making on-seam pockets somewhat of a challenge])...um, let's see, I'm sure I'm forgetting something, but I'm also not finished yet.

On the plus side, putting the piping in was easy, and I love the way that looks.  Silver lining.

Did I mention that I even PLANNED some seam ripping in this project that I haven't gotten to yet?  Since I wasn't sure how the finished skirt was going to lie, I haven't inserted the on-seam pockets yet, so I'll be doing even more seam ripping before this is done, because I am NOT going to spend all of this time on a dress that doesn't have pockets.  [Yeah, that's the part I wrote while I was still optimistically thinking I'd come back and add pockets.  We'll see if it drives me crazy not to have them.]

So with all that, here's how it turned out:


I started by printing out this pattern, which claims to be a size 6, but...I'm pretty sure she must mean size 6 TODDLER, because there was no. freaking. way this was going to fit my typically-size-4-to-6 body.  I should have known, looking at her photos, because she is clearly much tinier than me, but anyhoo.  I added four inches to EACH SIDE of the skirt.  EIGHT total inches.  And I actually really love the way the skirt fits now.  I can't remember exactly now, but I added I think somewhere in the neighborhood of 6 inches to the bodice, but there was a lot more tweaking going on up there so I'm not sure how much of that was the pattern's fault.  I also added the waistband, because the bodice pattern pieces I tried fitting together ended up being reeeeally short as well as not near big enough around, so rather than recutting them all longer, I just added the horizontal waistband strip, which ended up being one of my favorite things about the finished look.

Speaking of the bodice, though, I really wanted to have piping along the neckline and armholes, but once it was there it made adjustments to these areas really difficult.  So rather than taking things apart AGAIN once I figured out that the neckline that I cut was droopy, I did this:

Not very professional, but a hell of a lot faster
Can you see how the piping is folded in on itself up there?  And harder to see is the seam going at an angle from the folded spot on the neckline down to a couple of inches under the armpit--that's just topstitched into place to keep it from bagging, and to hide an awkward bust dart.

Also, (and this one's really probably only obvious to me, so clearly I need to point it out):


Somehow in my exhaustion, I failed to line the skirt up properly before attaching it, so the darts are not in the same place on both sides, nor does the print line up.  I highlighted the darts with a black dotted line above--see how the one on my left is way further over?  I vaguely remember now that when I was putting in the zipper, I had a lot more extra fabric on one side than the other...doh.  I totally didn't even realize this until I was putting the finished dress on.

Also, that waistband started its life about 2 inches wider than you see it now.  The proportion was just off, but instead of taking the skirt off I just tucked the waistband under and topstitched it down.  LAZY!  And now that I see that I attached the skirt crooked, it would have been even better to take the skirt off because maybe I would have lined it up right the second time around.

Maybe you can't tell if I put my hand on my hip.

But in any case, it is finally done, thanks in no small part to the lovely Suzanne at D&T's Sewing.  She hosts a crafty social night on the first Friday of the month, which was motivation for me to haul it out and get it hemmed and over with.

No pockets.  I have no idea what to do with my hands.

I'm pretty glad I did too, because I wore it today and despite all of the issues that are mainly noticeable to me, I think it is a pretty flattering dress in a great fabric (it's a cotton lawn) with some nice details, and I think I will get some use out of it.  And I THINK I learned some things in the process--namely that I am not a pattern maker, so if a printed pattern isn't going to fit just start the heck over.

Thursday, June 27, 2013

Another Scoop Top, Another Anthro Inspiration...

When I made my first Scoop Top from the great Skirt as Top free pattern, I already had a plan that if that one worked out, I had another version I would try.


This shirt was based on this mixed-fabric top I saw on the Anthropologie website.

Anthropologie Pattern Drop Tee

Mine, of course, has mixed prints, since I can't help myself.  But I went with neutrals, since the shirt was a birthday present for a friend of mine and I didn't want to go TOO crazy.

Here's the front:

And just for fun (no, actually, it's because I was combining an upcycled sundress with a mere 1/2 yard of knit from Girl Charlee so I had to get creative with my cuts), the back switches the prints so the stripes are up top and the floral is at the bottom.  I really like the curved line joining the two fabrics in the back.


The floral part of the shirt came from an old dress of mine that had a wide ruffled hem (the paisley-ish part of the back of the shirt). I left the ruffle on for added interest--I thought it looked cool to bring in the variation on the print, but also I liked the dropped hem.  Also, um, I wouldn't have had enough fabric otherwise.  But I wouldn't have done it that way if I didn't think it looked good!  My husband thought it was kind of weird, but what does he know?

It didn't come out perfect on the first try--I had some issues with getting the ruffle to lay right.

Before prehensile-tail removal
I know that just what every girl wants is a ruffle extending out from her natural butt to make it look wider, but I thought I'd better take it in just to be safe.

It is so dang hard to get a photo session done period, there was no way I was doing another one once I fixed the tail issue--so my mom cropped out the tail for me in that initial photo.  That really is what it looks like now.  But these back and side photos were also taken pre-tail-removal, so the shirt lays better now than how it looks in these photos.  It's a little tricky working with a ruffled portion in the back--I had to do some angled tucks to get it to lay right, but I think it's worth it for the added detail.  And I curved the edges up to meet the front portion of the shirt (the same basic shape as the Scoop Top pattern), so I did have to hem the bottom edge of the shirt even though it was an upcycle.

Side view--shows how the prints line up
Yes, I cropped out my grown-out roots.  It's my blog, I can do what I want.
Good view of the pre-taken in extra-wide butt ruffle.
I really really love the end result on this one. So, Jess, if it turns out you just don't like this shirt enough to wear it, let me know--I'll take it back and make you something else!

Tuesday, June 18, 2013

Cutting up a Purple Jersey Sheet!

I've been having fun playing with the yardage that you get when you cut up a sheet set.  So far I haven't even touched the fitted sheet or the pillowcase, and I've got lots of the flat sheet left of this lovely purple jersey from a twin sheet set.  It was free, so I feel like I can try things and not be too worried about the results because there's only the investment of time, not actual money.

I'm super happy with my first experiment, and Little Sister wants to wear it over all of her tank top dresses, so I consider it a win.  I made a flyaway cardigan with a single button closure using this great tutorial from Caila Made:


But I took the raw edge a step further.  I didn't make a binding strip to go around the neckline, front, and hem; instead, I folded the edges of my front panels and hem over to the outside of the garment, then used a decorative stitch to sew them flat.  SO easy and fast to finish it this way!


You could totally use this method on short sleeves, a shirt hem, whatever, as long as you're using t-shirt fabric that doesn't fray.  I think the detail looks best when you stay right by the raw edge of the fabric.

I used a decorative stitch, but it would be cute with a simple zig-zag too, like in the Caila-Made tutorial.

When I did the corner at the neckline, I just tucked a loop of elastic under and made sure to sew it securely. I sewed the button on the other side afterwards.  And at the corners of the bottom hem, I tried to fold my fabric into a neat mitred corner.


It's the perfect lightweight topper, and I might make one for myself too!

Happy about her cardi

Giving me a very "Church Lady" vibe


Here it is just on it's hanger, in case you like that sort of thing.


And since I had so much of the fabric, I made myself another cap-sleeve tee as well.  I was a little sloppy with the construction on this one and I'm not as happy with the results.  I thought I might like it a little looser, so the waistline was more pronounced, but I think it just looks sloppy.


I've been wearing it with a belt, which helps:


And here's how the back looks:


How about that lovely backdrop, huh?  The hubby's been tearing up the backyard and there is literally NOWHERE I can stand back there that doesn't have a huge pile of dirt or dead plants in the image. So hello there, potted tomato plant, let's be friends.

And in other news, this summer is the first in my stay-at-home mom career where both kids are at home full-time (other than a few camps here and there--and even those are only a couple of hours a day).  The last two summers The Boy had preschool 3 mornings a week, so it was just me and Little Sister, and running errands and whatnot is definitely easier with one kid than two.  My kids are pretty good about playing together these days, but if I pull out the computer to try to blog, or do some work on my MIL's website or photos, or whatever, it's like an alarm goes off that WE NEED MOM'S IMMEDIATE ATTENTION!  So while I'm looking forward to this summer for spending some relaxed fun time together, I have a feeling the blog is going to be on the back burner for a while.  My precious alone time will be spent working on the website where I actually get paid, and hopefully with MAKING stuff, and maybe at some point I'll get a chunk of time to blog a whole bunch of projects at once.  But, fall is not too far away, so don't give up on me if you don't hear from me for a while around here!

Monday, June 10, 2013

Appliqued Raglan Tee

So, you've probably noticed that I don't make as much stuff for The Boy as I do for Little Sister, and one of the reasons for that is that he has drawers full of clothes that fit him, and he just grabs whatever is on top.  It just doesn't make that much of a difference to him, it would seem.  One t-shirt does the job as well as any other.  And he's been living in too-big freebie or gifted tees for so long that most of them still fit just fine, even if he's had them for a year or two.  Little Sister won't wear t-shirts and pants or jeans, and it's so expensive to buy the kind of dresses that I like, and she's really opinionated about what she wears, so it's cost-effective for me to make stuff for her.  And I won't lie, it's definitely more fun (and easier, most of the time) to make dresses than to make standard-issue boy clothes.

BUT.  When The Boy gets a new shirt from me and chooses it from the drawer repeatedly because "it has a mother's love"...well, maybe it's time to send some of those library summer reading program shirts to the Goodwill (or the upcycling pile) and start making room for some more handmade goodies.


I made my pattern from a shirt The Boy already owns, and followed Craftiness is not Optional's Raglan Tee Tutorial.  I had made a few of these before and loved the tutorial and results.


The Boy decided I should spice up the shirt by adding some animals from the scraps of fabric I had leftover from his pj's.  The kid's got a good eye!  The patch on the sleeve was my idea though.  I just cut the images I wanted out of the scrap knit fabric and sewed them on using a ball-point needle--pretty simple version of applique.


He has also started having fun with his "modeling" sessions.  He's getting used to the idea that if he wants me to make him clothes, he's going to have to let me take pictures of him wearing them!  The green and blue striped fabric came from Girl Charlee, and the gray sleeves and ribbed neckline were cut from an old t-shirt of the hubby's.  I only had a half-yard cut of the stripes, which was plenty for this size 5/6 tee since I was doing contrasting sleeves.  I also opted to do a rolled hem, since this fabric rolled really easily.

He's looking so old.  I might cry.

And henceforth, all of our photo sessions will include an airborne portion.
 We were photobombed by "Princess Jasmine"--Little Sister in the "jingly dress" brought back from a trip to Puerto Rico by Grandma and Papa.


 She doesn't love sharing the spotlight.

Get outta here!
Here's the post about the last time I made these shirts.  Neither of them fit anymore (sniff).

Wednesday, June 5, 2013

Anthro Inspired Stripe/Floral Tee

I had a knit striped fabric in my stash that I've been itching to sew with, and when I saw the Pattern Pop Tee from Anthropologie I thought I could make a version of it that would work for me.

Obviously, I veered from the inspiration.
The Scoop Top (free printable pattern from Skirt as Top) was perfect for this!  It has a pocket, and it even dips down in the back!  It's a great pattern, the tutorial is easy to follow, and I've already got a plan for another Anthro-inspired knits-meets-woven that should be perfect with it.  The top went together really quickly.

I had ordered the striped knit (a cotton jersey blend) from Girl Charlee without knowing what I was going to do with it, and when I was dually inspired by the Anthro shirt and the Scoop Top pattern, I went digging in my upcycling pile to see what I had that coordinated with the stripes.  And lo and behold.  This gem.

Anybody else out there wear one of these babies?
I used to LOVE this dress in high school. Sometimes I wore it with pigtails and mary janes.  Other times I went with leggings and my Authentic Doc Martens Purchased at the Actual Dr. Martens Store in London, England.  You know, when I was feeling badass.  Or cold.   I found it at my parents' house, shoved into a corner of my old closet, and knew that I would be able to use it for something--other than, say, wearing it as-is, since my style has morphed somewhat since then.

Proof.  And yes, I did make that hemp necklace I'm wearing.
Photo shamelessly stolen from a high school friend on facebook.
Not only did the colors work, and the drapey-fabric-with-built-in-wrinkles was a nice weight to tie together with the knit, but I also really like the way the tiers from the original dress give the back of the top some shape.


Maybe easier to see what I'm talking about here?

I also like the striped binding contrasting the floral in the back.
Also, I'm not much of a florals girl anymore, so having the stripes up front where I'm looking at it all day but knowing those purty flowers are hiding in the back makes it more wearable for me.

Here's how it looks on me
 I did end up taking the sides of the top in a teensy bit, but that might have just been due to working with the curve of the tiers in the back.  I was a little worried that I would need to cut out the back larger than the pattern since it was a woven instead of a knit, but I needn't have worried.

Back panel peeking out
 And my knit was fairly thin but not a tissue knit, so I was able to use a regular old zig-zag to attach the neckline and a double needle for the hemming, without any stay-tape or stabilizers.

I also have to say, I love the pocket for drawing attention to the mixed fabrics.  I don't usually love pocket tees, but in this case it's totally worth it!  And ALSO also, when I cut out the pattern, I thought this shirt was going to be waaay long, but it's totally not.  It's just perfect.  Go Scoop Top!

Monday, June 3, 2013

Yet Another Nightgown


Since making my first nightgown a few weeks ago, Little Sister has refused to wear any of her old pj's to bed.  Pair that with The Boy having grown out of all of his warm-weather pj's, I've been making nothing but sleepwear lately!  This nightgown was based on this photo and tutorial that I saw on Pinterest:

Photo and Tutorial from Everyday Chaos

Pretty simple to make, but it is intended for a bigger kid than Little Sister, so I could have cut down on the width a bit.  I also monkeyed with the casing at the top and mine came out pretty bulky, so I'd recommend just following the tutorial.


I used a piece of foldover elastic to make the straps, and I just sewed the ends together so I didn't have to worry about tying/untying a bow.  I do like that adaptation.  I don't know how long it ended up being--I just threaded it through the front and back casing and sewed it together, then slid it around until the sewn part was well hidden inside the casing.


The pinkish fabric is a knit with a slight burnout pattern, so it is a little sheer.  That's why I left the width alone--I figured that if it was gathered up more, the sheerness would be less obvious.


The pink brocade print + black ruffle does lend a little air of Brothel Lampshade, but it's still pretty cute on her.  And it's twirly.

Perfect for dramatic bedtime scenes.

This style could pretty easily be used as a dress as well--I think in this case the knit fabric (especially because it's a little see-through) keeps it well in the nightgown family, but I could see doing a daytime version of this as well.