The Boy loves what he calls "fake-out shirts"--where it looks like you're wearing a short-sleeved shirt over a long sleeved one, but really it's all one shirt. So that seemed like a good place to start here. I wanted to give it a little more visual interest, so I decided to try out a henley neckline too. I followed this tutorial from Melly Sews for the button placket, but I decided to just do a squared-off neck binding instead of the tapered one she describes. I loved this method for attaching the binding and will definitely use it again--I used zig-zag stitches on both the inside and outside to make sure there was plenty of stretch in the neck band even though the button placket meant that the stretch wasn't really necessary.
 |
| Plenty big neckline |
I also braved my serger for this shirt. While it wasn't really even necessary, I figured, I HAVE one, so I might as well use it, especially for stretchy knits. But after my first experiment with the serger on this knit top, I still wasn't confident because the machine seemed to be dropping stitches.
This is where I tell you about how much I love my neighborhood. Around the corner from me (about two blocks away), there is a relatively new little sewing shop called d & t. They have darling fabrics, a small selection of notions, handmade clothing, and work space. They teach classes there, but what has really appealed to me is the open sewing. I finally made it over there for the first time this weekend, and the woman there (I'd better get her name next time, huh?) futzed around with my serger until it was running smoothly. Huzzah!
 |
| The serger works! |
At home, using my regular sewing machine, I had already made the button placket, sewn the shoulder seams, and attached the short sleeves to the shoulders. Then I used one of their machines with a double-needle to hem the short sleeves and attach the long ones (cut out of the sleeves of an old t-shirt so they were already hemmed). Once the serger was no longer dropping stitches, I sewed up the sleeves and sides of the shirt, then hopped back over to the machine with the double needle to hem the bottom! It was so nice to switch from machine to machine (lucky for me it wasn't too busy in there)--that alone was worth the (VERY reasonable) price of admission ($5 an hour, and the first 1/2 hour free! Are you kidding me?), and on top of that I now have a perfectly functioning serger!
Oh, and I can't forget to mention a very important bonus-- d&t has a kids' play area set up in one corner! Little Sister came with me for open sewing, and she played there QUIETLY AND WITHOUT BUGGING ME for over an hour! Over an hour! She can barely go 10 minutes at home! I don't know if the novelty will wear off the next time we go in, but wow, it was so relaxing. I could ask an expert any little question that came up while working on my project, Little Sister was happy and playing, I came home with a practically finished project, there were other crafters there working on their own projects and contributing to an atmosphere of friendly creativity--it was awesome. Loved it. Can't wait to go back.
 |
| Run, don't walk. |
 |
| Maybe I should think about making him some new pants, too? |
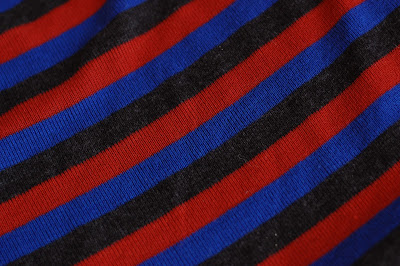
Here's a closer look at the knit fabric, which is very soft, but a little tricky to work with AND kind of see-through if you hold it up to the light.
 |
| It somehow doesn't look see-through when he's wearing it though. |
It works, but I'm not sure about the neckline. It came out just the way I planned (which is to say, yes, I did it that way on purpose), but when I saw it finished I wasn't sure if I liked the open tab at the top after all. I thought about adding an extra button there, but there wasn't enough room to space the buttons evenly, so I'm just leaving it as is. I could just sew it closed, the neckline is plenty wide. Thoughts?


No comments:
Post a Comment
Note: Only a member of this blog may post a comment.