
Attention Targets and Old Navys of the Pacific Northwest:
Boys need LONG PANTS in this part of the country until at least July!

The Boy has been growing like a weed, and all of his pants are suddenly highwaters. And in April (and now May, but I was searching a few weeks ago), there are NO PANTS to be had in any of my usual cheapie stores for boys clothes.
To add to this challenge, when pants can be found, there is a HUGE discrepancy between a size 4T and a size 5T. What is a kid to do when his 4T's are too short, but the 5T's are still 3 inches too long? Rolling up the cuffs is not an ideal solution for my active kiddo.
Luckily, I recently got a bag of old clothes from a friend (who also lent me her sewing machine while mine was in the shop--it went untouched). In there was a pair of women's casual pants that seemed like a perfect candidate for a makeover into a pair of boys size 4.5 T pants.

I used the Dana Made It printable pants pattern again, using the flat front. I perused my old blog post on adapting her basic or flat front pants pattern for upcycling women's pants, and it is actually fairly clear and helpful, so I'll just direct you there if you are interested in doing this project. But instead of using her pocket pattern like I did before, I re-used the pockets from the original pants, so I'll explain that below. I was reminded while making these pants that women's pants are so ideal for upcycling into kids pants because unlike most mens' pants, women's pants typically have some stretch, making them really comfy for kids. These pants were a perfect lightweight fabric with stretch and a textured stripe, almost making them look like corduroy.
I finished the whole project, AND kept an eye on Little Sister, during one of The Boy's preschool mornings. A morning where drop-off happened late (ahem, slowest breakfast eaters on the planet--but I do recommend this breakfast, while I'm on the subject), so I really only had about 2 hours to complete them. I'm actually writing this blog post in the few minutes I still have left before I need to pick him up. So it went pretty quickly!
I made The Boy try the pants on after Little Sister went down for her nap, and I was so pleased with the result that I decided to pull out an old pair of my cords (with a little stretch, natch) and make him another pair. He didn't want pockets on these, so they were even quicker, about 45 minutes start to finish! I got through the sewing, the fitting, AND the photo shoot before Iris woke up.
I guess two hours might still seem like a long time for something I could just go and buy for $10 (if there were any in the stores...), but really when I add up all the time I would spend driving around, dragging a kid or two through Target and Old Navy, being frustrated not finding anything, two hours plus no cash seems like the way to go. Especially if I'm making two pairs in a row. Totally worth it. Now if I could just remember this the NEXT time The Boy needs pants, and skip all the shopping in the first place, then we would be in business.
You know you have a winner when after the photo shoot, he asks, "Mom, can I wear these for the rest of the day?" Yes, yes you can.
 |
| Fist pump! |
 |
| Work it out. |
 |
| Yeah, um...I got nothing. |
And while we're at it, why don't we take pictures of the ones I made out of the cords too? I decided to make these a little roomier.
 |
| Not without my monkey |
 |
| Airborne |
 |
| Wait, the monkey is supposed to be on my back? |
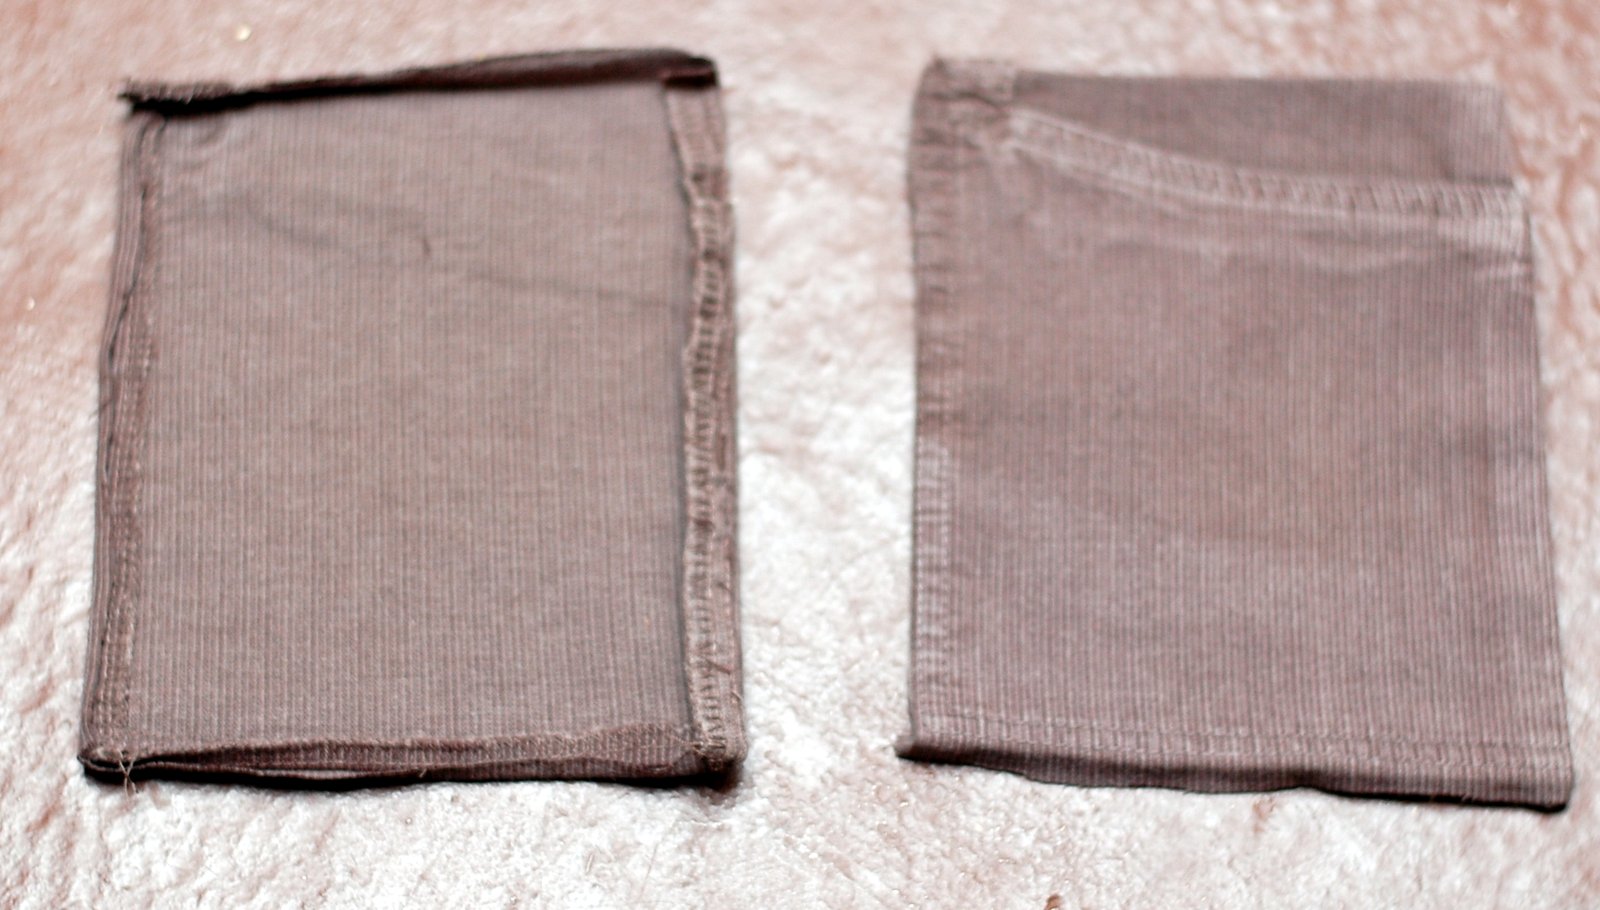
Ok, so here's how I did the pockets--

I cut the existing pockets out, including the back piece, leaving a little seam allowance around the outside (I did about 1/4 inch but now that I've done it, I'd recommend more, maybe 1/2?)
 |
| The removed pockets |
I ironed the seam allowance under all the way around on the pockets.
 |
| Shown wrong-side on the left, right side on the right. See what I did there? |
Then I pinned the pockets on the pants. I actually even measured, instead of just eyeballing. You will want the majority of your pocket to be on the FRONT of your pants (the side of your original pants seam that's slightly narrower and slightly lower at the top). My pocket was 6 inches across, and I thought it looked best with 3.5" on the front portion of the pants and 2.5" on the back. Also, place the pockets down from the top of the pants by 1.5 to 2 inches--you want to make sure the top of the pocket is out of the way when you fold the waistband over.

Because I cut the whole pocket, front and back, out of the existing pants, I actually sewed all the way around when attaching to my pants. If you've just cut out the front portion of the pocket, make sure you don't sew it closed when attaching it!
 |
| The pocket, attached. |
Once the pockets are in place, go back to Dana's directions and sew your pants together!
Oh, I like to put a tag in the back of the pants to aid in child self-sufficiency in getting dressed. I sewed mine in place AFTER pressing the waistband with the iron so I could see where the tag should go based on the pressed folds, but BEFORE sewing it down, so the tag was already there when I sewed the elastic casing.
 |
| Don't forget a little tag, so you have PROOF when you tell the boy he has his pants on backwards. |
 |
| I like the pockets. I just don't like to put my hands in them. |

they are really nice... want to make one tooo for my son ...
ReplyDelete