Well, Little Sister has been a very cooperative girl with all of the
Project Run and Play themes, some of which are things she would have never picked out on her own (although she did end up loving them anyway!) So when I saw the
"All That Glitters" theme, I knew I would make something pink and sparkly that Little Sister would love no matter what. She has earned it.
 |
I don't normally go in for something so fancy,
but I figured she could wear it for her birthday/Easter dress (a few days apart). |
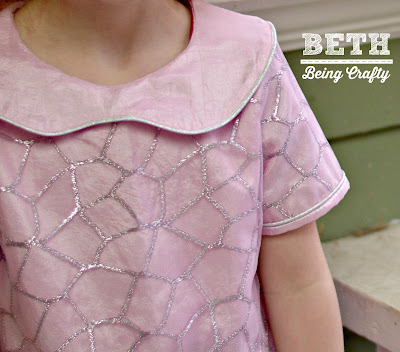
She was so excited when I showed her the fabrics. Both the satiny, slightly crinkly pink and the fun geometric-ish silver lace (I saw that it was called "giraffe" on the bolt) were in the clearance fabrics at Joanns, with an extra 50% off--you know I can't resist that kind of a deal! Even the piping was a bargain, from the clearance trims at
Fabric Depot--love that place!
 |
| Love it with her silver boots! It was pretty cold out today, hence the tights. |
This is the second time I've sewn the
Norah Dress from Mouse House Creations--last time was also for a Project Run and Play Challenge--I made
a double gauze Norah tunic with sashiko embroidery for the embellishment challenge last year, and it (and the matching one for her brother) are probably some of my favorite pieces to date!
In my mind, I envisioned a super cool mod-style button on the back--something like
this rhinestone-covered dome. But alas, I didn't have a button like that, so you'll just have to squint and use your imagination since I had to use this one instead.
 |
A cool button in its own right, but not what I had in mind.
|
I figured out a new-to-me technique for the sleeve--maybe this tutorial already exists out there, but I hadn't seen it before and I loved the way it turned out (and it was super simple), so I thought I'd share it!
I wanted to add the silver piping to the sleeve to echo the collar, but the overlay is sheer, so if I just sewed the piping on between the two layers, you would have seen the seam allowance showing through. Luckily though, my pink satiny layer was the same on both sides, so I had the idea of rolling the sleeve hem OUT instead of in, and attaching the piping there. I think it looks great!
First, I basted the overlay to the sleeve piece so it was like working with one piece of fabric. This would work without the overlay, by the way--just as long as the back side of your sleeve fabric looks as nice as the front side.
Then, I pinned the piping to the bottom edge of the sleeve on the WRONG SIDE.
 |
| Crappy iphone photos ahoy--impromptu tutorial! |
Sew the piping on, with the raw edges together. Then turn the piping to the right side of the sleeve:
Fold the bottom edge up again so that the piping is at the top of your "cuff." I used the edge of the piping as a guide for the width of my cuff, but you could make it wider if you wanted.
 |
| As you can see, I actually basted my layers together AFTER I sewed the cuff! |
Pin the piping in place, then stitch in the ditch (right along the line where the piping meets the cuff fabric) along the length of the bottom of the sleeve.
 |
| Pinned and ready to sew! |
You can use a piping or zipper foot to sew right up next to the piping, but here's a confession--I was too lazy to trade out my foot so I just plopped my regular sewing foot right down on top of the piping, and it worked fine! Obviously this will depend on how thick your piping is.
That's it! When I sewed the sleeve together, I did do an extra seam to press the seam allowance down on the inside, since it's a little thick where the piping comes together.
All in all, my finished product came pretty close to my design yet again! When I showed Little Sister this photo, she said, "Hey, it's got hair like mine!" I was like, um, yeah, I did that on purpose!
 |
| She even wanted to wear her silver boots since that's what was in my picture :) |
She did request that I leave the pockets out--I had planned to do a couple of welt pockets with the silver piping for trim. Is she crazy?? Doesn't she know that all the best dresses have pockets? But I wouldn't have had enough piping for the sleeve detail AND the pockets, so it all worked out for the best.


