Showing posts with label home improvement. Show all posts

Wednesday, November 28, 2012

Kiddo Padded Headboard!


Our little girl has moved into her big girl bed!  She transitioned pretty easily to a toddler bed (her crib converted into one), and even though SHE would have been comfortable there for a while, her dad and I were most definitely NOT comfortable when we snuggled in for stories at bedtime.  So we found a twin captain's bed on Craigslist and moved it in (breaking this family picture in the process, sniff).

Before
It was working pretty well, except...maybe it was intended to use a box spring?  I don't know.  It's a platform bed, so doesn't need a box spring, and adding one would have felt like my little girl was teetering a bit high above the floor for my taste.  But there was a lot of blank headboard showing.

With pillows removed.

And this handy little hole:


Great for stuffing toys and books into.  Not so fun for toy-and-book retrieval.

Sooo, I took it upon myself to make a padded covering for that area between the mattress and the cubby shelves on the headboard.  I measured the width and the height that I wanted, went to Home Depot where I found a piece of MDF in the scrap bin and they cut it to the right size for me (cost me two bucks, yeah!).
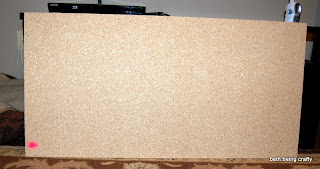
That pink dot means it costs $2.

I also had a roll of 1 inch thick foam that I bought at Joanns' with a coupon a while back, intending to make a headboard like this for the boy.  He may still get one at some point; we'll see!  This was the most expensive part of the project, since the stuff costs something like $17/yard.  Use a coupon!

My quilt batting was handed down from the hubby's grandma, and for my fabric I cut up the duvet cover my mom had made for Little Sister's crib.  The fabric matches the curtains that are still in her room.  That's why the two fabrics are on my headboard--they were already sewn together that way!  You can easily use more than one fabric as well.

Little Sister's original nursery--you can see her duvet and curtains here


Supplies:

Backing board, thick enough so that you can attach it (I used screws coming through the backside of it so they didn't show in front)
1 inch thick foam, same size (or slightly smaller) than the backing board
Sheet of quilt batting large enough to wrap over the foam and around the edges of the board
Fabric same size as the quilt batting
Spray Adhesive (not required but helpful.  You could also use hot glue, but it would be more of a pain.)
Staplegun and staples (make sure they aren't longer than your board!)


Directions:

First, cut your foam to the same size as your backing board.  Lay it out on top of the board, then lift up one end and spray the board with spray adhesive.  Get that end stuck down, then lift up the other end and spray the board little by little, laying the foam and pressing it in place.


Once the foam is adhered, lay out your batting over the top.  Make sure you have plenty to stretch to the back side of the board, where you will staple it in place.  I was lazy and didn't staple the batting separately; I just skipped on to putting the fabric on top.

Lay the fabric over the batting.  I started with the top since I wanted to make sure I had a straight line with my contrasting fabric.  I stapled right in the middle first, then stretched the fabric around the bottom and stapled in the middle down there.  Then I did the same thing on the sides.  Making sure the fabric was stretched tight and the line across the top was straight, I stapled the rest of the way across the top, then did the rest of the board.  I folded fabric under and stapled at the corners.  Because the back won't be visible, I wasn't too careful about the way the back looked--I just made sure the front was smooth.

Back side
 Once I was happy with the way everything was stapled down, I was done!


The only thing left was attaching it to the original headboard.  So I called in the husband.  I held the headboard in place from the front while he screwed through the original white headboard and into the new padded piece, and through to the bed frame.


Minor problem--I was thinking it would be more secure if I had the headboard go down below the actual mattress.  Turns out, it would have been easier to attach if the headboard just lined right up with the platform where the mattress rests (or a teeny smidge above that).  Because the headboard has THICKNESS.  Duh.  So we ended up with this issue:

Mind the gap.
Not such a big deal, really, so we decided to let it slide.  However we did have to be careful when attaching it that we didn't screw the drawer that's in the base of the captain's bed shut.  Not an issue if your padded headboard is smaller.

But all in all, I love it!  It brightens up a rather boring-looking bed, and it's way more comfy to lean on during story time.  Plus it softens the edge of the shelf for head-bonking.  So now we have an official big-girl room!


Sunday, September 30, 2012

House Renovations!

Ok, this isn't so much me being crafty, but there are PROJECTS that have been ACCOMPLISHED, some with at least my input and most completed while I was wrangling the kids and keeping out of the way, and even a few coats of paint that I applied myself.  I have been waiting and waiting to share pictures until everything is finished and perfect (not to mention tidy and organized) and I have realized that that day may not come for a long, long while (I refuse to say never).  So, I have pictures to show of what we have done to our house!  These pics go waaaaay back--some of this is stuff we did before we even moved in two and a half years ago, but the big deal is the upstairs renovation that we have been working on for the last year and have finally gotten to a point where we can live with it, and the contractor is no longer coming to our house, and the rest of the projects are finishing work that we can (when we get the time and energy) do ourselves (and with the free labor of those who love us and want the best for us--yes, I mean YOU!)

So, without further ado, OUR HOUSE!

The paint job happened after we'd lived here for about a year.

I'll do a quick tour of the main floor-that's where we did most of the work before we moved in--before moving on to the monster project that was our upstairs renovation.

Paint:  Sherwin Williams Compatible Cream (top) and Butternut (below)

Most of the "before" pictures were taken before the previous owners moved out.  We ended up buying it before it went on the market, so these are just some shots their realtor had snapped to show her colleagues.  So sometimes I don't have great angles for comparisons, but I did my best!  In the living and dining rooms, we pretty much just painted.

Paint:  Sherwin Williams Compatible Cream

The kitchen was our biggest pre-move project--floors, counters, some new appliances, backsplash.


We painted our kitchen the same color green as the outside of the house.  (Clary Sage from Sherwin Williams, if you're curious).


We've still got some more work to do in the bathroom--intending to install crown molding and need to replace the floors.

That text hidden behind my watermark says that we also enclosed the tub.
Paint:  Benjamin Moore Dartsmouth Green
A quick peek at the basement--we painted, and eventually took out the carpet and painted the concrete floor.  The basement is the site of our next major project, which the husband speaks of as though it will be happening sometime before my children are in high school.  I am not so sure.

Paint:  Sherwin Williams Nomadic Desert

There is a play area in the basement too, as well as my sewing area.  I'm not showing it to you.  It's served as extra storage and staging area during the renovation, and it's still just embarrassing.  Just imagine a lovely open area with a train table and perfectly organized toy bins, and a sparkling sewing machine with labeled bins and folded color coded fabrics, and that's pretty much what's over there.  You'll just have to take my word for it.

Moving back to upstairs--the stairs themselves were a huge portion of this most recent project.


I am LOVING all the space to hang family photos!  Sure, I could have hung some before, but it was a bit awkward with the divided wall, and we also pushed back the wall over the end of the stairs so you don't hit your head coming up, which opened up the area and made the pictures easier to look at.


We put a hallway through the original master bedroom, allowing us to open up the landing/upstairs.  It feels so much brighter and more open up there now!

Not done hanging more pictures upstairs yet!
Paint:  Sherwin Williams Compatible Cream

We stole some of the square footage from this room in order to give the master suite a good sized walk-in closet.  MUAH HA HA HA HA.  The funny thing is, it actually looks bigger now.

Paint:  Sherwin Williams Resolute Blue and Great Green (the boy's picks)

The original master suite became Little Sister's new room.  We put a new wall in this room in order to create the open hallway you saw before.

Paint: Sherwin Williams Sole (that should have an accent over the e--"so-LE!"

Previously, you had to walk through the master suite to get to a sitting area, which had doors to a small master closet and a bathroom.  The sitting room was being used as a master closet extension.


When we moved into the house, I was 8 months pregnant with Little Sister.  The sitting room made a perfect little nursery for her.

Also Sherwin Williams so-LE!  With custom-mixed colors for the mural.

But even then we knew that it was not a long-term solution.  Having to walk through mom and dad's room to get to the stairs is great for a baby--not so great when she gets older.  So the main part of the project was figuring out how to maximize the space in the sitting room to turn it into a master suite.  We talked to a few people about doing a dormer, but it was not in the budget.  So we got creative with our contractor, and were able to turn an 8x10 sitting room into a 12 x 14 master bedroom!

Next up:  buy grown  up bedroom furniture.
Paint:  Behr Rich Taupe
The footprint of the bathroom stayed the same, but it's probably one of the most impactful changes in the space.


I love the color in here.  It's a little hard to see in the pictures, but it's Behr Rocky Mountain Sky, kind of a grey-blue.  Very peaceful.


I mean.  It feels so luxurious now.  I LOVE it.

We didn't have room for two sinks in there, so...

Paint:  Sherwin Williams Nomadic Desert
Oh, and look!  I finally have a place to hang the awesome jewelry display my lovely friend Jill made for my birthday almost a year ago!  It's been tucked into a closet, waiting for its moment to shine.  And I must say--now that my jewelry is out where I can see it, I have been actually wearing it!  I'd pretty much been wearing the same necklace (maybe two) and pair of earrings for the last year, but now that I have all of my choices at my fingertips when I'm getting ready in the morning, I have been making good use of them.


The rest of the closet isn't finished yet (it's just an empty room with a dresser, and my clothes in a bunch of suitcases.  But man, you guys!  We are getting there!

Sunday, January 22, 2012

Easy Ikea Hamper Makeover

I bought these hampers for my kids at Ikea for $4.99, and they're fine, I guess, but I thought I'd be happier with them if I liked the fabric better, and it didn't seem like it would be too tough to cover them so that I liked them better.

The starting point
And I was right--it wasn't hard. But there are a few things that I learned through trial and error (or through not paying attention and error, so having to do it again) that might make it even faster and easier for you than it was for me!

First, I chose the fabric from my stash that I wanted to use, and then I grabbed an old shirt from the goodwill pile (eg, not something I wanted to upcycle into a dress for the little one). I traced the lid on the old shirt, laid it wrong-side-up on top of the face-up fabric, pinned them together, and cut out the circle. You might be able to tell from my photo that I cut right on the line. What am I, sewing for the first time with no idea what I'm doing? It was late at night. But please note, leave yourself a seam allowance, dummy.  Actually, I'd give it about a half-inch.

The next step is to shoo the persistent animals out of your extremely neat and organized workspace.

I know right where everything is.
Anyway, by pinning your wrong-side-up backing to the right-side-up fabric before you cut it (WITH a seam allowance, of course), you are ready to just stick it in the sewing machine and sew around the outside, right on the line you traced, leaving an opening big enough for your hand. I like to make a little 90 degree angle at the opening so that the edges fold themselves in when you flip it right-side-out.

Hard to see with the white thread, but...do you know what I mean?

Once it's right side out, stick your hand in there to push the edges out all the way around, then iron flat.
Auto-tucked-in opening.
I would sew the opening closed at this point, I left mine open but then it was a bit of a pain making sure it was closed while attaching to the hamper lid.

The lid comes off of the hamper (it's stuck with a piece of velcro), which is nice for running it through the sewing machine.  There is a piece of plastic boning that gives the circle its shape, and working with this was something I learned through trial and error.  I think it's still helpful to pin the fabric to hold it in it's general place, but expect to do a lot of tugging.

Feed it carefully into your machine.  What ended up working best for me was to place the plastic boning under my presser foot and sew the fabric circle down as close as possible to that boning.  It was a little hard to keep it under the foot, but it looked a lot better than when I kept the boning on the right side of the foot and tried tugging the fabric over far enough.  Yes, I did sew this on more than once to learn this. You're welcome.  In any case, the top probably won't look perfect, but it will look cuter than when you bought it.  It's a hamper, people.  Relax.

To cover the handles, I first flattened down the body of the hamper (it's got velcro tabs to hold it that way).  Then I cut out two rectangles of my fabric, approximately the same length as the handles (one for each side). I kept the fabric right-side-out and folded it around the handle, then sewed a straight line down the outside, making sure NOT to catch the actual handle in the seam.

Then I trimmed the fabric and turned it so the seam was toward the inside.  Finally, I cut two squares of felt for each side and glue-gunned them on, covering the ends of the fabric handle cover as well so that it would stay put and not expose my sloppy seam.


There's the finished product!  It still doesn't match my daughter's room, but what are you going to do? It lives in the closet anyway.

Posted by Picasa

Wednesday, October 5, 2011

Fabric Pen Cup!

I had some leftover upholstery fabric from when I made pillows for my basement, and I decided that my sewing area could use a little organization (since I could NEVER find a pen when I needed one).  I have this shelf with a bar underneath for hanging things, so a hanging pencil cup seemed like a good solution, especially since then I could put pokey things in there like an exacto knife and seam ripper, since the kids wouldn't be able to reach it.

Here's what it looks like:


I need to make a few more of these, in various sizes, so when I do I will take some photos of the process and post some sort of tutorial.  I could see them being handy for several things :)

Thursday, July 14, 2011

Pillows!

I love it when I can finish a project in an evening after the kids go to bed.  Then I can sit and admire my handiwork while watching random stuff on TV (coincidentally, as I watched "Clean House" on the style network tonight, there was an appearance by this tunic, the very same one that I refashioned into a pretty little dress for Little Sister!)

In any case, these pillows (an example of a one-evening project) are one step in the ongoing project that is our basement.  We knew when we moved in that this basement would be a project eventually, but we are now most of the way through a saga that started innocently enough with renting a steam cleaner for the carpet, included spending a Friday night spontaneously ripping out carpet (after said steam-cleaning dredged up all kinds of gross old cat pee smells), and will end (for now) with five out-of-town guests staying in our house in a little over a week.

New rug, old pillows.  Sorry the new painted floor is not visible in this pic.  Same old baby.
So, after sealing and painting our concrete basement floor (another fun way to spend your weekend evenings after the children go to bed), we bought a great big new rug for the sitting/TV room area.  I have been wanting new pillows for ages, and this overhaul is the perfect excuse, since the sad old ones don't go with the new rug at all.

Bought on clearance at Cost Plus, I don't know, 8 years ago?  

I got to dig through the outdoor clearance section as well as the home decor 50% off racks at Fabric Depot, the best fabric store ever, until I found the combination that I wanted.  I was pleased to find three fabrics that coordinated with each other AND the rug, all on sale for at least 50% off (including the rug, thanks Tuesday Morning!)

The fabrics (on the completed pillows, as you can see)
Little Sister woke up from her nap before I finished cutting the fabric, so
she was eager to help/hinder the process.

In addition to recovering the saggy throw pillows that we have, I also decided to turn our poor man's sofa with a chaise into a poor man's sectional by making my old body pillow into a backrest for the chaise section. This pillow was not-so-affectionately nicknamed "the surrogate" by the hubby because I used it to make myself comfortable while sleeping when pregnant.  We kept it around as floor padding when The Boy transitioned to a big-boy-bed, and even though it has spent the last few months tucked underneath his bed since the falling-out risk has all but disappeared, he was very nervous when he saw me taking it  to the basement.  "What if I have a hard fall?"  he asked me.  Well, I'm sure he'll live to tell about it.

Little Sister was also reluctant to give up the old body pillow.

Now what you've all been waiting for...the transformation!

Our same old basement with the new pillows/backrest:
Ta da!  I think the new pillows lighten things up.
Now, even with the clearance fabrics, this project wasn't as cheap as I wanted it to be.  I spent $36 on fabrics, and while I do have enough left over to make about four more pillows, I don't actually need four more pillows, so that's kind of a wash.  Although I think I'll make a rectangular pillow for the recliner, and probably a seat cushion for my crafting chair, so that's making it go a little further.  I know that there are places where you can spend north of $36 for only ONE pillow, but I don't shop at those places, and I know that I could probably have gotten 3 or 4 pillows for that amount of money at my favorite haunts Marshalls/TJMaxx/Ross/Tuesday Morning, but honestly driving around to find enough coordinating pillows probably would have been more work than making these myself!  Plus, you can't buy a "backrest" just anywhere--that baby is custom.

So all in all, I'm pleased with the way it turned out--and I'll post more about our basement transformation as it progresses!