Showing posts with label costume. Show all posts

Wednesday, October 12, 2016

Last Year's Halloween Costumes--Minions

Last year, we had fun making/adapting our own halloween costumes, but I never got around to posting them.  I intended to take some good pictures but never did it, and here we are a year later with still no post about what ended up being a really fun set of costumes.

So, here's the rundown:  The kids wanted to be minions.


Thrift store overalls (luckily found in close-enough sizes), thrift store yellow turtlenecks (adult sizes that I cut down), goggles made from empty duct tape rolls and those rounded masks you wear to keep from breathing in dust, and stocking caps ordered on Amazon.

And then the most amazing thing happened.  We were eating an early dinner, getting ready to go trick-or-treating, when we joked about how great it would be if the hubs had a Gru costume.

Then we realized...it wouldn't take much.  He had a black wool car coat and scarf.  He had a pair of pants that he bought in Tokyo not realizing he had accidentally purchased very skinny skinny jeans.  I stuffed a long, narrow decorative pillow into his jacket's shoulders, and Voila...


Is that amazing or what??

Since hubby had not originally planned to wear a costume, I planned my outfit separately and therefore don't fit in at all, but that's ok.  I was Kiki from Kiki's Delivery Service, a charming Miyazaki movie that you should watch this Halloween season if you've never seen it!


So that's it!  This year, we're not doing homemade costumes (sniff)...the kids wanted to be characters from Harry Potter, and it just didn't make sense to make Gryffindor robes when I could buy them so easily.  But there will be some surprises in store (if I get around to posting them before next year!)

Monday, February 8, 2016

Queen of Hearts!

It's Week 2 of Project Run and Play, and the theme is Cosplay.  You would think that after a year in Japan, I would have some great anime/manga inspiration here, but for some reason I just couldn't get into that whole thing.  I was thinking of sitting this week out, but then I realized that this week is leading up to Valentine's Day, and I was hit with the idea to make an outfit inspired by Disney's Queen of Hearts.


Little Sister had fun getting into character, even though she's typically sweeter than the inspirational queen.

Aww.  That's my girl.
When I started looking at pictures of the Queen of Hearts's outfit for inspiration, the collar made me think of LouBee Clothing's awesome Bimaa sweater.  I have sewn this pattern a few times, for both of my kids.  I used the shawl collar and made a slightly larger size to allow for the thicker fabric (I used a light french terry sweatshirt fabric that I got in Japan for 100 yen per meter (about 80 cents)--I miss the fabric shopping in Tokyo so much!).  I also extended the length into a tunic, angling out slightly for some extra room, so I made the band at the bottom larger to accommodate.

I want the roses to be RED!
I love these little half-circle pockets that allow for a pop of color.  I've added them to quite a few things I've made--the tutorial is from Anu Miki, found here.  I had to add in the yellow--not only based on the inspiration outfit, but also because otherwise I would have ended up with two weeks in a row of red, black, and white all-knit outfits!

Multiple Personalities
The fabric for the leggings was another 100 yen per meter find--I swear, the knits floor at Tomato in Nippori is a magical place!  I have a cardigan that I made for myself from this fabric--it is a soft and snuggly double knit--you can sort of see the dots joining the two layers in the pic below. I sort of guessed on the knee patch placement, and I NAILED IT!


While I was getting ideas for this outfit, I tried out one of my Christmas gifts--this awesome design notebook is really fun for getting the creative juices flowing!  The body outlines are all grown women, so I had to shift the proportions to give myself an idea--does anybody know if they make one of these for children's designs?  Anyway, I was pretty pleased at how close my outfit came to my original design!  I had to switch the direction of the stripes due to the stretch, but otherwise pretty spot-on!


So, I found out today that Project Run and Play changed the method of determining the winner of the sew-along from being chosen by judges to random drawing.  Hmm.  I have to say, I'm not excited about that.  It's still fun to check out all of the contributors (here they are for this week's theme), but something about having a competitive aspect really inspired me to take my designs to the next level.  I love having the theme and the community to motivate me to sew and get stuff up on my blog (have totally lapsed on that lately, while I've been working on getting my business up and running), but winning (or losing) via random number generator rather than showcasing someone's skill is not very inspiring.  And I hope this doesn't mean people will just start searching their archives and uploading any old thing that might fit the theme, just to get extra entries.  [Edited:  I've been thinking about this statement more, and it's not that I really think people would try to get extra entries--it's more that I really want people to link up as much stuff as possible, because I love seeing all of the entries, regardless of skill and/or effort level, but now every entry is equal competition--I'd rather see the people who really put amazing thought into the theme be rewarded.  It was fun for me when I started sewing along with really no thought (or chance!) of winning to see what the winners were doing, and after doing it for a few years I felt ready to put in that level of effort.  I have won a couple of sew-along challenges over the years, and it felt really, really good to be recognized, and I also typically have some weeks where I'm inspired and other weeks where I phone it in because I still want to participate even if I'm not going all-out, and I tell you--if I won a drawing on a week where I didn't give it much effort, I would feel so bad to beat out the other amazing sew-along competitors!  But based on what I'm seeing, I'm feeling a little guilty that I'm sounding like it's all about winning to me--it's not, really, but as I said before the competitive aspect helps motivate me.  ANYWAY, blah blah blah!  Sorry!]  It just feels very anticlimactic to me--wah-waaahhhhhh.  And I'm not sure why the switch was made--was it so that the ladies behind PRP didn't have to worry about finding judges?  If so, I totally get it--it's a lot to organize.

Um, what?
Didn't there used to be voting on sewalong contestants?  That could be one way to eliminate the need for judges, although it can be unfair when some people have lots more followers than others.  What if there was a method for voting similar to the real contestants' method--that in order to vote on the sewalong, you have to upload something?  And then you can't vote for your own?  Anyway, I think it was more fun for me to have the chance to be recognized for designs, and to see what kinds of things turned out to be winners.

Monday, February 1, 2016

Strawberry Tap Dance Togs

You guys, Project Run and Play is back!  I get so inspired by sewing with a group of people and seeing everyone's take on a theme, and frankly having a specific project that I know will end up in front of more than my average number of eyeballs is very motivational to me.

When I saw that the theme of the first week was knitwear, I knew immediately what I wanted to make.  Little Sister just started a fun tap dance class at a community center, and although there is nothing strict about it, we did notice that there was a dress code sign hanging up that specified tights and a leotard.  Well, Little Sister didn't have a leotard but I thought it would be fun to make one.  My first try was an awkward fit in pale pink stripes that gave me enough information to draw a new pattern and start designing a full knitwear look for Project Run and Play.

I'm getting down to the last bit of the awesome realistic strawberry print knit that I bought in Japan for less than $2/yard (I made this newborn set using it, and this tee for myself), and I instantly knew it would be a perfect leotard.  I could picture black and white accents for a graphic pop, and once I got started I couldn't stop!


The leotard was the no-brainer (I started with the free 24 month pattern from Shwin and Shwin and adapted it--added sleeves, and made it fit an almost-6-year-old), and I wanted to make a cardigan inspired by ballet wrap tops to go over it, but with a bit funkier vibe.


I love the black and white stripes against the strawberries--so fun!  Actually, all of the fabrics I used except for the black ponte knit in the cardi came from the fantastic Knits floor of Tomato fabrics in Nippori (Fabric Town in Tokyo).  I decided to add a little accent on the waistband (well, rib-cage band, I guess, since it's well above her waist!)--a bit of the black stripe gathering the band up a bit.

Sorry for the washed-out photo--it's hard to get the details to show up in black knit!
But the strawberry leotard is definitely the star of this look.  The fabric is a 4-way stretch, and the legs and neck are bound with foldover elastic.


The back of the leotard dips down a bit, and I cut the legs pretty low to avoid that awkward underwear-under-the-tights bunching.  And then of course we needed leg warmers--essential for dance class!


And while I was at it-- a headband too!  Why not?  I mean, when you start with that strawberry fabric, you go big or you go home.

This hairstyle cracks me up.
Next I added a pull-on french terry skirt to throw on after class.  The pattern is free, from Craftiness is not Optional--wonder where I got the idea to use this fabric?


Is it a bit much when you put everything together?  I don't know...I just can't get enough of it!


Little Sister prefers to wear just a few of the pieces at a time, but so far she has been excited about mixing and matching them.


I love all of the options!  And now I want to go eat a strawberry!


Sunday, June 21, 2015

Everyday Elsa

I have a confession to make--I am linking this dress up to this month's Project Run and Play, but I didn't make it specifically for that. Edited--I planned to link it up, but I was too late!  Just missed the collection. Boo.

As a matter of fact, I had been checking frequently to find out what June's pattern would be, and when I saw the Elsa pattern chosen by this month's host, Kiki from Kiki and Company, I laughed, because I had just finished an Elsa dress for Little Sister literally the day before.  I figured it was meant to be, even if I didn't use the actual pattern, so I'm linking up anyway! (uh...not so much meant to be after all.)

It still took me 3 weeks to get photos taken of it though, so I'm finally getting the blog post up.  And another confession--I started getting worried that I wouldn't get photos done at all, so when Little Sister chose this dress to wear on her first day of summer camp today, I told her we were going to take a few pics before school.

Luckily she was mostly game, and as a matter of fact she was inspired--she pulled the curtains back and told me we should use the white sheers and pretend it was snow!  We gave it a try, so these photos are her own idea.


The fabrics are knits from Girl Charlee that I brought with me when we moved to Japan.  The print on the white fabric has a slightly Scandinavian feel to me, so I thought it would be fun to make a casual dress that was inspired by Elsa.


The free Peep-Hem Dress pattern from Rock the Stitch was perfect for it--I just color-blocked the bodice (and did a lettuce hem on the top layer--something I've never tried before!)


I've had my eye on this free pattern for a long time, but it's finally a perfect fit for my 5-year-old, so the time was right!


I can see making this dress in lots of other fun fabric combinations--with the color blocked bodice, I could even see using wovens and keeping the top of the bodice in a knit.

The back--I just cut straight across to match up with the curved color blocking I did on the front of the bodice.
These particular knits from Girl Charlee are really light and soft, so even the two-layer skirt will be great for the hot summer weather.


I always love linking up to Project Run and Play, especially to see the other interpretations of the theme!  Take a look at this month's contributors here.

Also, take a look at this dress in action--perfect for our final visit to Tokyo Disneyland!  We made it there twice in our year in Tokyo, and really had great visits both times.


Friday, April 3, 2015

Book Parade: Heather the Violet Fairy costume!

Today the kids' school had a book parade, where the kids chose a character from a book they have read this year and dressed up to parade around the gym.  Little Sister's recent favorites are the Rainbow Magic Rainbow Fairies chapter books (I have been reading them to her).  She chose Heather, the Violet Fairy, both because it was her favorite color of the rainbow AND because she has the same hair as that fairy (blond and curly with bangs!)  Luckily for me, that fairy also has a pretty simple costume, and the free short sleeved peasant dress pattern in size 4-6 from Scattered Thoughts of a Crafty Mom was perfect for it!


I wanted two layers of fabric to give the dress a more ethereal fairy effect, so I chose a silky purple (almost magenta) fabric I found for 100 yen a meter and topped it with a soft lilac stretch lacy fabric. The color came out exactly like the book cover, which is good because was Little Sister ever a stickler for detail!


I'm experimenting with putting a jump in my longer posts so that more posts appear on my main page--read the rest after you click, and let me know if you love/hate having a jump!  I'll show you the book cover so you can see how well I matched this dress up :)

Thursday, October 23, 2014

Halloween 2014: Peter Pan and Tinkerbell

I don't know how it happened, but the kids came up with the idea all on their own to be Peter Pan and Tinkerbell for Halloween this year!  I thought our themed costume days were over once they started having their own opinions, but somehow it worked out!  I went and bought fabric before they could change their minds, because at our house once Mom has bought the fabric, there is no more costume indecision.


Thanks to the wonders of Nippori Fabric Town, I was able to get the fabrics I needed for Tinkerbell's costume (dress plus winter fairy coat and trim) for about $4.  I had to spend a little more to get the great french terry I used for Peter Pan's pants and hat (I spent $6), and I bought a pre-made green mens' shirt for his tunic.


I'll do a quick run-down of the Peter Pan costume, since it was pretty straightforward, then I will share a little more about how I made the Tinkerbell dress and winter gear.  Isn't it nice that Tinkerbell has some stories where she gets bundled up, so I can make my daughter put on a coat and she'll still be in costume?

Winter fairy photobombed by Peter Pan
Like I said, the Peter Pan tunic is just a men's t-shirt.  I cut jagged lines along the sleeves and hem, and cut off the neck binding and cut a small slit straight down to mimic Peter Pan's collar.  That made the neckline pretty wide, so after The Boy tried it on I added a couple of angled seams from the neckline to the top of the shoulder to make the neck opening smaller.  Done!


I used my modified Hosh Pants pattern that I have used previously to make pajama pants for these Peter Pan Pants (I like to call them the Peter Pants).  I wanted them to be slim, since Peter wears leggings, but I wanted The Boy to possibly get use out of them as sweats after Halloween, so I didn't go full legging.

Flying
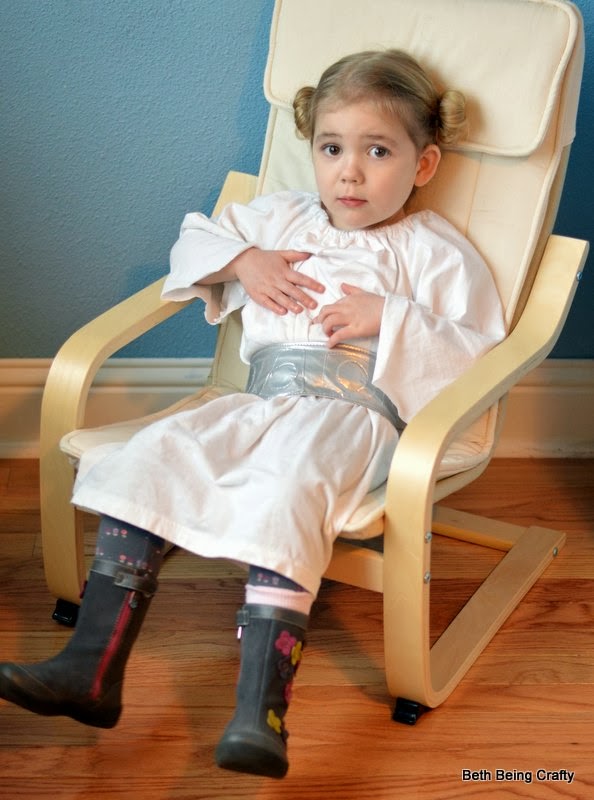
He had a belt from last year's Luke Skywalker costume that worked well--he can carry his Pixie Dust in there!  For the hat I mostly followed this tutorial, and I used this one for the boots using leftover fabric from my denim challenge outfit from Project Run and Play.


I had fun with Tinkerbell's dress.  I cobbled together ideas from a few different tutorials to come up with a shirred back tank dress with a double square circle skirt, and I think it worked great!

Very twirly

If you want to do something similar, I recommend adapting this free shirred back sundress bodice tutorial and adding this circle skirt (another free tutorial) to it--the points from the double square are perfect for mimicking Tinkerbell's leaves, I think!

Shirred back
I was only planning to buy a meter of fabric, and when the woman cut it for me it turned out there was a little over 1.5 meters on the bolt left, so she just gave me all of it for the price of one meter--which was only $1! (well, 100 yen).  And I was lucky she did, because I used almost all of it once I decided to make the double skirt.  Since I used a woven (a silky satiny stuff, which was not as difficult to work with as I feared it might be), I hemmed the skirt layers, which wasn't a big deal time wise.  I lined the bodice since the fabric was pretty thin, and I also added a layer of thin interfacing to the front of the bodice.

If I were Tinkerbell though, I might be a little chilly walking around in October, so I thought I'd try to make a winter fairy jacket.  I was so excited to find this quilted fabric (it's the same on the front and the back) for only $4 a meter!  And I only used half of it making this cute little coat!


I self-drafted the pattern using a t-shirt pattern.  I did french seams on the sides and shoulders since there's no lining; the fabric is double-sided so I wanted the inside to look nice and finished and also lay flat and feel comfortable.

The front and back dip down a bit to mimic the jagged leaf hem on Tinkerbell's coat.
The white crushed velvet trim came in a wide ribbon, so I just attached it like bias tape all the way around and as cuffs on the sleeves.  And I used a magnetic clasp to hold it closed!  The green quilted fabric is silky and has pin dots on it, and I've told Little Sister that she can use it as a jacket even after Halloween--I'm pretty proud of how it turned out!


I couldn't find any good green knit fabric to make leggings for her (or a shirt for Peter Pan for that matter), so I bought a pack of Rit dye in Kelly green and dyed a pair of white leggings out of our drawer for the winter wear.  Amazingly, they came out exactly the same color as the dress!  I would have liked them to be lighter, but at least they don't clash terribly!  I added some more of the velvet ribbon at the hem.


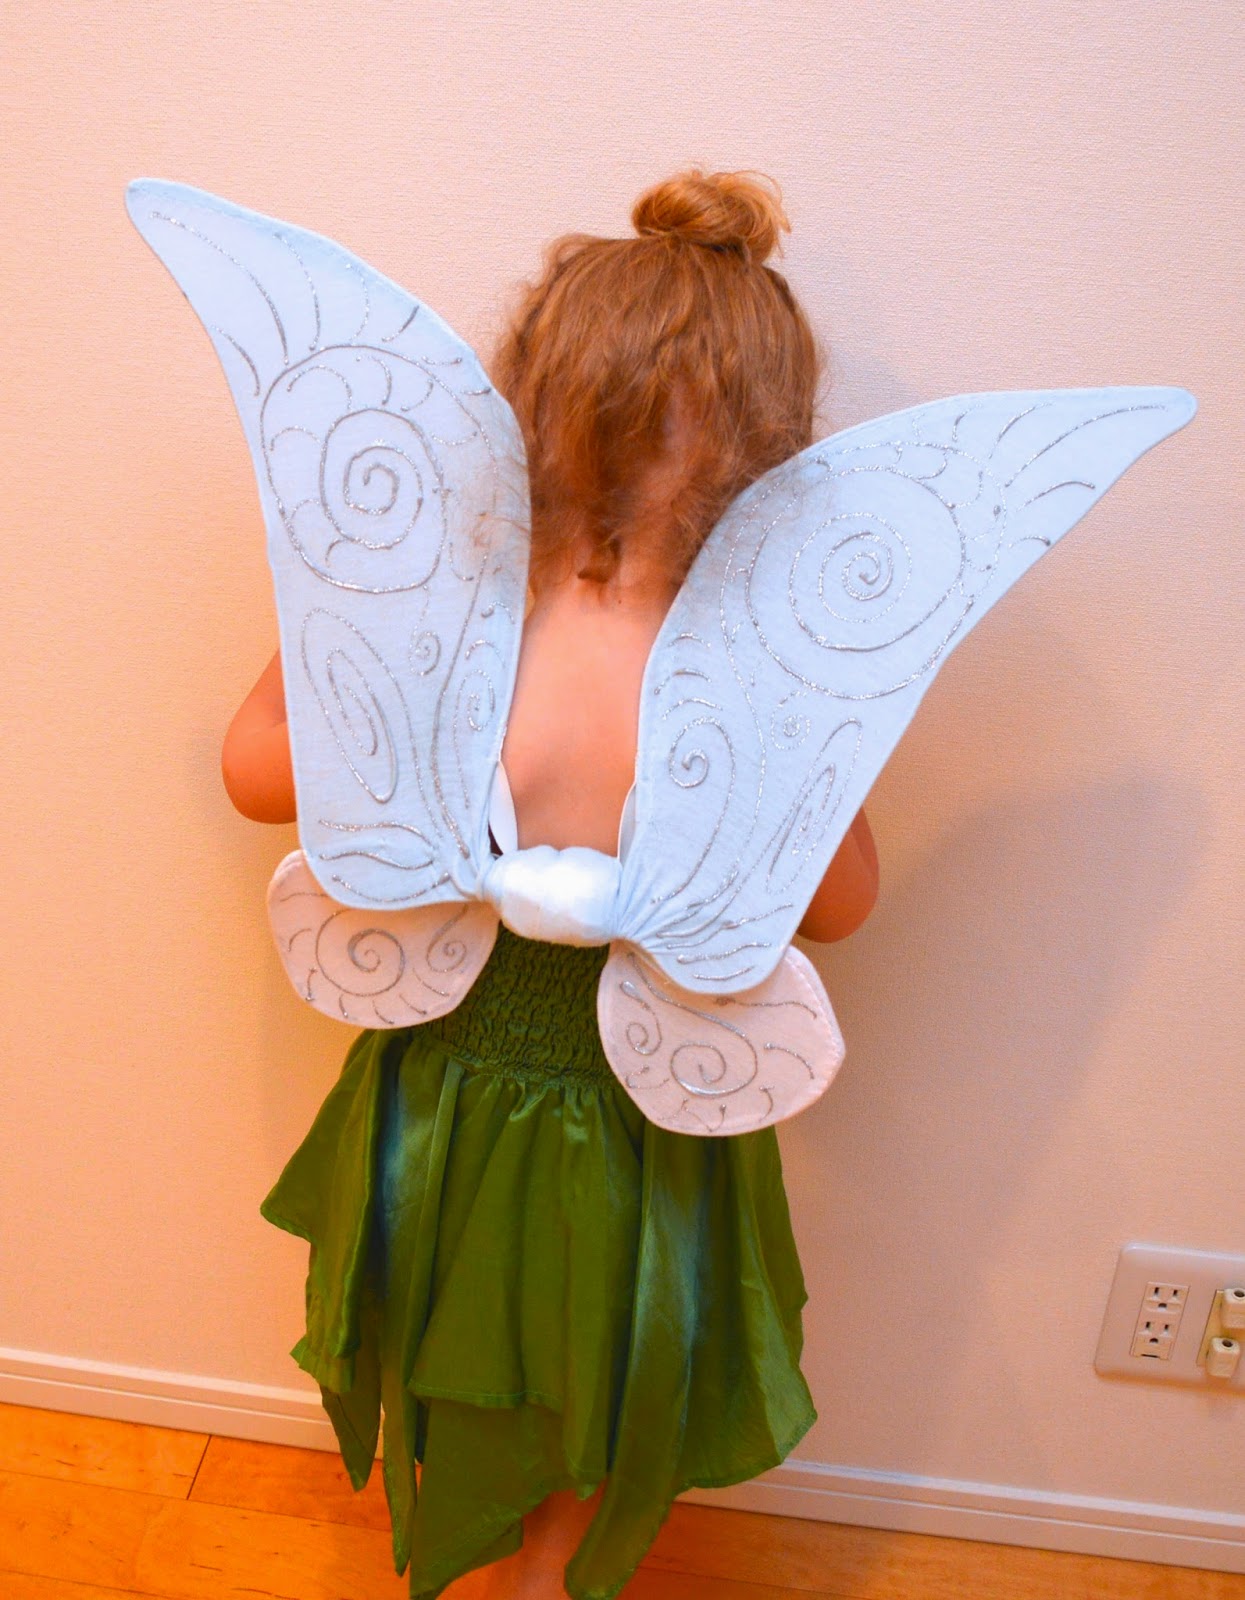
The dye match was even more amazing because I actually bought the dye for turning a white shirt green for Peter Pan.  But I couldn't read the fabric content of the white tee I bought, and while the leggings came out very green, the shirt came out a soft baby blue.  Not great for Peter Pan, but it was perfect for Tinkerbell's wings!  I had planned to buy the fairy wings but couldn't find any (except for fancy expensive ones for adult costumes), so I followed this tutorial to make our own, adapting the shape for Tinkerbell.  And I didn't have any white tights, so I improvised with 100 yen store t-shirts--both the one I accidentally dyed light blue and a plain white one.


And finally, I couldn't forget Tinkerbell's shoes!  Luckily these little white fabric shoes are easy to find in Japan--they are used as indoor shoes for little kids at school usually.  But they were a great blank canvas for fabric paint and a pom-pom.


If you've stuck with me this far, you get a reward--the silly pictures we took of these costumes! I would have loved to get out in the park for some fun outdoorsy shots, but it's been rainy and they get to wear the costumes to school tomorrow and I was afraid they'll get ruined before I got a chance to get good photos if I didn't just go for it.  These guys were so funny anyway.

Sneakerbell


Telling secrets

Toot noises: always funny.
Oh!  And we will be visiting Tokyo's unique Disney theme park, Disney Sea, on the day before Halloween!  So the kids will be able to wear their costumes to the park and be a part of the Disney Halloween fun.

Thursday, January 23, 2014

Little Leia Costume

Oh, I am so mad at myself!  I meant to finish this blog post last night so that I could upload it into the "Movie Inspired" week for Project Run and Play, and now submissions are closed.  Boo.  But I'm going to post it here anyway, since it's done and everything.


The Boy is having a Star Wars themed (SIXTH!!!) birthday party next weekend, and he already has his Luke Skywalker costume since that's what he wore for Halloween.  Little Sister will be the only girl at the party, so it seemed fitting that she have a Princess Leia costume to wear.  IF I could make it quickly, easily, and cheaply.


Well, check, check, and check!

I know, I know, Leia doesn't have a light saber, let alone a purple one, but give a girl a break!
Light saber is made from a wrapping paper tube covered in fabric from an old sheet and duct tape.
This costume is made from a couple of old t-shirts that I cut up and sewed together using a couple of free peasant top/dress tutorials.  Here are the links I looked at (free peasant dress tutorial from Trendy Treehouse and free peasant top tutorial from indietutes), and for reference, I cut the body panels out at 16" wide at the top, widening to about 18 inches at the bottom, and 25 inches in length.  I used the existing hem of the old t-shirts so I didn't lose any of that length to hemming.

I didn't have quite enough length so I had to sew two t-shirt pieces
together to get one of the panels.  I thought the belt would cover the seam...
maybe we should turn the dress around the other way!

For the sleeves I cut out two rectangles that were 12.5 inches wide and 18 inches long, and ended up cutting them off at an angle to mimic Leia's sleeves.  I didn't hem the sleeves since jersey doesn't fray.


The belt is obviously a defining feature.  It's the only thing I spent money on--I spent $1.35 on a quarter yard of silver vinyl fabric at Joann's.  I already had the velcro I used for the closure in the back on hand.  And Jess from Craftiness is Not Optional was nice enough to provide a free printable template and tutorial that I followed (except that I added a few extra inches to the belt's length).  Oh, and I didn't have any stitch witchery on hand, so I used regular double-stick tape to hold the pieces together while sewing.  It won't dissolve when washed, but since I'm not planning on washing or drying this belt in the machine anyway it should be fine.  I was surprised at how easy the vinyl was to sew--I expected more stickiness or something.  But you do have to be careful because every hole your needle pokes in that stuff is permanent!


And what kind of a Leia costume would this be without the hairdo?  I cut the toes off of a pair of too-small baby socks and made these mini-sock buns!  So crazy cute.

Ready to take on the galaxy!

And then have a rest.