Showing posts with label DIY. Show all posts

Wednesday, October 12, 2016

Last Year's Halloween Costumes--Minions

Last year, we had fun making/adapting our own halloween costumes, but I never got around to posting them.  I intended to take some good pictures but never did it, and here we are a year later with still no post about what ended up being a really fun set of costumes.

So, here's the rundown:  The kids wanted to be minions.


Thrift store overalls (luckily found in close-enough sizes), thrift store yellow turtlenecks (adult sizes that I cut down), goggles made from empty duct tape rolls and those rounded masks you wear to keep from breathing in dust, and stocking caps ordered on Amazon.

And then the most amazing thing happened.  We were eating an early dinner, getting ready to go trick-or-treating, when we joked about how great it would be if the hubs had a Gru costume.

Then we realized...it wouldn't take much.  He had a black wool car coat and scarf.  He had a pair of pants that he bought in Tokyo not realizing he had accidentally purchased very skinny skinny jeans.  I stuffed a long, narrow decorative pillow into his jacket's shoulders, and Voila...


Is that amazing or what??

Since hubby had not originally planned to wear a costume, I planned my outfit separately and therefore don't fit in at all, but that's ok.  I was Kiki from Kiki's Delivery Service, a charming Miyazaki movie that you should watch this Halloween season if you've never seen it!


So that's it!  This year, we're not doing homemade costumes (sniff)...the kids wanted to be characters from Harry Potter, and it just didn't make sense to make Gryffindor robes when I could buy them so easily.  But there will be some surprises in store (if I get around to posting them before next year!)

Wednesday, March 4, 2015

Field Trip Day Pack!

At our international school, the Pre-K class's big field trip of the year is during their transportation unit.  For this trip, the 24 students (with about 12 adults supervising, myself included) rode the school bus to a train station, where we boarded the busy Yamanote Line train, then after a few stops switched to the Tokyo Monorail, which delivered us to Odaiba, a man-made island across the Rainbow Bridge from Central Tokyo.  From there we walked a few blocks to the beach, where we had a picnic lunch and some playtime, after which we walked to the ferry dock and rode back to our bus parking by boat.  The school bus then brought us back to school.

It was a fun and exhausting day!  And knowing that the kids would be toting their lunches/water/snacks through all of these different modes of transportation inspired me to make a backpack for Little Sister that was more manageable for her to carry around all day than her usual big school backpack, which has to be larger to accommodate her school work and such.  This is what I came up with:

Overlooking the Rainbow Bridge in Odaiba

It's the perfect size to fit her lunch box and water bottle (or when it's a family day, her coloring wallet, kids kindle fire, some snacks, and sunglasses), and I just couldn't love this fabric any more than I do.


It's from the Melody Miller RubyStar line, and it has so many different prints mixed into one cut of fabric so it's perfect for a pieced project like this--I can give each element a different print!


The front flap has the iconic Viewmaster print--I definitely wanted to show that off.  I added some piping around the outside, and the lining fabric is all the same double-sided quilted stuff I used to make Little Sister's Tinkerbell jacket for Halloween.  It was nice for giving the back some padding and stability without having to add interfacing.  It's impossible to tell in these photos, but I also quilted around some of the Viewmaster circles for a. some added interest/texture and b. some quilting practice.

I also love the print that's on the main front panel of the bag.  It's a dark purple, and I love that it has personality of its own while still letting the viewmasters stand out.  In this shot you can also see that I used the pink and aqua stripes (with gold dots!) to make the straps, and it's a bit hard to tell but the top of the bag (where the purple hanging loop is inserted) has a cool arrow going across it!

She loves that the straps are different :)  Recognize that Bimaa dress?

I forgot to take pics of the back but you can sort of see it here, along with the floral side panels.


And here it is in action on the field trip-

Riding the monorail

Picnic Lunch time!

Stuffed into the Yamanote Line!

I made up the pattern for this bag, but if you want to make one, I followed some basic messenger bag instructions like these but added backpack straps between the flap and the body of the bag instead of putting a shoulder strap on the sides.  The important thing for keeping the backpack from sliding off the shoulders is to get the straps as close together as possible at the top.  I cut my straps 18" long, and ended up trimming off just a bit when I attached them, making sure they were still even.

I actually started by making another backpack, which was adorable but too small to hold Little Sister's lunch box and water bottle:

My favorite part are the arrows on the straps!
This one was from this great tutorial (with free pattern!) from Indietutes, except that I scaled the whole thing a little bigger since the tutorial is for a two year old and my girl is almost five.  Also, I added a little elastic to the inside of the top front of the back to keep it closed.  So when I made the bigger bag, I had these proportions to go on, but I also decided that the flap would keep things more contained while still being easy enough for Little Sister to handle on her own.

Wednesday, January 14, 2015

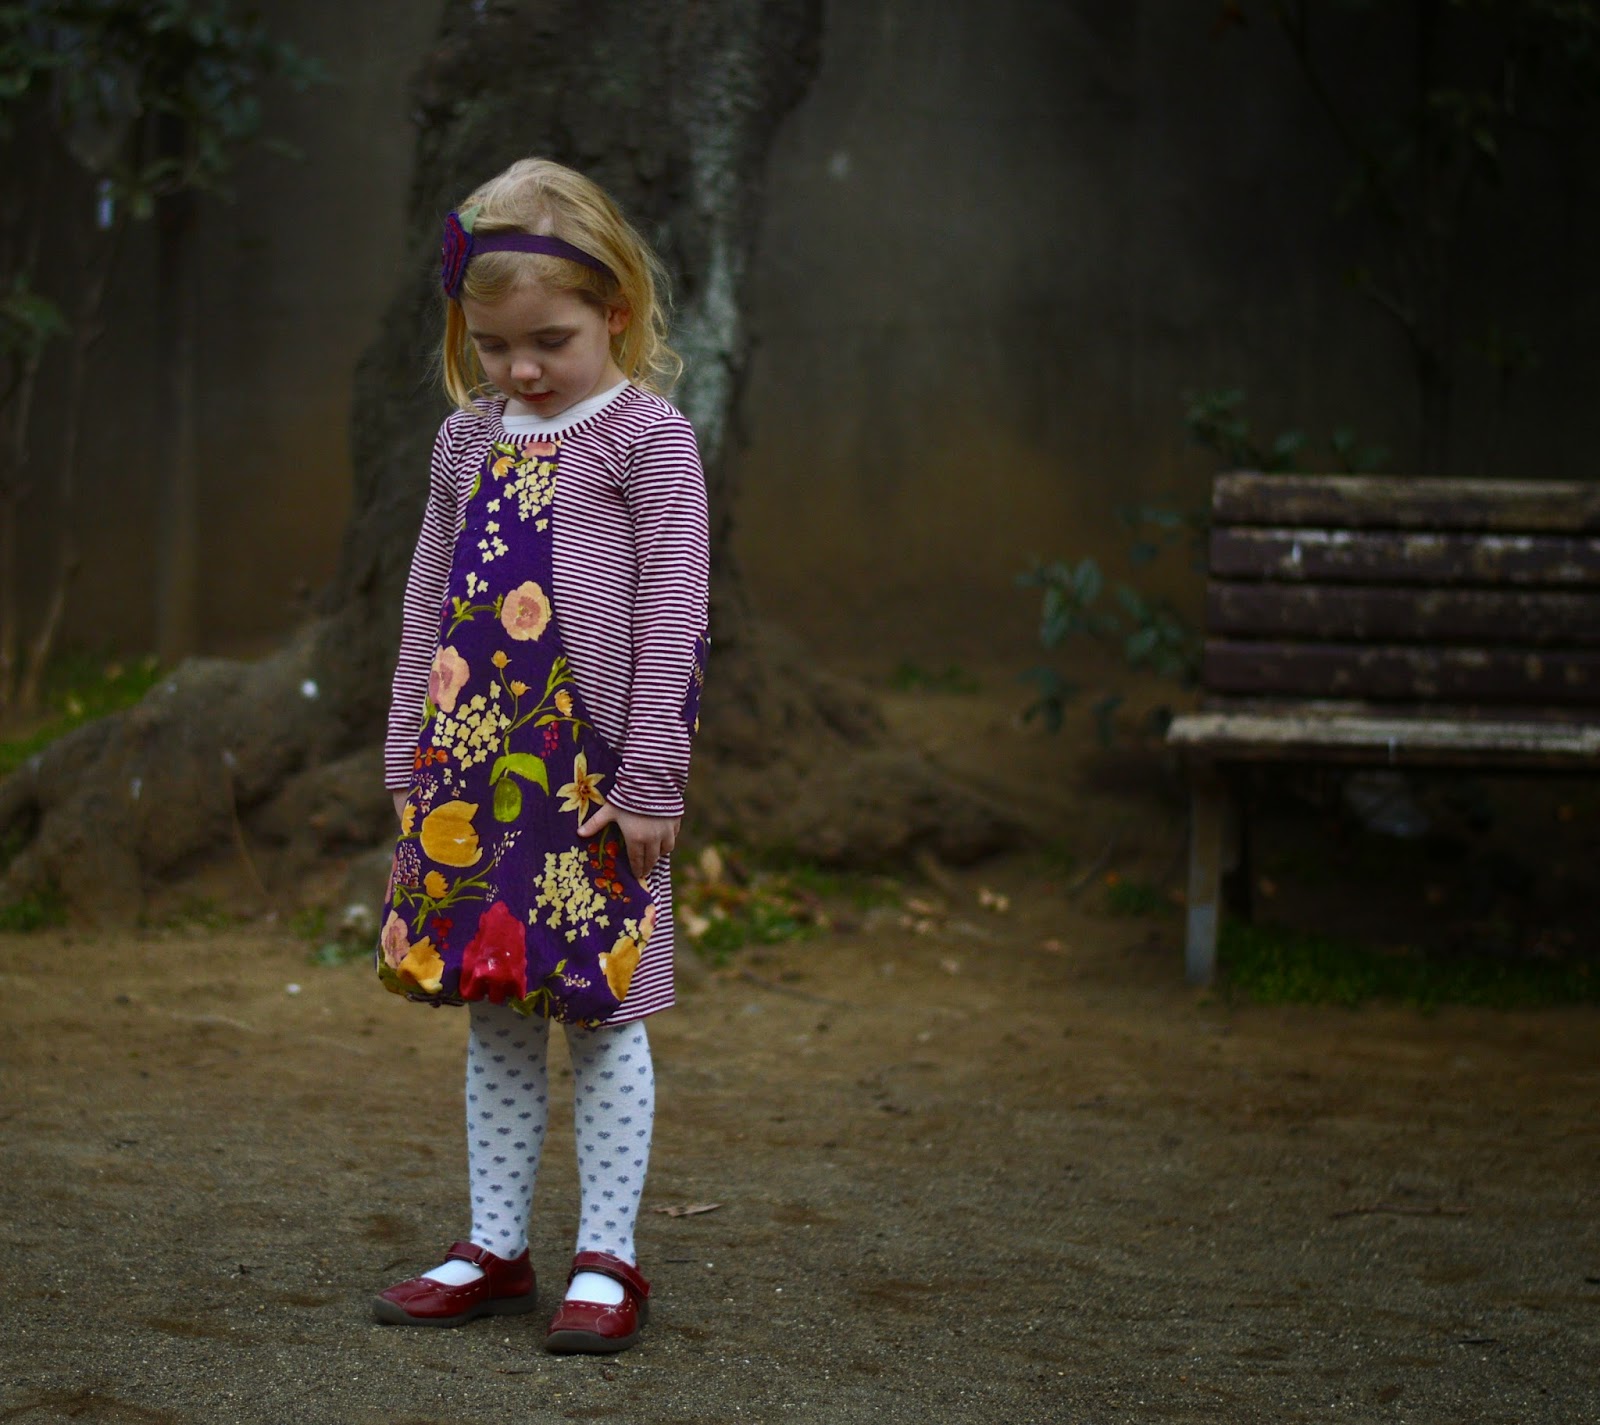
Bubble-Inspired Pocket Dress

It's time for Project Run and Play again!  They are running things a little differently this time around, so you'll be seeing posts from me throughout the year on various inspirations from the online sewing contest, rather than every week for the next month.

UPDATE:  I made the top 10!  It's time to vote--head on over to Project Run and Play and choose your favorite (ahem, #4, nudge nudge) between now and Thursday, January 28th!

The first inspiration is a sweet bubble-style sundress from Alida Makes.  I have actually sewn a sundress inspired by this pattern/tutorial once before, for a different season of Project Run and Play!  That was the first and only time I had sewn a bubble dress, and I loved the way it turned out.  However, I have since learned that Little Sister is not really interested in bubble dresses.  She NEVER wears that dress, no matter how much I push it.  I had purchased a few knit bubble skirts that were similarly ignored, so I had sort of given up on the bubble idea for her clothes.

But then.  I definitely wanted to participate in this month's sew-along!  I thought I would sweeten the pot for Little Sister by making this dress out of the lovely nani IRO double gauze that she has had her eye on ever since I brought it home from Fabric Town (Nippori) in Tokyo (for only about $7/meter!!)  I sneaked a little of that fabric as an accent when I made a Plantain Tee for myself, and she immediately recognized it as the fabric she wanted as a dress, although she liked the striped knit I used as well.  So now we will be twinsies ;)


I did minimize the bubble effect a little by only bubbling the front of the dress.  The back does not have a second layer--both to streamline it for Little Sister's tastes, and to conserve my nani IRO for the Ruby Top I plan to make out of the rest of it for myself!


I attached the floral in the front using the method Alida describes in her sundress tutorial, and I really like the effect.  Using the elastic thread makes it really easy, and the placement of the shirring allows the lining to tuck under nicely.  But instead of making the entire dress two layers, I cut the top layer so that I could add a giant kangaroo-style pocket in the front of the dress (another carrot to dangle for Little Sister, who loves wearing dresses with big pockets!).  At the end of the post I'll describe how I adapted the front of the dress.


Like I said, the back does not have the top layer--it's just a basic knit dress.  But with the important addition of elbow patches!  That was a request from Little Sister, who loved the elbow patches on my Plantain Tee.

I almost guessed right about where her elbows are located!
I'll have to get pics of us together at some point--I don't know if I'd be twins with her in public, but I do think it's kind of fun to have mother/daughter pieces.

Snapped a while back when I finished my shirt

I was excited to finish my dress last night, so we set out to take the pictures after school today, and Little Sister had a last-minute change of heart about being in the mood to be photographed.  She made me work hard to get anything resembling a happy child today, so I have to share the few pics I did manage to get!

Checking how the swing is attached to the bar

I will push your swing after you smile!

Why is Mom standing on a bench?

Let's try writing on the ground with this stick...

SO many of the pictures had this face!
 She was much more cheerful when we headed back to her school to pick her brother up after his club this afternoon.

At least the stick was a hit--she wanted to keep it!
The final version turned out pretty much as I had imagined--although when I looked back at my sketch, I remembered that when Little Sister had gotten her hands on it, she added a hair bow, so I guess I still have some work to do!

Joint effort
As far as putting this dress together, I pretty much just added the floral panel and bubble hem to the front piece of the dress then assembled the rest of it the way I would have put together any knit dress (or tee, for that matter).  Here's what I did:

First, I cut out the front and back panels from the knit.  I used a bodice pattern that I liked but cut it so that the pieces would be 20" wide at the bottom.  For the length, I used Alida's tutorial as a guideline. Her dress was about 19" long (the 20" piece gets folded over to make the casing) so I cut my dress to hang 18" from the armpit.

This fabric kind of makes me go cross-eyed if I stare at it for too long!

It's a super-soft knit, and I got it for 100 yen/meter (less than a buck!)
Then I used the front piece as a guide to cut out my floral panel.  I cut the same shape for the skirt, marked where the neckline should be, and eyeballed the curve. I even remembered to make it bigger than it would end up, since I'd be folding over the raw edge of the curve.

I did end up trimming it so it was the same length all the way across!
Next I pressed and hemmed the curves.  It was easy to do without puckering since the gauze has quite a bit of give and it was going around a bias, but if you were using a stiffer fabric you might want to finish the curves with bias tape.


Next I attached the floral panel to the front of the dress along the bottom hem.  This part made me stop and think, to make sure the floral was facing the right direction!  You want to sew them together with the RIGHT side of the floral laying on the WRONG side of the stripe.

Just like in Alida's tutorial, first I sewed the two fabrics together along the bottom.  Then I turned the floral to the front of the dress and pressed the bottom edge, and then I sewed two lines of shirring with elastic thread across the bottom of the knit stripe fabric (like in the tutorial).


But since I was only doing the front piece, my next steps were a little different.

I basted the floral to the front of the dress from the bottom of the pockets to the hem.  Then I topstiched the floral onto the dress from the top of the pocket (wherever I wanted that to be), up and around the neckline, and back down the other side.

Next I sewed the front and back of the dress together.  I wanted to do french seams on the sides to tuck away all of the gauze edges, so my assembly was a little wonkus.  I started with the dress body pieces WRONG sides together, sewed down the side seams, turned it inside out and pressed it, and finished off the french seams.  THEN I sewed the shoulder seams together, and attached the sleeves in the round instead of with the dress side seams open.

Of course there was the neckline binding and hemming the sleeves too, but who wants to read about that?  There are much more eloquent and easy-to-follow resources for those things if you need them.

Well, I'm excited to be kicking off another round of Project Run and Play, and I think it will be pretty interesting to have a month between new projects!  Hopefully I'll be able to participate in most of them!


Don't look so sad, Little Sister--you'll get a new dress next month!


Thursday, October 23, 2014

Halloween 2014: Peter Pan and Tinkerbell

I don't know how it happened, but the kids came up with the idea all on their own to be Peter Pan and Tinkerbell for Halloween this year!  I thought our themed costume days were over once they started having their own opinions, but somehow it worked out!  I went and bought fabric before they could change their minds, because at our house once Mom has bought the fabric, there is no more costume indecision.


Thanks to the wonders of Nippori Fabric Town, I was able to get the fabrics I needed for Tinkerbell's costume (dress plus winter fairy coat and trim) for about $4.  I had to spend a little more to get the great french terry I used for Peter Pan's pants and hat (I spent $6), and I bought a pre-made green mens' shirt for his tunic.


I'll do a quick run-down of the Peter Pan costume, since it was pretty straightforward, then I will share a little more about how I made the Tinkerbell dress and winter gear.  Isn't it nice that Tinkerbell has some stories where she gets bundled up, so I can make my daughter put on a coat and she'll still be in costume?

Winter fairy photobombed by Peter Pan
Like I said, the Peter Pan tunic is just a men's t-shirt.  I cut jagged lines along the sleeves and hem, and cut off the neck binding and cut a small slit straight down to mimic Peter Pan's collar.  That made the neckline pretty wide, so after The Boy tried it on I added a couple of angled seams from the neckline to the top of the shoulder to make the neck opening smaller.  Done!


I used my modified Hosh Pants pattern that I have used previously to make pajama pants for these Peter Pan Pants (I like to call them the Peter Pants).  I wanted them to be slim, since Peter wears leggings, but I wanted The Boy to possibly get use out of them as sweats after Halloween, so I didn't go full legging.

Flying
He had a belt from last year's Luke Skywalker costume that worked well--he can carry his Pixie Dust in there!  For the hat I mostly followed this tutorial, and I used this one for the boots using leftover fabric from my denim challenge outfit from Project Run and Play.


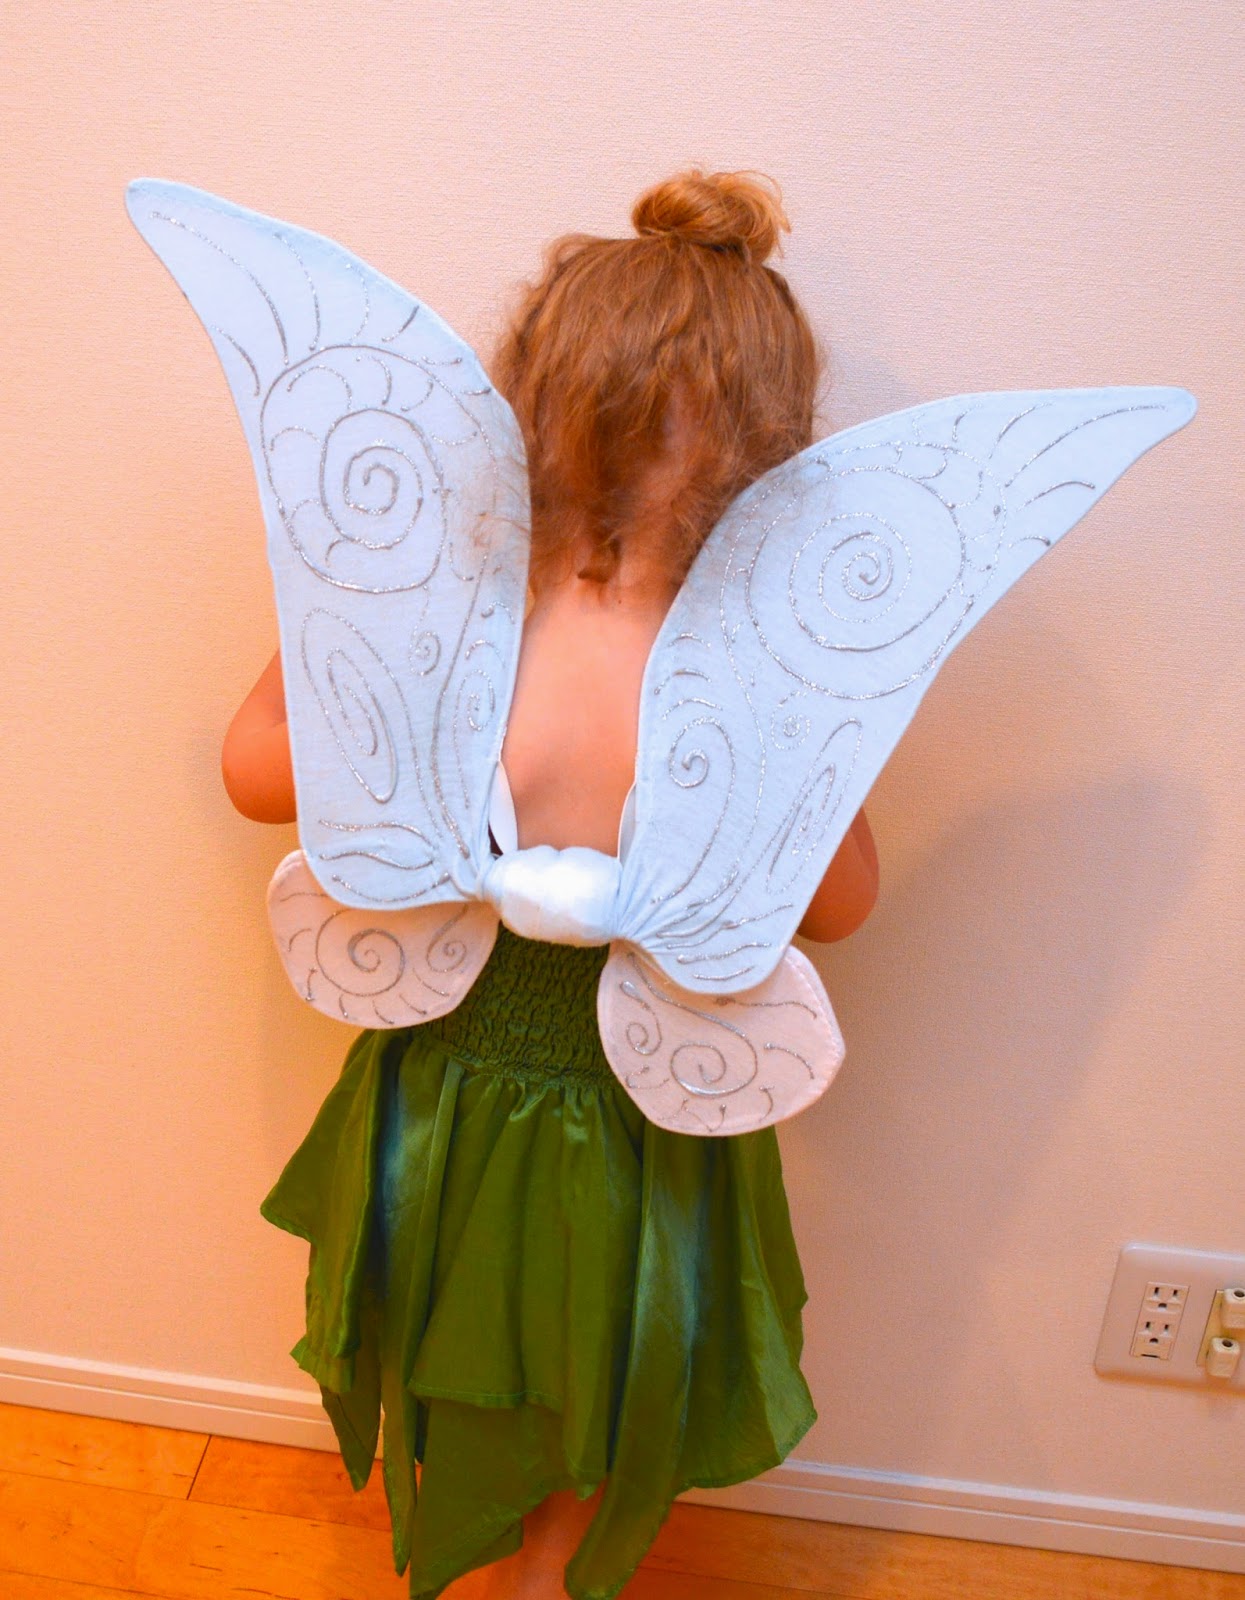
I had fun with Tinkerbell's dress.  I cobbled together ideas from a few different tutorials to come up with a shirred back tank dress with a double square circle skirt, and I think it worked great!

Very twirly

If you want to do something similar, I recommend adapting this free shirred back sundress bodice tutorial and adding this circle skirt (another free tutorial) to it--the points from the double square are perfect for mimicking Tinkerbell's leaves, I think!

Shirred back
I was only planning to buy a meter of fabric, and when the woman cut it for me it turned out there was a little over 1.5 meters on the bolt left, so she just gave me all of it for the price of one meter--which was only $1! (well, 100 yen).  And I was lucky she did, because I used almost all of it once I decided to make the double skirt.  Since I used a woven (a silky satiny stuff, which was not as difficult to work with as I feared it might be), I hemmed the skirt layers, which wasn't a big deal time wise.  I lined the bodice since the fabric was pretty thin, and I also added a layer of thin interfacing to the front of the bodice.

If I were Tinkerbell though, I might be a little chilly walking around in October, so I thought I'd try to make a winter fairy jacket.  I was so excited to find this quilted fabric (it's the same on the front and the back) for only $4 a meter!  And I only used half of it making this cute little coat!


I self-drafted the pattern using a t-shirt pattern.  I did french seams on the sides and shoulders since there's no lining; the fabric is double-sided so I wanted the inside to look nice and finished and also lay flat and feel comfortable.

The front and back dip down a bit to mimic the jagged leaf hem on Tinkerbell's coat.
The white crushed velvet trim came in a wide ribbon, so I just attached it like bias tape all the way around and as cuffs on the sleeves.  And I used a magnetic clasp to hold it closed!  The green quilted fabric is silky and has pin dots on it, and I've told Little Sister that she can use it as a jacket even after Halloween--I'm pretty proud of how it turned out!


I couldn't find any good green knit fabric to make leggings for her (or a shirt for Peter Pan for that matter), so I bought a pack of Rit dye in Kelly green and dyed a pair of white leggings out of our drawer for the winter wear.  Amazingly, they came out exactly the same color as the dress!  I would have liked them to be lighter, but at least they don't clash terribly!  I added some more of the velvet ribbon at the hem.


The dye match was even more amazing because I actually bought the dye for turning a white shirt green for Peter Pan.  But I couldn't read the fabric content of the white tee I bought, and while the leggings came out very green, the shirt came out a soft baby blue.  Not great for Peter Pan, but it was perfect for Tinkerbell's wings!  I had planned to buy the fairy wings but couldn't find any (except for fancy expensive ones for adult costumes), so I followed this tutorial to make our own, adapting the shape for Tinkerbell.  And I didn't have any white tights, so I improvised with 100 yen store t-shirts--both the one I accidentally dyed light blue and a plain white one.


And finally, I couldn't forget Tinkerbell's shoes!  Luckily these little white fabric shoes are easy to find in Japan--they are used as indoor shoes for little kids at school usually.  But they were a great blank canvas for fabric paint and a pom-pom.


If you've stuck with me this far, you get a reward--the silly pictures we took of these costumes! I would have loved to get out in the park for some fun outdoorsy shots, but it's been rainy and they get to wear the costumes to school tomorrow and I was afraid they'll get ruined before I got a chance to get good photos if I didn't just go for it.  These guys were so funny anyway.

Sneakerbell


Telling secrets

Toot noises: always funny.
Oh!  And we will be visiting Tokyo's unique Disney theme park, Disney Sea, on the day before Halloween!  So the kids will be able to wear their costumes to the park and be a part of the Disney Halloween fun.