Well, this project felt like home to me after the last few things I've made. I've been using patterns, learning new skills, and pushing myself to become better at sewing, but really my heart is still in haphazardly chopping up old clothes to make something new.
In this case, I was inspired by
this post from Mama Bear Says that I had pinned on Pinterest ages ago. Like, back in the beginning of time of Pinterest for me. The idea is that you can reuse the TOP of a pair of women's pants, including the fly, to make a pretty dang professional pair of kids' pants. I gave it a cursory glance when I first pinned it, but mentally shelved it because it said that the process worked best for making boys pants in size 8-12, and that is thankfully still a long way off for me. But as I skimmed over it again recently, I realized that the blogger suggests using "mom jeans" so that the waistband will be high enough for boys pants. I am embarrassed to admit that I own a pair of DEFINITELY "mom jeans"--although in my defense, they have been in the "to be upcycled" pile for quite some time--so I tried measuring out a pair of the boy's pants that actually fit with those, and it definitely wouldn't have worked, because he is still not a size 8-12. They would have come up to his armpits. But that got me thinking, maybe some low-rise pants would work to make smaller sizes. And what do you know, the waist-to-crotch measurement on a pair of my old low-rise pants was pretty much identical to The Boy's current size, which is usually a 5 or 5T. In the front, that is. I had to get creative for the back, but getting creative and making it work is the fun part.
This is to give you an idea of how the sizes lined up:
So, I laid the boy's pants (Old Navy size 5T, for reference) out on top of my old pants. In hindsight--I should have turned both pairs inside out for accuracy. I cut around one side of his pants, leaving lots of extra room at the bottom for a wide hem that could be let out later. Measuring your child's waist might be a good idea, since estimating is a little tough when you are making a non-elastic waist pant but you are using an elastic waist pair as your guide. I stretched out the elastic when cutting it out, but I ended up with much too big of a waist on my end product--and I'll show you my genius solution to that problem later in the post! Aren't you tantalized now?
After I had one side cut out, I folded it over to cut out the other side in an attempt to have some sort of symmetry. This particular pair of pants had wide pockets that were set in close enough that I think he may still be able to use them, even though they will be smaller now, so I made an attempt to keep the pocket lining somewhat intact too.
When I turned mine inside out to sew them up, I realized that the back was waaaaaay higher than the front.
So, I cut the waistband off (all the way down to the welt pockets) and reattached it.
 |
| I had the back of the pants right-side up, and laid the waistband right-side down on top, with the raw edges together, and sewed a straight line, with a fairly large seam allowance so I'd have room to sew the raw edges flat on the inside. |
Then I sewed the seam allowance flat on the inside of the pants, and added a couple of patch pockets that I made out of the leftover leg fabric.
 |
I ended up trimming off that extra fabric sticking out beyond the waistband,
just so you know. |
Once the back was only a little higher than the front, the way it's supposed to be, I sewed the jeans up the outside of the leg, then added a zig-zag for extra stability, and hemmed.
Sewing the two sides of the waistband together was pretty thick.
 |
| Hmmm, that doesn't look like it would be too comfy, does it? |
I attempted to flatten the seams down by laying the seam allowance to one side and using a wide zig-zag stitch over the top:
 |
| That's a little better. |
And in the interest of full disclosure, I should tell you that I didn't start out with a denim needle, but I did put a denim needle in when I broke the standard one. I think it helped...but I broke the denim needle shortly thereafter. All in all, I went through 4 needles on this project (all on the waistband seams), making it more expensive than the original "free" that I was going for, but what are you going to do? One of those was totally a fluke though. I can only blame the pants for three needles. If you are careful and do some hand-cranking when you get to the thick parts, you will probably have better luck than I did.
These pants had a double closure (not a hook-and-eye--what are these things called? A bar closure? Just look at the picture!)
 |
| These things were always difficult for ME to do up, so I wanted to give the boy a break. |
I thought that would be a bit of a hassle for my 5-year-old, so I removed one of the button details that the original pants had on the side of the waistband and reattached it above the fly.
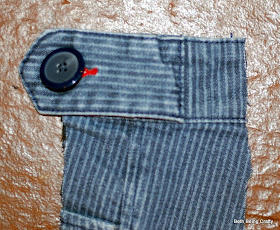 |
| Cut from the side of the waistband |
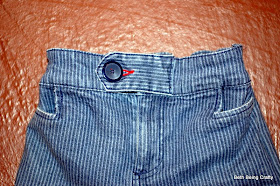 |
| Its new, more helpful position |
After taking out those bars and stuff, of course.
I mentioned before that the waistband turned out way too big. Well, after all of that needle-breaking on the waistband, I wasn't really prepared to take it apart and try again. I thought about cutting a slit and inserting some elastic somehow, but I wasn't quite able to get my head around how I would make that work. So I thought, what the hell, I'd try just sewing some elastic right on top. I started just past the side seam (I thought the elastic might also help smooth the bump from all that fabric at the side), then sewed the 1-inch-thick elastic all the way across the back of the waistband, stretching the elastic as much as I could while sewing. And, I was surprised as you to find that it actually worked!
 |
| Inside |
 |
| Outside |
 |
| Upside down (I couldn't help myself) |
I thought the waistband would probably be too thick to be elasticized very much. But nope! The pants totally fit now.
 |
| I had him raise his arms to show the top of the pants. |
There is some room to grow, and I can let out the hem too, so if we can keep the knees intact these pants might last a while! I do have to say that I actually would have preferred a slimmer leg, but I just get so nervous that things are going to be too small! I always think to myself, I can always take things IN more, but it's much harder to make it bigger. But the fact is, once I finish something I rarely go back and make adjustments if it already works. So while these would probably look cooler if they weren't so baggy, they will probably work just fine as is.
 |
| Baggy backside. We like to call this "relaxed fit." |
It does feel like coming full circle, because these were the first pants I purchased after The Boy was born, when I was out of maternity pants but certainly not ready for my pre-pregnancy pants yet. And now that little boy is wearing them. Awwww.
 |
| Not so little any more |
 |
| Pants in action |
Summary--if I had measured my child's waist when making these pants, they would have been super easy! Just three seams (1. reattaching the back waistband, 2. outside of right leg, 3. outside of left leg), then zig-zagging the waistband seams down and hemming the bottom. If only I had listened to my college theatre tech's advice of measure twice, cut once, instead of my own philosophy of guesstimate and do it over.




.JPG)

