Our little girl has moved into her big girl bed! She transitioned pretty easily to a toddler bed (her crib converted into one), and even though SHE would have been comfortable there for a while, her dad and I were most definitely NOT comfortable when we snuggled in for stories at bedtime. So we found a twin captain's bed on Craigslist and moved it in (breaking this family picture in the process, sniff).
 |
| Before |
 |
| With pillows removed. |
And this handy little hole:
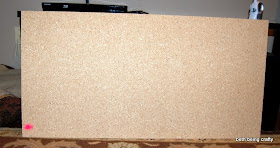
Sooo, I took it upon myself to make a padded covering for that area between the mattress and the cubby shelves on the headboard. I measured the width and the height that I wanted, went to Home Depot where I found a piece of MDF in the scrap bin and they cut it to the right size for me (cost me two bucks, yeah!).
 |
| That pink dot means it costs $2. |
I also had a roll of 1 inch thick foam that I bought at Joanns' with a coupon a while back, intending to make a headboard like this for the boy. He may still get one at some point; we'll see! This was the most expensive part of the project, since the stuff costs something like $17/yard. Use a coupon!
My quilt batting was handed down from the hubby's grandma, and for my fabric I cut up the duvet cover my mom had made for Little Sister's crib. The fabric matches the curtains that are still in her room. That's why the two fabrics are on my headboard--they were already sewn together that way! You can easily use more than one fabric as well.
 |
| Little Sister's original nursery--you can see her duvet and curtains here |
Supplies:
Backing board, thick enough so that you can attach it (I used screws coming through the backside of it so they didn't show in front)
1 inch thick foam, same size (or slightly smaller) than the backing board
Sheet of quilt batting large enough to wrap over the foam and around the edges of the board
Fabric same size as the quilt batting
Spray Adhesive (not required but helpful. You could also use hot glue, but it would be more of a pain.)
Staplegun and staples (make sure they aren't longer than your board!)
Directions:
First, cut your foam to the same size as your backing board. Lay it out on top of the board, then lift up one end and spray the board with spray adhesive. Get that end stuck down, then lift up the other end and spray the board little by little, laying the foam and pressing it in place.
Once the foam is adhered, lay out your batting over the top. Make sure you have plenty to stretch to the back side of the board, where you will staple it in place. I was lazy and didn't staple the batting separately; I just skipped on to putting the fabric on top.
Lay the fabric over the batting. I started with the top since I wanted to make sure I had a straight line with my contrasting fabric. I stapled right in the middle first, then stretched the fabric around the bottom and stapled in the middle down there. Then I did the same thing on the sides. Making sure the fabric was stretched tight and the line across the top was straight, I stapled the rest of the way across the top, then did the rest of the board. I folded fabric under and stapled at the corners. Because the back won't be visible, I wasn't too careful about the way the back looked--I just made sure the front was smooth.
 |
| Back side |
The only thing left was attaching it to the original headboard. So I called in the husband. I held the headboard in place from the front while he screwed through the original white headboard and into the new padded piece, and through to the bed frame.
Minor problem--I was thinking it would be more secure if I had the headboard go down below the actual mattress. Turns out, it would have been easier to attach if the headboard just lined right up with the platform where the mattress rests (or a teeny smidge above that). Because the headboard has THICKNESS. Duh. So we ended up with this issue:
 |
| Mind the gap. |
But all in all, I love it! It brightens up a rather boring-looking bed, and it's way more comfy to lean on during story time. Plus it softens the edge of the shelf for head-bonking. So now we have an official big-girl room!


No comments:
Post a Comment
Note: Only a member of this blog may post a comment.