Pages

Thursday, June 28, 2012

Upcycled T-shirt Waistband Skirt

This skirt has been hanging around for years.  For EVER.  I bought it in college on clearance at Old Navy for somewhere in the neighborhood of $5.00.  I wore it for years.  It never quite felt out of style, but it definitely did quit fitting me at some point.  I kept it through two pregnancies because of those awkward before-and-after sizing periods, but it's been at least two years since I've worn it and I decided it was time to let it go.   It's made out of a thin woven cotton with a tiny bit of stretch, great lightweight skirt fabric, so I decided not to go too crazy with it and stick with a simple skirt.  The girl has had a recent obsession with what she calls puffy skirts, and I suppose that if I want her to actually wear the clothes I make for her I should MAKE WHAT SHE LIKES, instead of making what I want her to wear all the time.  So, I figured that by gathering up a skirt made for a full-grown lady into a size that would fit a two-year-old, it should be puffy enough for her discerning tastes.  I liked the stretch waistband idea I'd seen around, and had the leftover waistband that I'd cut off of this shirt, so thought I'd use that for the top.

Rocking it.
Surprisingly, while she does like it, it didn't turn out as full as I had expected.  Maybe I need to add another layer underneath.

So here's the run-down of how I made it, if you're interested in that kind of thing.

I started with this lightweight A-line skirt and scrap of t-shirt fabric.

Hello, old friend.
My t-shirt fabric was already folded in half and pressed, since it had been a waistband on another shirt.  If yours isn't, then make sure you cut your t-shirt fabric to twice as wide as you want your waistband to be (plus an inch for two 1/2 inch seam allowances).  Mine would have been about 7 inches wide opened up.

First, I put the t-shirt waistband piece around the girl's waist to see how small I should make it.  I actually ended up taking it in some more, since (duh) it's stretchy, so it was slipping down on her.  So make it a pretty snug fit.  My finished waistband for my 2-year-old is about 15 inches around, to give you an idea.  You could just fold it in half lengthwise and sew a seam, making it a loop, then press the raw edges open on the inside, or you could press the raw edges in first to give it a more finished look on the inside.  It's not going to fray, so either way is fine.

When I was ready to start cutting the skirt up, I had my trusty helper hold the obnoxious dog out of the way:


Then I stripped off the puffy skirt that Little Sister was wearing (one of her current favorites, that of COURSE I didn't make) to check the width.


My skirt was quite a bit wider, but I figured a little extra puffiness wouldn't hurt anybody.  I aim to please.  I definitely wanted to use the existing hem on this skirt, as I am pretty much incapable of sewing one of those tiny perfect rolled hems.

I decided to make the new skirt a little longer as well, which may account for some of the lack of puffiness, but the brown skirt does have an underlayer too, which is the real secret to its success.

Next was to sew a straight basting seam (machine set to the widest stitch length) all along the top of the skirt, without backstitching at the beginning and end.


This way, if you pull on your bobbin thread (the one on the bottom), you will create a gather.  Do it carefully, so that you don't break the thread.  You could have a separate gathering seam for the front and back so you don't have to gather quite as much at once, but I'm lazy so I just do it all at once.


Gather the top of your skirt up until it's a bit wider than your waistband.  That way you can stretch your waistband as you attach it so that there's enough room to pull the non-stretchy part over her hips/diaper.  When I gather, I'm not too careful about getting the gathers even at first--I just bunch the fabric up until the top of the skirt is the width I want, then I tie the loose threads together so it doesn't get any looser or tighter and THEN even out my gathers.


Then flip the waistband inside out and upside down, and pin it to the right-side-out skirt, with the raw edges of the waistband lined up with the raw skirt edges.

I started by pinning the two side seams on the skirt, then the front and back in the center, then pinning inbetween my pins, to make sure I had equal amounts of skirt all around the waistband.  You will be stretching the waistband a bit as you pin it.


I opted to use a zig-zag stitch as I sewed my waistband to my skirt, to give it a little more stretch. I also made sure to stretch the t-shirt waistband as I sewed.  After sewing the two pieces together, I flipped up the waistband, then (again stretching as I sewed) added a topstitched seam on the waistband right above where it meets the skirt, making sure to catch the ruffled edge in the seam.  This helps flatten the waistband and secure the seam.

And just look at that sass!

Cue the "tsssss!" sound effect.
Okay, I apologize for that one, but with that pose you know you were thinking it.


Yeah, I had too many photos to choose just one or two.  Here is a tip for those of you having a hard time getting your toddler to cooperate during a photo shoot:  throw food at them!  We had been picking raspberries off the bush you see behind her in the pictures, and I literally took a handful of them and told her to catch.  One of our best photo sessions to date!  Note:  I do not recommend this method when photographing a white outfit.

I can't tell if the dog was impressed or not.

Tuesday, June 26, 2012

To Be or Not To Be...The Boy's adventures in summer camp

We sent The Boy to summer camp at Northwest Children's Theater, and he LOVED it.  The theme for his age group was Busytown, like the Richard Scarry books, because NWCT did a production of Busytown during their season last year.  My parents took him to see it, and he about lost his mind, since he loves the books so much.  He wanted to know how old he would have to be before HE could be Huckle Cat, and he got his picture taken with practically every cast member, beaming the whole time.

So when I saw the listing for this year's summer camp, saw that it was happening during one of the four weeks that his preschool was closed this summer, and asked him if he was interested, he was SO excited.  He looked forward to it the whole rest of the school year.  It was definitely more expensive than the community center summer classes I had been planning to fill his weeks off with, but in this case it was totally worth it.

The Boy's big entrance
"I'm Terry Turtle, the taxi cab driver!"
Breaking the fourth wall 
The Busytown Song--big finale.
It's kind of great having a fan club.

There is another round of Busytown camp at NWCT in August that coincides with The Boy's other weeks off of school.  And it's a different theme and script, so it would be a different experience.  They told them about it when The Boy went to camp, and he's been asking to go.  I love, love, love that he's so excited about theater and being in plays.

I was a theater major in college, and then a drama teacher.  So naturally, I am passionate about performing and am so excited that it is something The Boy is loving to do too.  I loved seeing him on stage at camp, and would be thrilled if he became a "drama kid" in school.

But.

I have to keep reminding myself:

He is four years old.

He would most likely be equally excited about any kind of camp that I sent him to.  Just because he had fun at drama camp does not mean that he is destined for a life in the theater.  I wouldn't even necessarily WANT him to be destined for a life in the theater!  And he is four years old, why am I even thinking about him being destined for a life in anything specific?

So.  I have told him that if he really wants to do another camp instead of having a week of break at the end of the summer, we will look at a variety of kinds of camps and see what else he might think was fun.  There are t-ball classes, space-theme camp, art camp, nature camp, zoo camp, science camp, pirate camp, elf and fairy camp...so many things.  As I have been reading him the descriptions of the different camps, the ones that get him excited are the ones that mention plays and performance.  Which I KNOW is a result of just finishing a performance camp that was very very fun for him.  I still have to remind myself that he needs exposure to lots of kinds of activities at this point.

It's so hard, though, because obviously it's easier for me to work up excitement about something that I am truly passionate about.  As he gets older and is making choices for what he is interested in, I will be supportive no matter what it is.  So I feel like my job for now is to do my best not to influence that decision.  Sure, expose him to drama, but try not to seem any more excited about that than about anything else.  But is it wrong that I want to just let him keep on rolling on the drama train, because he loves it and I love it so why not just encourage it?  Not to mention that I think that drama is chock full of valuable skills for kids, transferrable to lots of different areas.  I mean, how much more fun would I have as a parent volunteer someday if he ends up involved in things that I know something about, enjoy, and could be very helpful with?  How much more patient would I be with endless practices and driving around if the end result was something I truly enjoyed and believed in, rather than got through?  I'm sure that I will enjoy seeing The Boy participate in whatever it is that excites him someday, but it's SO HARD not to be selfish right now and point him in the direction of the things that excite ME.   What if I let him choose for himself and he ends up wanting to play FOOTBALL?!?  At least traumatic brain injuries are rare for drama kids!

When we chose to send The Boy to drama camp this summer, I totally found myself explaining every time, "The theme is Busytown, and The Boy loves Busytown and loved that play so much that this seeemed right up his alley..." which is absolutely true, but what I was really saying is, "I'm not a stage mom, I'm not pushing The Boy to do theater because I love theater, this camp is about more than just theater..." just in case anyone was judging me as such.  Because I know there is a grain of truth there.

Maybe I have nothing to worry about--as The Boy gets older, he will continue to form opinions about what he enjoys and what he doesn't, and I can sit back and just appreciate what he comes up with. At four years old, I am constantly impressed and surprised by the strengths he has in different areas, and I want him to continue building as many of them as he can.  And maybe if I back off, he'll end up choosing things I'm interested in all by himself, which would be much more satisfying than if I feel like I pushed him into it in any way.

So help me out here--how do you decide what activities to expose your kids to, especially when they are too young to have a clear opinion?  A little bit of everything?   The things you personally enjoy?  Things that aren't your own strong suit so they won't be getting them at home?

Sunday, June 24, 2012

Hot/Cold Pack pocket for Insulated Casserole Carrier!

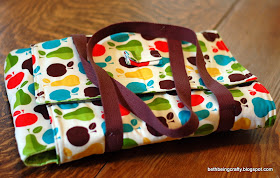
Just in case you have a 4th of July potluck to go to, I thought I'd actually post this in a timely manner!  Usually, I'd be posting on the 4th on my way out the door, saying, "Hey, maybe you'd like to try this NEXT year..." but I managed to have this done ahead of time because the casserole carrier in question was actually a birthday gift.

How cute is this fabric for something you use to carry food?

I made another casserole carrier using this tutorial, with added tips on measurements and straps from this page here, and I decided to put my own little spin on it. 

I had this idea when I made my own casserole carrier and was joining the top and bottom pieces--why not leave one side open so that you could slip an ice pack or heat pack in there, upping the insulation's ability to keep something hot or cold?

So I only sewed up three of the sides and added a little velcro tab:


Then I made a hot pack using some scrap fabric and rice.  I got the idea from this therapy pack tutorial, but skipped the essential oil and made my pack to fit in the bottom of my carrier.  You heat the pack in the microwave for 2 minutes before putting it in the carrier's pocket.  It does make the carrier quite a bit heavier, but I was pleased with how long it kept my turkey noodle casserole with hidden cauliflower and carrots hot for the preschool potluck!  Oh, and bonus--you could definitely use this rice pack as a therapy pack too.

Hello there!
You could also slip a couple of those gel ice packs in there if you've got something to keep cold, like these rhubarb custard bars...mmmmmmmm.


Thursday, June 21, 2012

Women's Chiffon-Trim Tank (upcycled)


I was inspired while window-shopping with my mom to make a summer top for myself!  I have tried and tried to find a picture of my inspiration shirt, but to no avail.  I do have a terrible photo on my phone, with awful reflections through the window, so I've chosen not to share it.  Instead, I'll just show you what I made!

I know, I know, I already showed you above, but this one shows the overall proportions better.
I started with this baggy, unflattering shirt that I only haven't donated because I was planning to make something out of it for Little Sister.  But she has plenty of stuff!  So this one's for me!  


I love the color, but it has always been too big, and too low-cut, with oddly baggy sleeves, so I never wore it.  Well, maybe to yoga a couple of times.

The inspiration shirt was a tank with slight gathering in front, just like this one.  It was striped, but it had a contrast floral chiffon hem as well as straps, which is really what inspired me.  The inspiration shirt was also more of a tunic length, but I was working with what I had, and I actually love the way the mid-hip length looks.

I had this floral polyester chiffon leftover from another repurposing project--this had been part of a tunic that I made into a dress for Little Sister that I still love.  It was one of my earliest repurposings, and man, it was a lot of work!  I try to keep things simpler now.


The magenta flowers were exactly the right color, and I had plenty left for this project!  Great, more encouragement to hang on to random scraps--just what I needed.  If only I had unlimited craft storage space!

I started by cutting off the sleeves and the waistband of the shirt.  I held on to the waistband because I had a feeling I could use it for something else (stay tuned!), and I would need the sleeve fabric to make bias tape for the armholes.


Then, using a shirt with a fit that I like, I determined where to take in the body of the shirt.


After getting an approximate width using the template shirt, I measured to make sure I was taking the same amount off of each side of the shirt:


Then I sewed a straight seam and a zig-zag for stability (hello, need to learn how to use my serger!), and trimmed off the extra.  If you have a serger (and know how to use it), this would be where to use it.


I measured the width at the base of my shirt, and cut a length of chiffon that was just a little wider than it (about two extra inches altogether).  The t-shirt is obviously stretchier than the chiffon, so you want some room to stretch the t-shirt as you attach the chiffon so that it's not too tight on your hips.  So, my t-shirt was 18.25 inches across the front (36.5 inches all the way around), so I made two chiffon strips each 19.5 inches long, including seam allowances (I didn't have enough chiffon for one continuous strip, so I had to sew two pieces together to make my continuous loop).  I wanted my band at the bottom to be around 3 inches wide, so my strips were each 19.5 inches long and 6 inches wide.
 With right sides facing (actually my fabric was the same on both sides so this didn't matter, but in case yours does), I sewed the two pieces together making one loop.  Then I turned it right side out and folded it in half as shown:


I then laid it around the outside of my shirt (right-side out), raw edges together, and pinned all around, starting with the seams and stretching the t-shirt slightly to line it up all the way around.  Then I just sewed a straight seam.  Later (once I was done with the white thread) I topstitched, but I'll get back to that.  Man, I really was wishing I had taken the time to figure out how to use my serger before starting this project, but someday soon I promise that will be a priority!


While I still had the white thread in my machine, I moved on to the straps.  I wanted a little point in front, like the inspiration shirt had, so I measured the width of the t-shirt at the place that the straps would join in front and back, then doubled that and added seam allowance to figure out how to make my straps.  The strap needed to be wider in front than in back, and I wanted it to come in a bit before widening back out in the back.  So this is the shape that I cut--I pretty much just had to wing it.


I turned a tiny hem under at the top and bottom--this would be hidden when attached to the shirt so I wasn't too worried about making it perfect.


Then, I folded the strap in half lengthwise, right-sides together, and sewed from top to bottom, then turned it right-side out.  Sorry, no picture of that step!

I pinned the straps to the shirt to see how they would attach, then measured the raw edge of the armhole so I could make strips to finish the armhole edges.  Make them longer than they need to be--it's much easier to cut off excess than to start over because they came out too short!  I made mine out of the excess fabric from the sleeves, and they are not actually cut on the bias but function like double-fold bias tape--I made it by pressing the strip in half lengthwise, then folding the edges into the middle and pressing again.


I attached them around the armhole like you would attach double-fold bias tape--pretty easy to do, I think, but not so easy for me to explain...I just did a little hunting around online, and the explanation for attaching knit binding (called "full binding") on page two of this document here seems to be a pretty clear explanation of what I did.


After the armholes were finished, I sewed the straps on in the back first, just by tucking the t-shirt inside the tube and topstitching the straps down.

Yuck!  Sorry for this terrible picture!
In the front, it was a little trickier, since the tube has a point in the front, but not on the inside of the  shirt.  So I turned it inside out and pinned down only the back side of the tube, made sure that the pointed front was out of the way, and topstitched the back side down...


Then flipped it back right-side out and topstitched the pointed front of the strap down.


Once I was done attaching the straps, I used a double-needle to topstitch around the chiffon band at the bottom of the shirt, mostly because I like the look of it but also to reinforce where the chiffon was attached and sew down some loose edges of the chiffon on the inside.  On that note, make sure your raw edges are turned UP so that you catch them in your topstitch if you do this step.


I wore it on Father's Day, and when I was showing it off to my mom we pulled out Little Sister's old dress made from the same fabric.  She immediately wanted to put it on, so I happily obliged.

Our first matching mother-daughter outfits.
Hers is getting a little short, but it amazingly still fits!


She had fun trying to get me to expose myself in the pictures.

What a goofball.

Sunday, June 17, 2012

$1 Summer Infinity Scarves!


You all know how much I love an infinity scarf.  I have had so much fun giving old sweaters (especially cashmere!) and sweatshirts a new life by making them into circle scarves using the method described in this tutorial I found on the blog  Adventures in Dressmaking.  You can see my upcycled versions here, and here, and again here, here, and here with more cowl-like versions.  But sometimes, I do actually visit the fabric store.  And when I do, I always, always check the remnant bin.  These cuts of fabric, less than one yard each, have so much potential.  And they are 50% off whatever the current price of the fabric is.  So when almost everything in the store is already 50% off (crazy "firefly sale" at Joann, what the heck!), that makes these little remnants cost next to nothing.

To be fair, I actually spent about $1.80 on the brown scarf, but the green one was only 80 cents.  I know I'm late in posting for this to be any help this year, but I made these scarves (at the total last minute, hence the lack of a "Hey, here's an idea!" post) to give to the boy's two preschool teachers for an end-of-school gift.  My husband thought this was a terribly Pacific-Northwest gift--a summer scarf.  Yes, we do need scarves in the summer here; sigh.

Both of my fabrics were polyester chiffons.  The brown one is textured and the green one is silky. Because these fabrics were thin and silky, I could get away with using a remnant.  These came on bolts that were 54 inches wide, which was enough length to get a nice drape on the scarf. If you want to use t-shirt fabric or something thicker, a remnant probably won't work because you'll need more than 54 inches of length.  Be careful though--some fabrics are only 44 inches wide, which would give you quite a snug little scarf!


I used the same fabric amounts and method for each scarf, so I'll just explain it as though I made only one.  I didn't take pictures (if you need more detail, you can take a look at the post I linked to above), but it's a pretty simple process so I hope this makes sense!

For each scarf, you'll need:

1 54" wide remnant, 2/3 of a yard so approximately 24 inches, of a silky or chiffon-y type fabric.

Directions:

1. Fold your fabric in half lengthwise, right sides together.
2.  Using a Sharps needle if you have it (if you don't, it will probably be fine but you might want to test it out a bit, or use a brand-new needle), sew a seam down the full length of the scarf, creating a tube that is 54 inches long.  If your fabric is sheer, make sure to sew your seam to the inside of the selvage markings, so you can cut those off.
3. Using a pillowcase (or something) to protect your fabric, press your seam open.
4.  Turn your tube right-side out.
5.  Making sure not to twist your tube, grab both ends of your tube.  Line up the seams at the ends and hold the raw edges together (right sides together) and sew your tube closed, leaving as small an opening as possible.  (There are pictures of this step in the tutorial I linked to above, if you're not sure what I mean.  This is one of those things that's much more difficult to describe than it is to actually do.)
6.  Using a matching thread, sew the opening closed, as invisibly as you can.  Make sure not to pull too tight and pucker the fabric!

Granted, I've made a few of these before, but I spent about 45 minutes total making these two scarves--even including hand-sewing the openings closed!  45 minutes and less than $3?  I almost feel like I ought to get those teachers a little something extra.

Tuesday, June 12, 2012

Kale Berry Smoothie Recipe

My son loves vegetables.  He will eat pretty much everything we put in front of him.  A short period in his toddlerhood withstanding, he has always been a really good eater--and thank goodness for that, because when he never slept easily for the first two years of his life, we could console ourselves by saying, "Well, at least he's a good eater."

My daughter?  Not so.  If there's a hint of something green on her plate, that's an excuse for her to avoid eating anything at all.  She has been known to pull a stray piece of parsley out of her mouth from a bite of some otherwise inoffensive pasta, declaring, "Not this."  I have had to be verrrry sneaky about getting vegetables in her system, and this yummy smoothie is one way that I do it.


I start by putting the kale in the blender--I find that it gets smoother and more hidden when it's at the bottom.


The bananas go on top of that, broken into chunks, then I dump in the frozen berries. You could use fresh too, but I like the bit of iciness that the frozen berries add.


Although, I usually microwave the berries for about 30 seconds before putting them in, because if they are frozen solid I end up with big chunks of frozen berry in there.  Not as big of a problem as big chunks of unblended kale, but still not ideal.


I like to throw in a tablespoon of flax seed meal, because it's healthy for anyone with the added bonus of reducing constipation in the girl--big shock that it's an issue, given that all she wants to eat is bread and cheese, right?


Anyway, I top the whole thing off with apple juice, blend until smooth, then pour into glasses and drink.


It makes about one large glass and two little ones.  You can always slightly increase your amounts if there will be two grown-ups drinking these.


And then here's where I get really sneaky...


I make the leftovers into popsicles! I always feel like an evil genius when I serve kale for dessert, am I right?

This recipe is totally adaptable--you can add yogurt, mix up the fruits, use spinach instead of kale, add carrots, use a different kind of juice or substitute water, etc, but here is a good general recipe for a kale smoothie in which very discerning toddlers cannot taste the vegetables.

Kale Berry Smoothie:

Note--I measured my ingredients this time to make sure it came out the right consistency and everything, but usually I just throw in the amounts that look good!  It's a very forgiving recipe.

Ingredients:

2 cups kale, stems and stalks removed, broken into small pieces.
2 ripe bananas (also a good use for over-ripe bananas)
2 cups frozen berries, slightly defrosted in the microwave
1 Tbs flax seed meal (optional)
1 cup apple juice

Directions:

Place kale in the blender and add banana chunks.  Pour in the berries and a tablespoon of flax seed meal if desired.  Top with apple juice and blend until smooth.  Pour into cups, then pour remaining smoothie into popsicle molds and freeze.

Wait, is this thing good for me?  Blech!