Pages

Tuesday, July 29, 2014

The Ruby Dress and Top

It's here.  I've finally reached the point in sewing my own wardrobe where I have decided I am willing to pay for a few patterns.  So far, it's all been freebies and making my own patterns based on things I already own.  I don't know why, but moving overseas was the change I needed to finally decide that it was worth it to pay money for a few versatile patterns that I could print out at home and make over and over again.

The first one I bought was the Ruby Dress and Top by Made by Rae.  I have been ogling versions of this pattern online for a while, and thought I could make dress and top versions (duh), plus I liked some of the versions I'd seen with sleeves added on to make it a more year-round pattern.

And here's my Ruby Dress!


I actually made a Ruby Top first, just a very basic version.


Here it is, belted.

Based on my measurements I cut out a size 6 with extra length to make it more tunic-y, and I felt like it came out a little big so I made a smaller one for the dress.  I knew with the dress I wanted to line the bodice, and Rae's tutorial on doing that mentioned that it would be good to try out the pattern without a lining first since it's easier to adjust the fit that way, so I was glad I had done the top first to give me a better idea of my bodice sizing.

As you can see, I made a few adjustments to the pattern:

I have been getting eaten alive by the mosquitos in Tokyo!

I added piping to the seam where the yoke and the rest of the dress join up.


I really like the way it looks, but since I did a lined bodice it made it a little difficult to join everything up nicely.  I would recommend saving the piping for when you are not making a lined bodice.

I continued the piping on the back as well.
I made these fun pockets to mimic the design of the top, with the white and the piping:

You can also see them in the photo at the top of the post.

I followed the tutorial for these pockets from anu*miki --I have made them with knit binding before on a dress for The Girl, which is easier, but it works with piping too as long as you are sure to make your opening big enough, since it's not going to stretch.

And I tried the dress on without the elastic waist, and just like the tunic, it's just not flattering to my body type that way.

Gotta have the belt!

For the tunic, I like belting it, and I have the option of tucking it in, so I didn't need to add the elastic waist, but I like having the waist in place permanently on the dress so I don't have to use a belt if I don't want to.


I left plenty of length on the bottom of the dress, since I knew I'd need it if I added the elastic waist, so I decided to have the dress hit just at my knee instead of the mini-length of the pattern, which works better if you can pull off that no-waist mod-shift-mini look!

This dress is perfect for lounging at my tea house in my peaceful Japanese garden, like I do.

Just kidding!  This was taken at the Inokashira Zoo.

I'm excited to make a dress and top with sleeves for fall--that will bring my price per piece on the pattern down to just $4. I can live with that!


Friday, July 18, 2014

Japanese Jinbei-Inspired Pajamas


Thanks to the blog Tomatoes and Jasmine, I have found some wonderful places in Tokyo to buy fabric.  I still haven't made my way out to Fabric Town, but it's been fun exploring the options in central Tokyo.  The fabric I used for these pajamas came from Odakaya in Shinjuku.

It's been warm and humid here (surprise, surprise!), so when I found this breezy cotton seersucker in prints that I loved for a reasonable price, I thought it would be fun to make the kids some pajamas.

Little foxes and bunnies on the left, fugu (blowfish) and traditional Japanese pattern blocks on the right.

I had bought them some adorable jinbei (Japanese pajamas), but I guessed on their sizes, and both sets are a tiny bit on the small side--they fit ok now, but they won't for long.

These cotton jinbei are so great for summer sleeping!

They are SO CUTE!  I thought about buying a jinbei pattern and making them some more in a  larger size.  But, the wrap tops require strings to be tied on the inside and outside, meaning I need to help the kids get their jammies on.  They are 4 and 6 now--I am OVER putting their pajamas on them.  So I thought I'd make a similar style but without the wrap so that they could get into their pj's all by themselves.


For the shorts, I used the free printable Oliver and S's Sunny Day Shorts pattern in a  size 7 for the boy and a size 4 for the girl.  There are simpler shorts patterns out there (this one has different sized front and back pieces, as well as a separate waistband), but I think that the few extra steps for these shorts make a much nicer fit than some of the more basic ones I have tried.

For the tops, I planned on using the same pattern for both again--the Scrubby Jams free top pattern from Sewing Mama RaeAnna.  But I decided to feminize the girl's top by adding flutter sleeves instead of the regular short sleeves in the Scrubby Jams pattern.   I used the flutter sleeve pattern from the free reversible wrap top pattern from Craftiness Is Not Optional--a top I had all printed out to make later on!


For the girl's top, I mostly followed the Scrubby Jams top directions.  The two differences were the flutter sleeves, and that I used a wider front bottom bodice panel and gathered it a bit in the center (I cut out a size 4 top bodice front and size 4 back, but used a size 6 bottom bodice front).  To do the flutter sleeve instead of the traditional short sleeve, I cut out four flutter sleeve pieces using the CINO pattern--two main fabric, and two lining.  I sewed one lining and one main fabric together along the curved edge (right sides together), then turned them right side out and pressed flat.  I then basted along the open straight edge and pulled to make a slight gather.  For inserting the flutter sleeve, I laid the sleeve on the shoulder of the top (main fabrics together) with the raw edge of the sleeve lined up with the top of the armhole.  I sewed it on, trimmed the seam allowance, then I attached single-fold bias tape all the way around to finish the armhole.  I was really happy with the way it came out.


The boy's top was more straightforward--he is slim and tall, so I cut out the size 6 top but added a couple of inches of length, and I curved the hemline on both the front and back, just because I like it that way.


I took back view pics too:


I'm pretty sure Little Sister has her shorts on backwards, and how about that bedhead?  I always think it's more authentic if I take pajamas pictures when they first wake up, before they've had a chance to spill their breakfast on them.  But this often means I haven't combed anybody's hair yet either!

I really liked these patterns, and I think they make a great pair of summer pajamas!  It seemed like most of the summer pajama pattern sets I could find were intended for knits, which are great, but I wanted to use these lightweight wovens and these patterns did the trick.  Hope it helps!

Thursday, July 10, 2014

Bathrobes


This was one of the last sewing projects I finished before we left for Tokyo.  Somehow I felt better about bringing two bathrobes with us than I would have with packing 4 yards of absorbent fabric!


The striped fabric was a micro-terrycloth that I picked up at Joann's at least a year ago, when they were having a 50%off sale on all of their red-tag fabrics.  I'm pretty sure that made it $2 a yard, so I got 2 yards of each color, with the idea of making bathrobes for the kids.  Then I just never got around to it.  But in Japan, baths are a pretty big deal.  And our apartment has an awesome Japanese-style bath, where you shower before getting into the tub, and we have been using it all the time.  The kids love it, and are both totally used to getting cleaned up in the shower before they just get to play and relax in the tub.  And their robes are getting tons of use!

Trial run in our Portland shower

Even with two yards of each color, the terry cloth alone wasn't enough to make the robes for both kids.  In my stash, I had some knits that I had gotten during a sale from Girl Charlee that coordinated with the stripes--just one yard of each, which was enough to make the exterior of Little Sister's robe, but not quite enough for The Boy's, since he is ginormous.  Luckily I had enough stripe to do a contrast sleeve and a little extension for the hem!  His belt got a little shorted though--it's just enough to keep it tied, but no double knot! 


I love these robes.  Other than the placement of the loop for hanging and the belt loops, they are totally reversible, but we've kept the terry on the inside for post-bath drying off.  They are cozy, they are cute, and they were simple to make.  I used a tutorial I found here, making a pattern from things in the kids' closets.

I found a few more projects in my photo files that I managed to take pictures of but never posted before we left, so I'll share those soon!

Monday, July 7, 2014

Lunch Mats

Whoa, has it really been a month and a half since I last posted here?!  That's the longest I've gone since starting this blog almost 4 years ago.  The last time I posted, I was ready to depart for our two-year expat assignment in Tokyo, Japan.  Well, we've been here for just over 6 weeks now, and I have started sewing again!

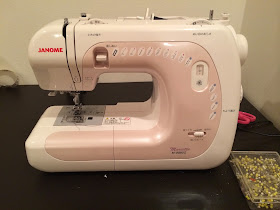
I bought a new machine here in Tokyo, since mine is old and somewhat sentimental--it was my grandma's, and so I would need a converter to use it here, but I would also be worried about getting it fixed if something went wrong.  So I have a machine--it's a Janome Marietta--I tried to find the one with the simplest controls since I can't understand the manual!

You know you wanted to see her.  She's pink!

Luckily all important Japanese instructions are accompanied by helpful illustrations.

So far, it's been fine.  I'm sure it's got some tricks up its sleeve that I don't know about, but I'll figure it out!

My very first sewing project was these lunch mats.  There was a mass email from the kids' summer school program that starting TOMORROW all kids needed to bring some sort of small mat to use when they were eating their lunch in the gym.  It would have been nice to have some notice, but I happened to be out running errands with a friend that day, and we happened to discover a fabric store while we were out (Yuzawaya, if you're curious).  They had pre-cuts of 100x50cm of these cute quilted Japanese prints, and even though I wasn't sure if the mats were for sitting on or for putting your food on, I thought these would work.  I picked up some bias tape too because I couldn't remember what kinds of trims and notions I had packed--I hadn't sorted out my sewing box yet!


This was the perfect project for trying out my new machine.  I just had to sew four straight lines around the edge of a pre-quilted, two-sided piece of fabric!  All went well.


And it's funny--I asked the kids what they would be using the mats for, and Little Sister told me it was for putting their food on.  But The Boy said that it was definitely for sitting on!


And now that they have been bringing them for the last two weeks, it turns out that they were both right--the PreK class puts their food on their mats, and the bigger kids sit on the mats.  But they might as well fight about it anyway, right?

And guess what else?  I have totally gotten into making bento lunches.  It started because of the cute bento lunch boxes that are available everywhere here.  I haven't gotten too fancy with cutting shapes or anything (okay, I have used a heart-shaped cutter for slices of cheese), but the dividers alone make everything look better.  The kids go to an international school where most kids just bring the same kind of lunch bags we were using at home, but they both tell me they like the bentos better, and Little Sister brings home an empty lunchbox WAY more frequently than she did at home, so the cuteness factor seems to be working.


I've also gotten a few colorful silicone cups that work well for little things like blueberries or raisins, and some fun toothpicks for cheese cubes or pieces of deli meat.  The school is nut-free, so I've had to figure out what Little Sister will eat for lunch now that our standard PB&J is off the table.

Anyway, I'm excited to be back into sewing!  I've already made covers for some throw pillows on our couch and some awesome pajamas for the kids using Japanese fabrics.  I think it will be my turn next!